When you work with reports in Knowledge Portal, there is a Specific Actions area in the right pane. Currently, the Data Import option is available in this area for most InTrust reports, but not all of them. Use it to configure import of data required for the selected InTrust report from an InTrust repository to an audit database.
This process is similar to the report-driven data import you set up for your reporting jobs; it uses not only the database connection account, but also an importing account—the one under which data is imported from the source repository to the database.
The authentication method and credentials for the database connection are specified in step 5 of the Report-Driven Data Import Wizard (see the procedure described below). The specifics of using the importing account and database connection account are described in the following table.
|
Authentication method selected |
Importing account that will be used |
Database connection account that will be used |
|---|---|---|
|
SQL Server Authentication (with the specified credentials) |
InTrust Server account (specified during InTrust setup; for details, refer to InTrust Installation Guide and User Guide) |
Specified credentials |
|
Windows Authentication (with the specified credentials) |
Specified credentials; this account should be included in AMS Readers and granted Logon as a batch job privilege on the InTrust server |
Specified credentials |
|
Integrated Windows Authentication |
Account specified for connection to InTrust Server (see step 3 of the procedure below). |
Account specified for connection to InTrust Server (see step 3 of the procedure below). |
To configure data import when generating reports interactively
Credentials to be used when connecting to InTrust Server
Specify the parameters of InTrust database the data will be imported to:
The following is required:
On the final screen, review the results of data import; if needed, select View the report after finishing. Click Finish to close the wizard.
In addition to a number of predefined reports for products supplied in the Report Packs, the Knowledge Portal component provides for creation of custom reports. This process is based on using report models.
A report model helps Report Builder users to explore and select the data that they want to use from the underlying data source. Report models provide familiar business names for database fields and tables, logically grouped model items, and predefined relationships between items within the data source. They are used by the report server to automatically generate a query for retrieving the requested data, thus facilitating ad-hoc reporting.
In Knowledge Portal, predefined models are brought in by the Report Packs you install. Each model defines:
The InTrust model is installed automatically, and you can use this model to create the reports on audit data collected by InTrust. The available models are displayed when you are on the Data Sources tab:
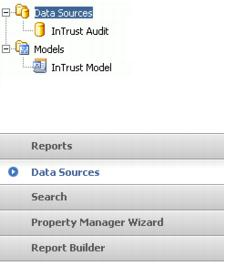
To explore the InTrust model, click the Report Builder tab in Knowledge Portal. Report Builder is launched, and the model tree is displayed on the right pane.
|
|
Caution: Report Builder is available only if ASP .NET 2.0 is installed on the client computer you are using. |
Select the InTrust model from the models tree. From the panes on the left, you can select the objects you are interested in and the fields to obtain the data you need on these objects (such as Trusted Domain). To add an object or a field to your report, simply double-click this item in its pane.
You can use a full range of report building capabilities, as described in detail in Working with Report Builder (Ad Hoc Reports). See also Report Builder Help.
After you get back to Knowledge Portal, the report you create will appear in the reports tree in the left pane. By default, the report will use the data source prescribed by the model it was built on. You can use the Change Data Source option for your custom reports.
|
|
Notes:
|
Under the InTrust Model node, the following items are displayed:
These items are the perspectives of the InTrust model. A perspective is a subset of a model. For example, the whole InTrust Model allows you to create reports on any kind of events stored in InTrust Audit database, and its Windows: Logons perspective can be used to report on logon events.
After you select a model or any of its perspectives on the right and click OK, a number of entities and their fields are displayed in the left pane, as shown below:
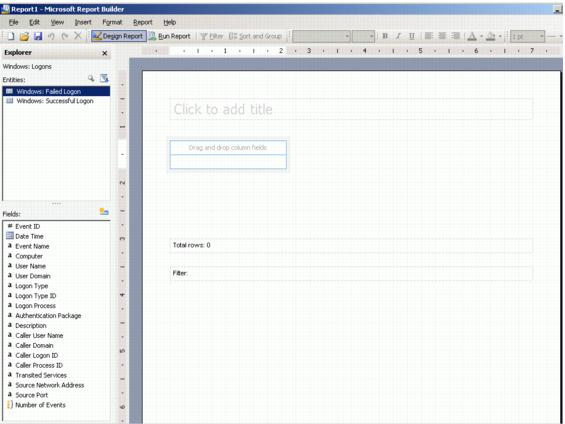
In the most common case, an entity corresponds to a database table (or named query). For example, Windows: Failed Logons and Windows: Successful Logons are the entities of the selected Windows: Logons perspective. An entity consists of fields: for instance, the fields of the Failed Logons entity correspond to the event fields as they are presented in Event Viewer (such as Event ID or Date/Time).
To build a report using a model, drag and drop the fields you need, placing them into report layout area on the right.
In addition, you can use the Knowledge Portal to create new models and to change the data source for model-based reports.
To create a model
Each model is intended to work with a particular data source; to change the data source for model-based reports in bulk, you should take the steps described below.
To change the data source for multiple reports
You can also change model and data source for a single model-based report.
To change the data source for a single report
You can create a copy of existing model that you can use to create reports on the same product and the same data source as the original.
To create a copy of a model
Now you can create a custom report using any available model and Microsoft SQL Reporting Services report building capabilities.


