Introduction
PST Importer is an extension to the Metalogix Archive Manager for Exchange application and is installed by default on the Metalogix Archive Manager for Exchange server. It is a handy tool for importing PST files from one or more users in your organization. If there are a small set of PST files, you can import these PST files manually. If there are a large number of users, you can install the PST Gatherer component as an application or service on a user's computers and automate the process of searching and loading the PST files into the PST Importer. This document describes manual and automated importing in detail.
The term PST Importer server is used in this documentation. It is the same as the Metalogix Archive Manager for Exchange server where PST Importer is installed.
Installation
In this topic:
·Windows Server 2012 / 2016 / 2019 / 2022
·.NET Framework 4.6.1 or higher
·Microsoft Outlook 32 bit client
oFor Exchange 2013, Outlook 2013 is needed.
oFor Exchange 2016, Outlook 2013 or 2016 is needed.
oFor Exchange 2019, Outlook 2019 or 2021 is needed.
|
|
NOTE: All versions of Outlook specified above require the latest Microsoft Office service pack and public updates. |

Since Microsoft Outlook data files (PST files) are handled exclusively by Microsoft Outlook Extended MAPI (the messaging API used by Microsoft Outlook), it is necessary to configure it properly on the computer where importing of PST files takes place. PST Importer works with two types of PST files: ANSI data files and UNICODE data files.
The default Extended MAPI cannot handle Microsoft Outlook data files, unless its configuration file (MAPISVC.INF) contains messaging services to handle them. Therefore all messaging services installed on the computer must be added to the MAPISVC.INF file.
·When no Microsoft Outlook is installed, then the MAPISVC.INF file is located in the C:\Windows\system32 Windows system folder, and the Extended MAPI configuration is read from this file.
·When Microsoft Outlook is installed, then another MAPISVC.INF file is installed in the C:\Program Files\Common Files\System\MSMAPI\1003 folder, which includes the messaging services for Microsoft Outlook.
Since PST Imported uses the default MAPISVC.INF file is located in the Windows system folder, this file must be updated with the Microsoft Outlook Extended MAPI file. To update Extended MAPI configuration file (MAPISVC.INF), follow these steps:
1.Locate the MAPISVC.INF in the C:\Windows\system32 Windows system folder.
2.Locate the MAPISVC.INF in the C:\Program Files\Common Files\System\MSMAPI\1003 folder.
3.Make a backup copy of both files.
4.Replace the MAPISVC.INF file in the Windows system folder with the file located in the the C:\Program Files\Common Files\System\MSMAPI\1003 folder. This will ensure that Extended MAPI will be using the correct configuration file. If messaging services are missing in the MAPISVC.INF file, no importing of Microsoft Outlook data files (PST files) will take place. Note that some of the values are different on different computers. For more information see Troubleshooting.
5.When the default MAPISVC.INF in the Windows system folder has been updated, close all applications which are using the Extended MAPI to reload MAPISVC.INF.
PST Importer is installed by default when you install Metalogix Archive Manager for Exchange. If it has not been installed, see the Metalogix Archive Manager for Exchange Advanced Installation Guide. Look for the topic Install the Archive Server in the Advanced Installation section.
When installing the Metalogix Archive Manager for Exchange you will be prompted to select the individual features. In the Select Features window, select the PST Importer feature and proceed with the installation.

Configuration
PST Importer must be configured before use to set up critical folders for operational use and specify a default mailbox and folder for PST imports. To configure the PST importer, follow the steps described below:
In this topic:
·Steps to open the Options window
Steps to open the Options window
1.Click Start > Programs > Metalogix > Archive Manager Exchange > PST Importer to start the application.
2.From the Tools menu click Options to open the Options window and review or revise the properties in each tab as described below.
3.Click Apply to save and continue or click OK to save and exit the Options window. Click Cancel to exit the window without saving any changes.
The Folders tab specifies the location of the folders that are used for various operations of the PST Importer. A default location for each folder is already specified and you can modify them as needed.
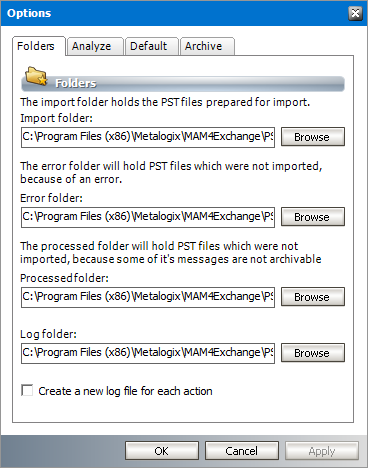
All the folders are created by default under C:\Program Files (x86)\ Metalogix\ MAM4Exchange\PST. You may select another location by clicking the Browse button and selecting another folder.
Import folder - Microsoft Outlook data files can reside anywhere on the computer. When opened by PST Importer they are copied from their original location to the Import folder for further processing. When all items from a PST file are successfully archived, then the PST file is deleted from the Import folder.
Error folder - Stores the PST files which were not imported because of an import error. not all items from a desired . The PST file is moved from the Import folder to the Error folder.
Processed folder - Stores the PST files which were not imported because one or more messages could not be archived. The error can also happen if the option Move non-archivable messages to mailbox is not selected in the Default tab. The PST file is moved from the Import folder to the Processed folder.
Log folder - Stores the log files generated by PST Importer. Log files are used for recording all the actions on PST files (e.g. analyze, report, etc.).
Create a new log file for each action - By default, all logs are written into one log file. Select this check box to create a new log file for each action on a PST file (e.g. analyze, report, etc.).
The Analyze action helps to identify a suitable owner in the destination mailbox for messages in PST file depending on the frequency of occurrences in the sender and recipient list. The Analyze action counts the senders and recipients from all emails in the PST file and generates a count. A ratio is calculated for each recipient and sender by dividing the total number of occurrences of recipients in the recipient list and senders the sender list by the sum of recipients and senders. The ratio is displayed as a percentage. The user with the biggest ratio indicates the most suitable destination mailbox or owner of the messages in the PST file and would therefore be automatically assigned as the default owner.
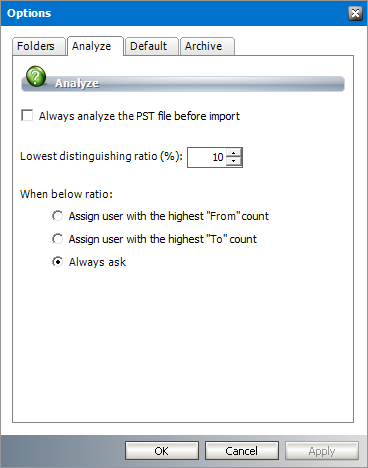
Always analyze the PST file before import - Select this check box to every manually loaded PST file is analyzed.
Lowest distinguishing ratio (%) - There could be several users with a marginal difference in the ratios. Set this value to determine how the default owner is assigned as described below:
·If the difference between the two highest ratios is higher than the Lowest distinguishing ratio, then the owner is assigned tot he mailbox user with the highest ratio.
·If the difference between the two highest ratios is lower than the Lowest distinguishing ratio then:
oAssign to user who has the most "From" count - select this option to assign the user with the highest "From" count as the default owner of the PST file that was analyzed.
oAssign to user who has the most "To" count - select this option to assign the user with the highest "To" count as the default owner of the PST file that was analyzed.
oAlways ask - you will be prompted to manually assign an owner of the PST file that was analyzed.
|
|
NOTE: If an assigned user does not exist on the Exchange server, or the assigned user exists but has not been synchronized with Archive Manager, the default owner configured in the Default tab will be used. |
This tab defines the default properties that are used during a PST file import when these properties are not defined for the PST file being imported.
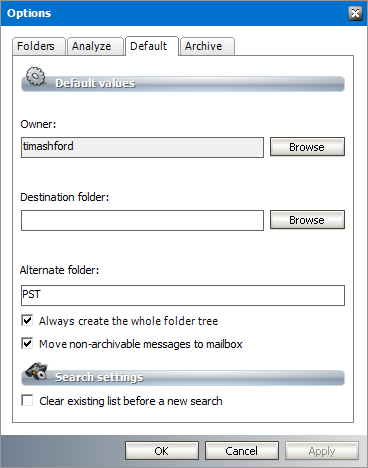
Owner - the destination mailbox that will be used to load the messages from a PST file.
Destination folder - the root folder for all messages that are loaded from a PST file. If the folder does not exist in the destination mailbox, the folder will be created.
|
|
NOTE: If you intend to import more than one PST file to the same destination mailbox, you can create unique root folders for each PST file by entering the special tags described below: a.%PSTNAME% - the folder name is the display name of the PST file. b.%PSTFILENAME% - the folder name is the file name (without extension) of the PST file For example, if Maya-2019.pst is the file name of the PST folder being imported and you enter PST Archive/%PSTFILENAME% in the Destination folder, then a folder hierarchy will be created under the destination mailbox root as PST Archive > Maya-2019. |
Alternate folder - This property is required if the Destination folder is blank. If there are any messages in the root node of PST file, then these messages will be will be imported to this folder. If this folder does not exists in the destination mailbox, the folder will be created automatically. All other items will be imported to the respective folders of destination mailbox and non-existent folders will be created automatically.
Always create the whole folder tree - select this check box to create the entire tree structure of the PST file in the destination mailbox including folders that are empty. When this option is not selected, empty folders in PST file will not be created in the destination mailbox.
Move non-archivable messages to mailbox - select this check box to move all non-archivable messages like already archived, shortcuts and undefined message classes to the destination mailbox. If this option is not selected, the messages that cannot be archived are not moved to the destination mailbox and the PST file is subsequently moved to the Processed folder when the import completes.
Clear existing list before a new search - select this check box to clear the search results list in the Gather management window every time you search for PST files. In this way the old search results will be deleted and only the new results will be included in the list.
Allows you to specify the compression and retention for messages imported through PST Importer.
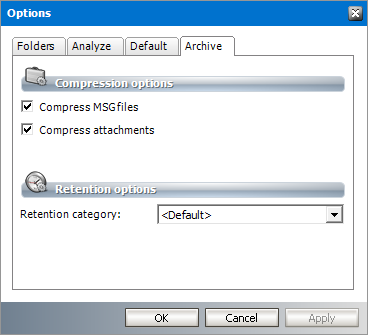
Compress MSG files - select this check box to compress messages when they are archived.
Compress attachments - select this check box to compress attachments when they are archived.
Retention category - select a predefined retention category from the down-drop box. If no retention category is selected, the default retention category set in the Archive Manager will be used.
Log files
Each action on a PST file is logged in one or more log files. Logs are written to a single file or action-specific files based on the configuration settings. For more information see the Folders tab section.
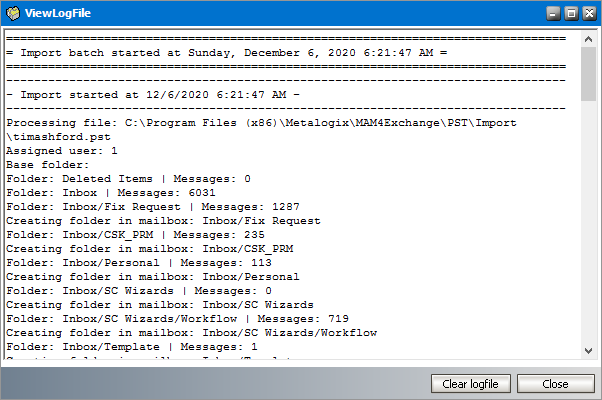
Steps to view log files
1.Open PST Importer.
2.Click the File menu and then select View log file.
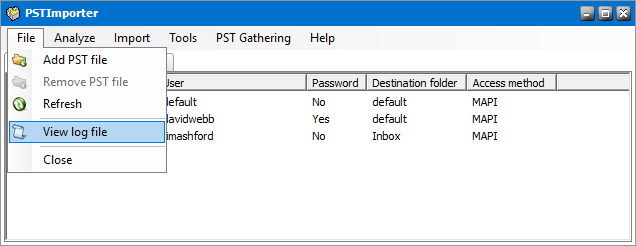
3.The log files are displayed in the Log Files window. This list can be sorted by name, date or size by clicking the respective column header.
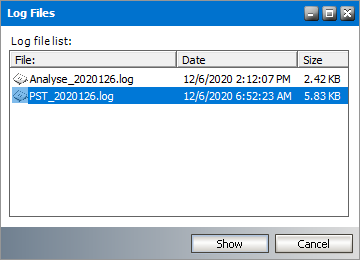
4.Double-click a log file or select a log file and click Show. The contents are displayed in the ViewLogFile window.