
Automate Exporting Data
Summary
This tutorial teaches you how to automate the task of exporting data using the Export Wizard activity. You will build a script that handles a special case of exporting to a .csv file and one that exports to a Microsoft Access® database.
In this tutorial you will learn:
- How to use the Export Wizard activity in Automation
- How to export data embedded with commas or quotes to a .csv file
- How to export data to a Microsoft Access database
You will need:
- A sample database from which to export data
- A query for selecting the data to export

Introduction
Exporting data is a common task and a great candidate for Automation. Automation's Select to File activity can handle basic exporting tasks. However, for more complex or special situations, you must use the Export Wizard activity.
Export to .csv with Special Quote Characteristics
A comma separated values file (.csv) is the most common format to use when exporting a large number of rows. A .csv file can handle millions of rows, while an Excel file does not handle a large number of rows as efficiently.
For most tasks that require exporting to .csv, you can use the Select to File activity. However, if your data contains commas or quotation marks embedded in the cell values, you must specify special quote characteristics. To do that, you must use the Export Wizard activity.
- To get started, connect to your sample database (or the database from which you want to export the data).
- Select Tools | Automation to open a new Automation window.
- Click the Export Wizard activity to add it to the Automation design window.
-
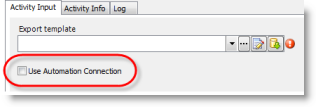
On the Activity Input tab, deselect the Use Automation Connection option. This instructs Toad to use the connection associated with the Export Wizard template instead of the one associated with the Export Wizard activity.
- In the Export Template field, click
to build a new template. The Data Export Wizard opens.
- Click Next on the Welcome page.
- Click Add on the Export Objects page.
-
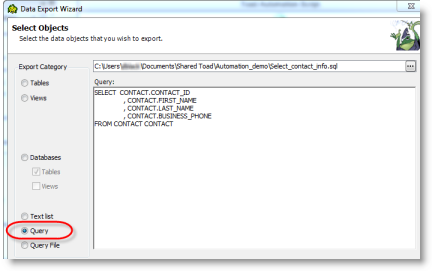
On the Select Objects page, select Query as the Export Category, and enter your query in the editor box.
Alternatively, you can browse to and select a query file. The query text displays in the editor box where you can modify it, if necessary.
Note: If you want to link a query file to the template, select Query File. Then browse to and select the file. This is useful if you need to change the query frequently, but don't want to change the template.
Click Next.
- On the Select Output Format page, select Comma Separated Values as the Output Format.
- If your data contains commas or quotation marks embedded in the cell values, select the Always quote strings/char option.
-
Then, in the Quote character field, enter a character that you know is not included in the quoted strings (cell values). For this example, enter the pipe (|) character. Click Next.
- On the Select Output Options page, select a location and file name for your .csv file.
- (Optional) Select the Overwrite option and/or add a Date/Time suffix to the file name.
- Click Next. On the Export Object page, click Next.
-
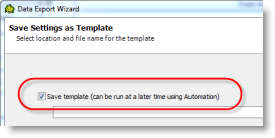
On the Save Settings as Template page, select the Save template option. And then select a location and file name for your Export Wizard template.
- Click Finish when done.
-
Click

Change Database Connection
If you want to use the Export Wizard template that you created, but you want to change the database from which you want to export data, you can change the database connection without changing the template.
- To change the database connection, on the Activity Input tab for the Export Wizard activity, select the Use Automation Connection option.
- Then select the new database connection from the list. This instructs Toad to use this connection and ignore the connection associated with the Export Wizard template.
Export to Access
The Select to File activity only allows exporting to a file. The Export Wizard activity, however, provides a number of other output options, including exporting to an Access database.
- To get started, connect to your sample database (or the database from which you want to export the data).
- Select Tools | Automation to open a new Automation window.
- Click the Export Wizard activity to add it to the Automation design window.
- On the Activity Input tab, deselect the Use Automation Connection option.
- In the Export Template field, click
- Click Next on the Welcome page.
- Click Add on the Export Objects page.
-
On the Select Objects page, select Table as the Export Category, and select a table from the list. Click Next.
- On the Select Output Format page, select Access Database File as the Output Format. Click Next.
- On the Select Columns page, click Next.
- On the Select Access Output Options page, select an existing Access database (or create a new one by entering a new Access database file name and location).
- Select an existing table, or create a new one. If you selected an existing table, you can select the Truncate Data option to overwrite the existing rows. If you don't select this option, Toad appends the data.
- Click Next. On the Export Object page, click Next.
- On the Save Settings as Template page, select the Save template option. And then select a location and file name for your Export Wizard template.
- Click Finish when done.
-
Click
The Export Wizard provides many more export options than the Select to File activity. Use the Export Wizard activity when you need to specify more than just the basic export-to-file requirements.
Schedule A Script
See Schedule Your Script to learn how to schedule the Automation script.
Note: To learn more about the Export Wizard, see Export Data with the Export Wizard.