Tutorial: Build a Query Visually
The Query Builder enables you to create a query without writing or editing SQL statements. Even if you are familiar with SQL, the graphical interface makes it easier to create relationships and visualize the query.

Note: This procedure does not cover all of the possible steps of visually building a query. It only covers the steps required to build a query for the scenario.
|
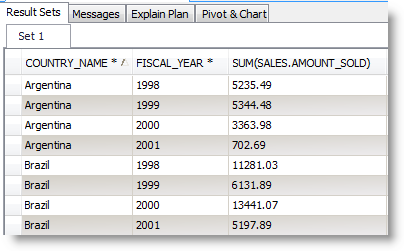
Scenario Your company wants to improve its global sales, starting with countries where it has a customer base but generally low sales. You need to create a query that identifies countries with less than $500,000 in sales for each of the last four fiscal years. Note: This scenario uses the SH (Sales History) sample schema that comes with Oracle 10g so you can follow the procedure. |
To visually build a query based on this scenario
- Connect to the database and select Tools | Query Builder | Query Builder.
- Select the SH schema in the Object Explorer.
-
Drag the following tables from the Object Explorer to the Diagram pane: TIMES, SALES, CUSTOMERS, and COUNTRIES.
Tips:
- Select Query Builder | Arrange Tables (ALT+Q+A) to have Toad arrange the tables in the Diagram pane.
- You can press CTRL and select a table, and then drag the table into the Editor pane. Click the list to create statements.
- You can also press CTRL and select all of the tables in the Object Explorer, and then drag them into the Diagram pane. Toad automatically arranges the tables.
- Add the following columns to the query by clicking each column:
Table
Column
COUNTRIES COUNTRY_NAME TIMES FISCAL_YEAR SALES AMOUNT_SOLD Tips:
- To view details for a table in the Diagram, click
(F4). If a table is not selected, details for the last selected table display.
- To remove a column from the query, click
or drag column off grid.
- To view details for a table in the Diagram, click
- Complete the following steps to group the data and sum the sales:
- Select the Group By field in the COUNTRY_NAME column, and then click +. The Group By field is in the Criteria pane, which is below the Diagram pane.
- Select the Group By field in the FISCAL_YEAR column, and then click +.
-
Select the Aggregate Function field in the AMOUNT_SOLD column and select Sum. This sums all of the sales per fiscal year per country.
Note: If you select a group by clause or aggregate function for a column, the rest of the columns in the query must also have a group by clause or aggregate function.
- Complete the following steps to select the fiscal year range:
- Select the Where Condition field in the FISCAL_YEAR column and click
. The Where Condition window displays.
- On the Form tab, select BETWEEN in the Operators field.
- Select 1998 in the first Constant field.
-
Select 2001 in the second Constant field and click OK.
Note: The SH schema does not have current data. The 1998-2001 years provide the best data for the purposes of this scenario.
- Select the Where Condition field in the FISCAL_YEAR column and click
- Complete the following steps to select countries with less than $500,000 in sales:
- Select the Having Condition field in the AMOUNT_SOLD column and click
- On the Form tab, select < in the Operators field.
- Select Sum in the Aggregate field.
- Enter 500000 in the Constant field and click OK.
- Select the Having Condition field in the AMOUNT_SOLD column and click
- Select Ascending in the Sort field of the COUNTRY_NAME and FISCAL_YEAR columns.
-
Click
.
The query results display in the Results tab. See View Result Sets for more information.
-
To save the query, right-click the Query Builder tab and select Save File.
You can save a query and any results sets in a Toad editor file (.tef). This file format is useful for building scripts that have large result sets that you do not want to continue executing or for saving results when you have not finished building a script.
- See About Designing Toad Data Reports for more information about creating a report from this data.
See Tutorial: Build a Subquery for a tutorial on creating a subquery.
See Add Subqueries for more information on how to add a subquery.
Create Cross-Connection Queries
Use the Cross-Connection Query Builder or the Cross-Connection Editor to create a query that combines data from multiple, dissimilar databases. For example, you can create a query that joins managers from a SQL Server database to their employees in an Oracle database. (This is also often called a heterogeneous or cross-database query.) Toad uses an enhanced query engine to implement advanced execution processes that are specially designed to improve the performance of cross-connection queries.
Before creating a cross-connection query using an Oracle, Teradata or MySQL ODBC connection, please see the special considerations listed at the end of this topic.
Note: This feature is available in the Toad Data Point Professional Edition only.
To build a cross-connection query visually
-
Select Tools | Build Query | Cross-Connection Query Builder.
Note: A blue banner along the right side of the Diagram pane indicates that you are in Cross-Connection Query mode.
- Drag tables and views from the Object Explorer to the Diagram pane.
-
Complete the query in the same manner as you would a non-cross-connection query, but note the following exceptions.
Object Explorer Feature In Cross-Connection Query Mode... Options Connection Treelist is the only view option available. In this option, connections, databases, tables, and views are displayed in a treelist in the Object Explorer window.
Filters Filters are especially useful in cross-connection queries to reduce the number of objects displayed in the treelist in the Object Explorer window.
Note: Review the "Considerations and Limitations of Cross-Connection Queries" section below.
To compose a cross-connection query in the editor
-
Select Tools | Edit | Cross-Connection SQL Editor.
Note: A blue banner along the right side of the Editor pane indicates that you are in Cross-Connection Query mode.
-
Compose the SQL statement in the same manner as you would a non-cross-connection query, but note the following exceptions.
SQL Editor Task In Cross-Connection Query Mode... Naming tables and views To reference a table or view, you must use a cross-connection fully-qualified name. The format for a cross-connection fully-qualified name depends on the database. The following is an example using the SQL Server format:
<database connection string>.<database>.<schema>.<table>
'sqlserverconn'.database.dbo.table
Note: For the database connection string, use the connection string displayed in the Navigation Manager window for each connection (or in the Name field in Connection Properties).
Tip: Copy and paste a SQL statement from a single connection editor to a cross-connection editor and Toad automatically changes the syntax of the statement to include the cross-connection fully-qualified names.
Using alias names You must use alias names for tables and columns in a cross-connection query. Using code completion In Cross-Connection Query mode, the scope of available options in code completion expands to include the databases, tables, and views for all the open database connections.
Note: For a list of SQL functions to use when composing a cross-connection SQL statement, see Cross-Connection Query Functions.
Tip: To expand/collapse a database node in the code completion list, use CTRL+left arrow and CTRL+right arrow.
Tips:
- In a cross-connection code completion list, the selected database displays a descriptive tooltip containing database and connection information.
- To learn how to optimize cross-connection queries, see Optimize Cross-Connection Queries.
- Use the Database Diagram tool to create and save cross-connection relationships, and then send the tables with their relationships already created to the Query Builder.
- You can use Intelligence Central functions instead of platform-specific functions in cross-connection queries against Views in Intelligence Central. See Using Intelligence Central Functions in Queries for more information.
Considerations and Limitations of Cross-Connection Queries
Review the following considerations and limitations before creating a cross-connection query.
|
Consideration/Limitation |
Description |
|---|---|
|
Performance concerns |
A cross-connection query may take longer to execute than a query against a single database because result sets from each database are retrieved and combined to generate a single result set. In the Professional edition of Toad Data Point, the enhanced execution engine utilizes several optimizing techniques to improve the performance of cross-connection queries. |
| ODBC driver support |
An ODBC driver can be selected for a single connection through each connection's Properties dialog or globally through Tools | Options | Database. |
| Using an Oracle connection in a cross-connection query |
To use an Oracle connection in a cross-connection query, you must install an Oracle ODBC driver. Note: The Oracle Full Install client includes an ODBC driver. However, if you are using the Oracle Instant client (which may not include an ODBC driver), you may need to install an Oracle ODBC driver. |
| Oracle Direct Connection | You cannot use an Oracle Direct Connection in a cross-connection query. |
| Using a Teradata connection in a cross-connection query | To use a Teradata connection in a cross-connection query, you must install a Teradata ODBC driver. |
| Using a MySQL ODBC connection in a cross-connection query | To use a MySQL ODBC connection in a cross-connection query, you must specify a database for the connection. |
|
Result sets |
You cannot edit result sets. |
| Oracle Long Data Type | Cross-connection query does not support Oracle long data types or Oracle LOBs. |
Optimize Cross-Connection Queries
Cross-Connection Query Functions
Tutorial: Visually Build a Query
Reverse Engineer Queries
One way to build a query is to begin adding columns and creating joins in the Query Builder, and then send the query to the editor to add more complex functionality, such as a UNION join. You can also send a query from the editor to the Query Builder. For example, you inherited a large query when an employee left and you need to edit it to resolve an issue. After looking at the query in the editor for some time, you still cannot decipher it. So, you right-click the statement and select Send to Query Builder. Now that you can visually see how the tables are referenced, you can identify and resolve the issue.
Considerations and Limitations in the Query Builder
Consider the following when reverse engineering a query using the Query Builder:
|
General |
Description |
|
Single statement support |
The Query Builder only supports one statement at a time. If you add multiple statements to the Query tab, only the first statement is used. If you make any changes to the statement on the Diagram tab, the other statements are lost. |
|
Quote identifiers |
If you selected the Quote Identifiers checkbox in Tools | Options | Database | General and generate a query from the Query Builder in SQL Server, the query cannot be reverse engineered. |
|
ODBC support |
You must use ANSI SQL for the query. |
|
Excel support |
Copying a generated query and attempting to reverse engineer that query results in an error. This issue occurs because the parser defaults to Oracle syntax, which does not understand quotation marks for fully qualified object names. To avoid this issue, clear the Use fully qualified object names and Use fully qualified column names checkboxes in Tools | Options | Database | Query Builder or manually edit the query. |
|
Non-ANSI joins (Oracle only) |
When sending a query from the Editor to the Query Builder, Toad automatically uses ANSI joins. If you use Where clause joins, click  to disable ANSI joins. This converts the statement to the correct join. to disable ANSI joins. This converts the statement to the correct join. |
|
Where Condition |
Description |
|
Where condition does not display in the Criteria grid after sending it to the Query Builder from the Editor |
If you send a query that contains a Where condition from the editor to the Query Builder, it displays in a Global Where clause bubble on the Diagram pane instead of in the Where Condition field in the Criteria grid. You can double-click the Global Where Clause bubble in the Diagram pane or can click You can also use the Where condition fields in the Criteria grid to add new Where conditions. Although they display in the grid, they are added to the Global Where clause in the Query tab. |
|
Where condition created in the Criteria grid of the Diagram tab disappears |
If you define a Where condition in the Criteria grid and edit any part of the query in the Query tab, the Where condition is removed from the Criteria grid and placed in a Global Where Clause bubble. You can double-click the Global Where Clause bubble in the Diagram pane or can click |
|
Having Condition |
Description |
|
Having condition does not display in the Criteria grid after sending it to the Query Builder from the Editor |
If you send a query that contains a Having condition from the editor to the Query Builder, it displays in a Global Having clause bubble on the Diagram pane instead of in the Having Condition field in the Criteria grid. You can double-click the Global Having Clause bubble in the Diagram pane or can click You can also use the Having condition fields in the Criteria grid to add new Having conditions. Although they display in the grid, they are added to the Global Where clause in the Query tab. |
|
Having condition created in the Criteria grid of the Diagram tab disappears |
If you define a Having condition in the Criteria grid and edit any part of the query in the Query tab, the Having condition is removed from the Criteria grid and placed in a Global Having Clause bubble. You can double-click the Global Having Clause bubble in the Diagram pane or can click |
|
Query Builder Diagram Tab |
Description |
|
Comments and code regions removed after making changes in the Diagram tab |
When reverse engineering a statement from the editor or the Query tab and switching to the Diagram tab, if the statement contains a block comment or code region and you make a change in the Diagram tab, the comment or code region is removed from the statement. |
|
Same column cannot be used in the criteria grid |
You cannot use the same column more than once in the criteria grid. Even if you create a separate alias for the second use of the column, that column is created as a calculated field |
|
Execute with different query in the Diagram and Query tabs |
If the query in the Diagram tab is different than the query in the Query tab, executing the query executes the SQL in the Query tab instead of the Diagram. |
|
Save with different query in the Diagram and Query tabs |
The Query Builder saves both the statement and diagram in the same file. The contents of the statement and diagram can be different without losing changes. |
 to edit it.
 to edit it.
To reverse engineer a query
-
Right-click a statement in the Editor, and select Send to Query Builder.See About Editing SQL for more information.
or
Click
in the Query Builder to send a statement to the Editor. Skip the remaining steps and continue to edit the query. See About Editing SQL for more information.
Troubleshooting: If the query cannot be modeled in the Diagram tab, a message displays and the statement opens in the Query tab. This usually occurs because the graphical diagram cannot support some functionality in the statement. You can view an explanation for this in the Output window or by hovering over the syntax with a red underline (
) in the Query tab. To continue, correct the error and click
to apply the change and open the Diagram tab.
-
Continue to build your query visually using the diagram.
-
Select the Query tab and make any additional edits. Indicators for an edited statement are as follows:
Inserted lines
Modified or removed lines
Modified characters
Use the toolbar
in the lower-right corner of the Query tab to modify the color used for each indicator.
Caution: If you manually enter or update the statement in the Query tab, you must click
-
Click
to execute the query.
Tip: If you have multiple statements in the Editor and you want to send only one to the Query Builder, highlight the statement, then right-click it and select Send to Query Builder.
Create Cross-Connection Queries
Build a Subquery
In this tutorial you will create a subquery to use to filter your selection of address IDs to only those addresses from specific regions.
To build a subquery
-
Connect to the Toad Sample (Access) database in the Navigation Manager.
- Select Tools | Query Builder | Query Builder.
- Drag the ADDRESS table to the Diagram pane.
-
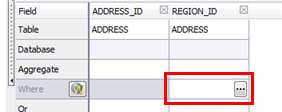
Click these column names in the ADDRESS table to add the columns to the query:
- ADDRESS_ID
- REGION_ID
- To add a subquery:
-
Select the Where field in the REGION_ID column and click
-
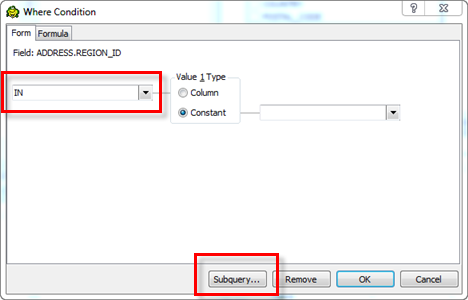
Select the IN operator from the list, and then click Subquery.
-
A child Query Builder window displays for you to use to build the subquery.
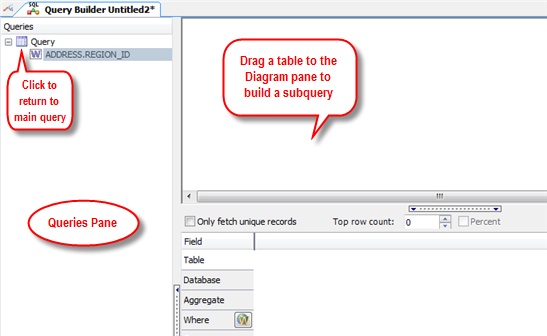
-
The child (subquery) Query Builder window includes a Diagram pane, a Criteria pane, and a Queries pane for navigating back and forth between subqueries and the main query.
-
-
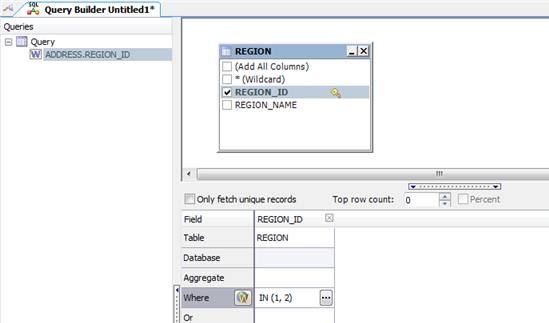
Drag the REGION table to the Diagram pane and select the REGION_ID column.
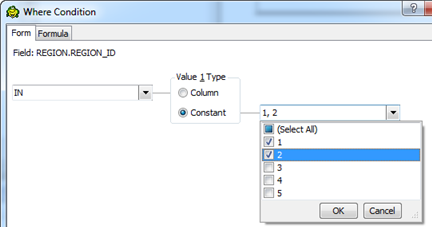
-
Select the Where field in the REGION_ID column and click
-
Your subquery window should look something like this:
- Click
-
-
Click the Query node in the Queries pane to return to the main query window. A call-out in the main query Diagram pane indicates that the statement contains a subquery and identifies the column it is on. Hover over the call-out to view the subquery statement.
- Click