
Changing Navigation Settings After a Migration
|
Navigation: Copying SharePoint Objects as a Separate Action > Changing Navigation Settings After a Migration |
You can change both global navigation and quick launch settings for site collections and sites as a separate action.
|
|
In order to have full access to these features in an on premises target, it is recommended that the Metalogix Extensions Web Service (MEWS) be used. |
|---|

Changing Global Navigation Settings After a Migration
|
Navigation: Copying SharePoint Objects as a Separate Action > Changing Navigation Settings After a Migration > Changing Global Navigation Settings After a Migration |
Global navigation, also known as the top-bar navigation, can be changed after a migration, at either the site collection or site level.

To change global navigation settings after a migration:
1.In the Explorer View, select the site or site collection for which you want to change the global navigation.
2.Right-click and choose Change Site (or Site Collection) Settings > Global Navigation Settings.
3.If you want any changes to global navigation settings to be applied to any parent sites, check the Push changes to parent site box.
4.If you want any changes you make to global navigation settings to be applied to any child sites, check the Push changes to subsites box.
5.Select the appropriate option(s) on the Global Navigation tab- Global Inheritance options.
|
If you want the global navigation for the selected site collection/site to |
Then |
|---|---|
|
be the same as that of the parent site |
check the Display the same navigation items as the parent site box. |
|
display any navigation items that exist within any sub-site of the selected node |
check the Display the navigation items below the current site box. |
|
retain its current inheritance settings |
check the Do not change global navigation inheritance box. |
NOTE: Remaining options on the Global Navigation tab are disabled for all versions of SharePoint except SharePoint 2010.
6.Select the appropriate options on the Sorting tab.
NOTE: Any sorting options that you specify will apply to both Global and Quick Launch navigation.
a)Chose a sorting type. Use the information in the following table for guidance.
|
If ... |
Then |
|---|---|
|
you want navigation to be sorted automatically, based on the set Automatic Sorting options |
select Sort Automatically. |
|
you want to be able to sort navigation manually |
select Sort Manually. NOTES: When you select this option, the settings are changed within SharePoint, to allow for manual sorting of the navigation, and does not actually change the navigation through Metalogix Content Matrix itself. |
|
you want any existing sorting options to remain unchanged |
select Do not change sorting type. |
|
·you selected Sort Manually AND · you want any publishing pages within the site to be sorted according to Automatic Sorting settings |
check the Sort Publishing Pages Automatically box. NOTE: This option is only available if you chose to Sort Manually. |
b)If you chose to Sort Automatically or Sort Manually with the Sort Publishing Pages Automatically option enabled, complete the options in the Automatic Sorting section (Sort By: and sorting direction).
7.Select the appropriate option on the SharePoint Ribbon tab. Use the information in the following table for guidance.
|
|
These options are available for an on premises target only if you are using an Object Model connection (either local or using the Metalogix Extensions Web Service (MEWS)). |
|---|
|
If you want to... |
Select |
|---|---|
|
preserve any current settings for the SharePoint ribbon |
Do not change ribbon settings. |
|
make the Show Ribbon and Hide Ribbon commands available within the Site Actions drop down menu |
Make "Show Ribbon" and "Hide Ribbon" commands available. |
|
hide the ribbon, making ribbon commands unavailable |
Hide the ribbon commands. |
8.To run the action, click [OK].
Changing Quick Launch Settings After a Migration
|
Navigation: Copying SharePoint Objects as a Separate Action > Changing Navigation Settings After a Migration > Changing Quick Launch Settings After a Migration |
Quick Launch settings, also known as the top-bar navigation, can be changed after a migration, at either the site collection or site level.
To change Quick Launch settings after a migration:
1.In the Explorer View, select the site or site collection for which you want to change the global navigation.
2.Right-click and choose Change Site (or Site Collection) Settings > Quick Launch Settings.
3.If you want any changes you make to Quick Launch settings to be applied to any parent sites, check the Push changes to parent site box.
4.If you want any changes you make to Quick Launch settings to be applied to any child sites, check the Push changes to subsites box.
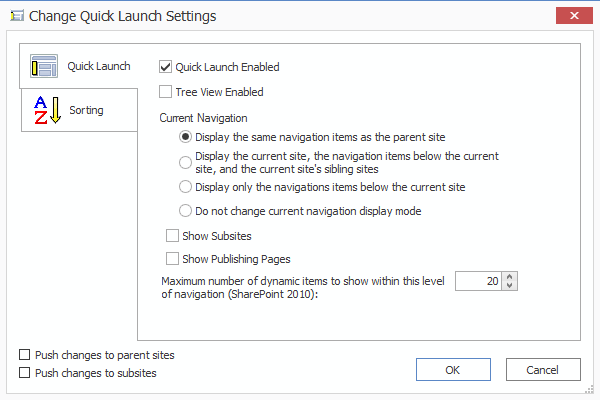
5.If you want Quick Launch Enabled on the site, make sure this box is checked.
6.If you want Tree View Enabled on the site, make sure this box is checked.
7.Select the appropriate Current Navigation option. Use the information in the following table for guidance.
|
If you want ... |
Then |
|---|---|
|
to allow the Quick Launch to display the same Quick Launch items that are displayed in the parent site |
Display the same navigation items as the parent site. |
|
the Quick Launch navigation to display navigation items that exist in both existing sub-sites and sibling sub-sites |
Display the current site, the navigation items below the current site, and the current site's sibling sites. |
|
the Quick Launch navigation to only display navigation items for its existing sub sites |
Display only the navigation items below the current site. |
|
preserve the current quick launch navigation display settings |
Do not change current navigation display mode. |
8.If you want sub-sites to be shown in the Quick Launch, check the Show Subsites box.
9.If you want Publishing pages to be shown in the Quick Launch, check the Show Publishing Pages box.
10.If you migrated to a SharePoint 2010 target and you want to set the number of dynamic items that can be displayed within that level of the Quick Launch:
§Check the Maximum number of dynamic items to show within this level of navigation (SharePoint 2010) box.
§Select the applicable number.
NOTE: This option is disabled for all versions of SharePoint except 2010.
11.Complete the appropriate options on the Sorting tab, as you would if you were Changing Global Navigation Settings After a Migration.
NOTE: Any sorting options that you specify will apply to both Global and Quick Launch navigation.
Converting Classic Pages to Modern Pages After a Migration
|
Navigation: Copying SharePoint Objects as a Separate Action > Converting Classic Pages to Modern Pages After a Migration |
After migrating from a classic site to a modern site, you can use a solution provided by Microsoft and PnP Community to convert classic pages within the migrated site to modern pages via the Content Matrix Console.
IMPORTANT: The assemblies required to run this action are not shipped with Content Matrix and must be obtained from the PnP Community. If you initiate a Convert Classic Pages to Modern Pages action and the assemblies are missing, a pop-up message will display which includes a link to a Knowledge Base article with step-by-step instructions. Quest does not provide support for this solution, as Content Matrix only provides users with the capability to run it.
Supported Objects
The Convert Classic Pages to Modern Pages action converts all applicable classic pages and their web parts to modern pages. It is available for the following objects:
Site Level:
· Team Site with no Office 365 group (STS#3)
· Team Site with Office 365 group (GROUP#0)
NOTE: Currently, Content Matrix does not support migrations to this site type.
·Communication Site (SITEPAGEPUBLISHING#0)[
Note that site root pages will also be converted
List level:
Document libraries within a supported site type.
Item level:
Classic pages in a document library within a supported site type.
Converted Page Naming Conventions
Converted modern pages are saved in Site Pages library, along with the original classic pages. By default, the converted page uses the same name as the classic page and the classic page is renamed Previous_<original_page_name>.aspx. If you want classic pages to retain the original name (and continue to display using the existing url), you must change the value of the configuration variable TargetModernPageTakesSourcePageName in the Application Settings.xml file to False. The modern page will then be named "Migrated_<original_page_name>.aspx; however, the content approval status of the classic page will be changed from Draft to Pending, and a new version of that page will be created.
To convert classic pages to modern pages:
1.Select the object whose pages you want to convert.
2.Right-click and choose Convert Classic Pages to Modern Pages.
NOTE: This menu option is available only for supported objects.
You can monitor the progress of the action in the Job List.
Current Limitations and Known Issues
·This action is not supported for use with PowerShell or Distributed Migration.
·Conversion of classic publishing pages is not supported.
·If the Site Pages library requires checkout, target pages are checked out as unpublished.
·If a classic page is checked out by another user during migration, there may be issues in converting the page.
·Approval status is not preserved.
·Metadata except "CreatedBy, Created, Modified" are not preserved on the target page.
·The Modified by field on the target page is set to the connecting user.
·If Content Matrix is uninstalled, DLLs and files deployed for this action are not be removed automatically and will need to be removed manually.