
Filter Options
|
Navigation: Configuring Copying Options > Filter Options |
In Metalogix Content Matrix, filters can be set and applied to items within the scope of a migration. Metalogix Content Matrix uses inclusive filters, and these can be added and applied to any level of a migration. Any filters that are set in a migration will be applied to all items within the scope of the migration. Multiple filters can be applied to each level of a migration.
To configure Filter Options:
1.Select the appropriate filter option(s). Use the information in the following table for guidance.
NOTE: In some cases, when you check one of the filter options users may be prompted with a warning "Information" message regarding workflows. If no workflows are being migrated, click [OK] to continue. If workflows are being migrated, please read the message over and be cautious when setting any filters that they are not part of any migrating workflow.
|
If |
Select |
|---|---|
|
·you initiated a site collection- or site-level migration AND ·you want filters to be applied to child sites within the scope of your migration |
Apply filter on Child Sites. |
|
·you initiated a site collection- or site-level migration AND ·you want filters to be applied to lists and libraries within the scope of your migration |
Apply filter on Lists and Libraries. |
|
you want filters to apply to items or documents within the scope of the migration |
Apply filter on Items and Documents. |
|
·you initiated a site collection or site-level migration AND ·you want to exclude selected site columns from the migration |
Apply filter on Site Columns. |
|
·you initiated a list-level migration AND ·you want to exclude selected list columns from the migration |
Apply filter on List Columns. |
|
·you initiated a site collection- or site-level migration AND ·you selected the Copy Other Root Files/Folders option in the Site Options tab AND ·you want filters to apply to custom folders that exist at the root of a SharePoint site the scope of your migration |
Apply filters on Other Root Folders. |
2.Follow the procedure for Applying Filter Expressions.
Applying Filter Expressions
|
Navigation: Configuring Copying Options > Filter Options > Applying Filter Expressions |
NOTE: This procedure applies to all filter types except Site Columns and List Columns.
To apply filter expressions:
1.For each option you selected:
a)Click the [ ] button to the right of the option to display the Filter [Object] dialog.
b)Select a Field (that is, a field column from the source) and Operator, then (depending on the Operator) enter or select a Value.
NOTES:
§Fields are listed by their internal name (and not their display name). The available options in the Operator and Value fields will be based on the Field value that is selected.
§If setting a filter at the Item/Document level, the Field value can be manually entered, and is not limited to the options that are available in the drop down list. This gives the filter a little more flexibility at the Item/Document level.
2.If you want to add additional expression to the filter:
a)Click [Add Row] or the [Tab] key.
b)Select the appropriate And/Or option:
§If you want the condition to be applied in addition to any filter expressions that precede it, select And.
§If you want to condition to be applied as an alternative to any filter expressions that precede it, select Or value is set, the filter will be added as an alternative filter value.
The Or value is more likely to be used in scenarios where some filters are grouped.
Select/enter a Field, Operator, and Value as described in Step 2(b) above.
Note that, as each expression is applied it displays in the box at the top of the dialog.
3.If you want to group filter expressions, continue with the procedure for Grouping Filter Expressions, following.
NOTE: Currently, you cannot change the ordering of filter expressions. To do so, you must remove then re-add them.
To remove any filter, select the entire row and open the context menu (by right-clicking), and select Delete Filter(s). Alternately, once a filter row is selected, you can use the [Delete] key. The ordering of filters cannot currently be modified. They would have to be removed and re-added to change the ordering.
Grouping Filter Expressions
|
Navigation: Configuring Copying Options > Filter Options > Grouping Filter Expressions |
You can group two or more filter expressions that you want Metalogix Content Matrix to process as a unit. Only filters that are adjacent to each other can be grouped. For example, if you have six filters (numbered 1 to 6), you can group, numbers 1 and 2, or 4 and 5, or even 2, 3, 4, and 5. But you would not be able to group 1 and 3, 2 and 5, or 2, 4, and 6. In the case trying to make a grouping of 3,4, and 6, you would be able to group 3 and 4, but you would not be able to add 6 to that group, unless 5 was also included. Multiple groups can also be grouped together into a single group, provided they are adjacent each other.
EXAMPLE:
In the below image there are six filters added at the Lists and Libraries level, and these contain three groupings. There are two sub-groupings that are grouped together into a third, larger one.

If you were to read through the filters they would be applied as follows: First a Created filter would be applied for the specified date. Next another filter would be applied to that content on the Modified date for a separate date value. Next the end result of the third, large group would be applied. To determine what the result of this is, you need to take a closer look at the smaller groups.
This first of the smaller groups starts by applying a filter to the Title where the "Project" value is contained within the title. The second line in this first group then applies an Or condition based on a Name value. So the result of this group would be any file that contains "Project" in the Title value, Or and file that's actual Name starts with "Migration."
Then we look at the second sub-group. Here the first filter condition starts with Or, meaning that the whole group is part of an Or statement. This second sub-groups states that the files must have a Status value that equals "Active," as well as the CreatedBy user must not be "Metalogix\JohnS."
All together the results of the filters would be any files that have:
§A Created date greater than, or equal to the specified date.
§A Modified date greater than, or equal to the specified date.
§A Title value that contains the "Project" value in it Or a Name value that starts with "Migration."
§Or a Status value of "Active" And a CreatedBy value that is not "Metalogix\JohnS."
To group filter expressions:
1.In the Filter [Object] dialog, highlight the rows you want to group together.
2.Either:
§Click [Group Filters].
OR
§Right-click and choose Group Filters.
To remove a filter grouping:
1.In the Filter [Object] dialog, highlight the rows within the grouping you want to remove.
2.Either:
§Click [Remove Grouping].
OR
§Right-click and choose Remove Group.
Applying Site Columns or List Columns Filters
|
Navigation: Configuring Copying Options > Filter Options > Applying Site Columns or List Columns Filters |
By default, all source columns are included in a migration. You can use this filter option to select specific columns that you want to exclude. Excluded columns and their data will not be migrated to the target, but the rest of their data will still be migrated.
NOTE: The name of this feature depends on the level of the migration. For site collection or site-level migrations the option is called Apply filter on Site Columns. If the migration is at the list level or below, the option is called Apply filter on List Columns.
To apply Site or List Column filters:
1.Click the [ ] button to the right of the Apply filter on Site (or List) Columns option to display the Filter [Object] dialog.
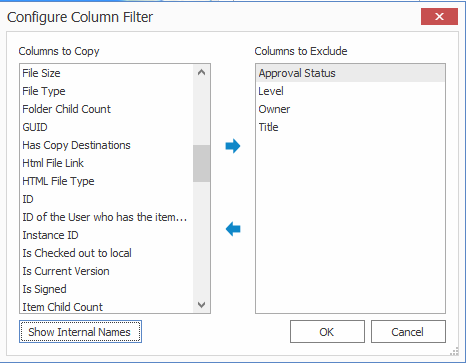
2.From the Columns to Copy section, highlight the columns from the source that you want to exclude.
NOTE: By default, columns show the Display Names, but you can, alternatively, choose to show Internal Names (by clicking [Show Internal Names]).
3.Click the right-facing arrow to move columns to the Columns to Exclude section.
NOTE: If you want to return columns to the Columns to Copy section, click the left-facing arrow.
4.When you have finished selecting columns to exclude, click [OK].