
Site Collection Options
|
Navigation: Configuring Copying Options > Site Collection Options |
If you initiated a site collection level migration, select the Site Collection Options tab and specify the options described below.
|
|
Site Collections can only be pasted to a Web App or Farm connection type, using an Object Model (OM) level connection (through the use of a local or Extensions Web Service connection). A similar (but slightly limited) set of Site Collection options is also available for migrating to O365 environments, when an Office 365 Tenant connection is used. |
|---|

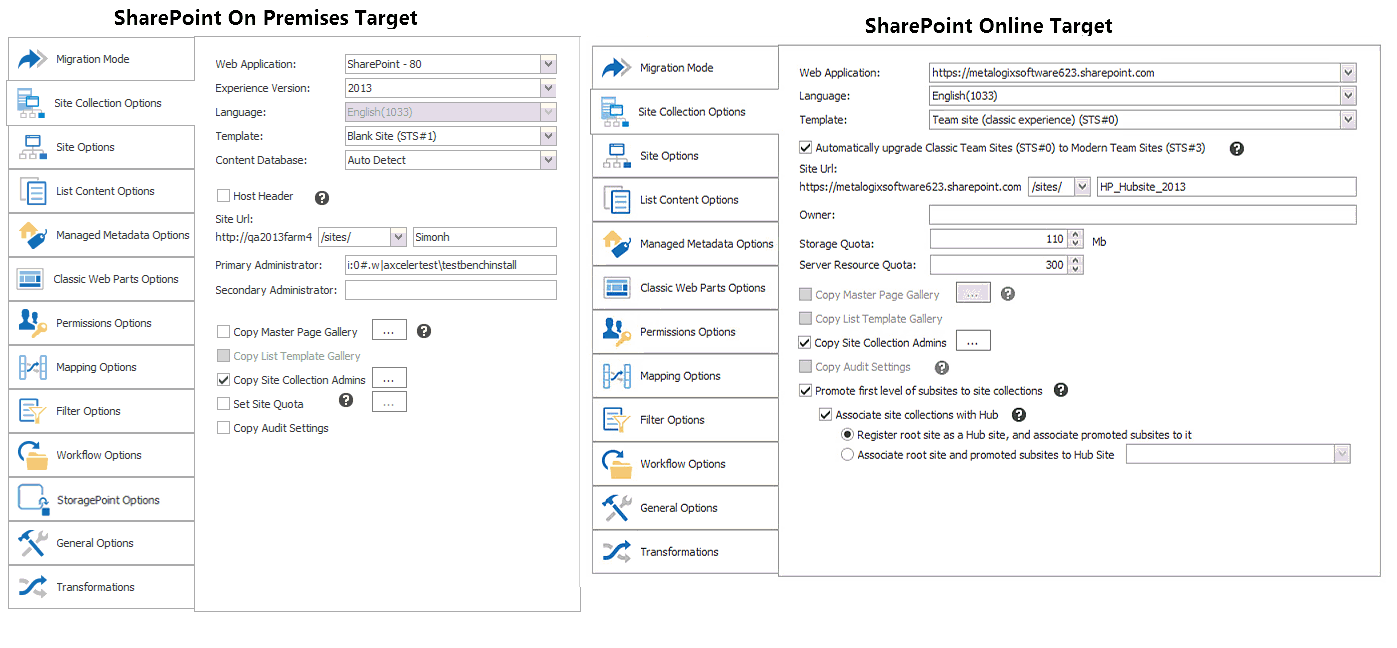
To configure Site Collection Options:
1.Use the information in the following table to determine the appropriate action to take.
|
If your target environment is . |
Then |
|---|---|
|
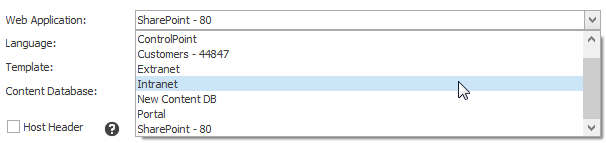
On premises |
select the Web Application into which you want to migrate the site collection from the drop-down. |
|
Office 365 |
For Web Application, select the appropriate URL from the drop-down:
|

2.If different from the default, select an available Language from the drop-down.
3.If different from the default (the template used on the source), select a Site Collection Template from the drop-down.
NOTE: For SharePoint Online and SharePoint 2019 targets, you also have the option to Automatically upgrade Classic Team Sites (STS#0) to Modern Team sites (STS#3).
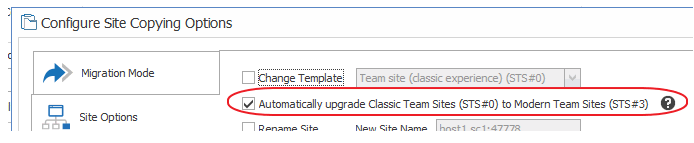
See Team Site to Modern Team Site Migration for a complete explanation of this option.
4.If you are migrating from a SharePoint 2010 source to a SharePoint 2013 on premises target, choose the Experience Version (2013 or 2010) from the drop-down.
NOTE: This option is only visible when you are migrating from SharePoint 2010 to 2013.
5.If your target is SharePoint on premises: If the Web Application into which you are migrating the Site Collection has more than one Content Database and you would like to specify the one you want to use, select it from the drop-down.
6.Use the information in the following table to determine the appropriate action to take.
|
If you want to use |
Then |
|---|---|
|
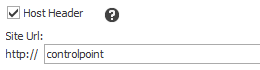
a Host Header for your Site Collection URL
(For a SharePoint on premises target only) |
·check the Host Header box, and ·enter the host name in the Site URL field. |
|
a path-based URL for your site collection |
select the appropriate managed path and enter the URL name in the Site URL field. |
7.Use the information in the following table to determine the appropriate action to take.
|
If your target environment is . |
Then |
|---|---|
|
On premises |
·If different from the default (the migrating account), enter the user account that will be the Primary Administrator for the new Site Collection. The migrating account should be set as the Primary (or Secondary) Administrator to help ensure that the account can access the new site collection after its creation, so it can migrate the remaining content. ·(Optional) Enter a user account that will be the Secondary Administrator for the Site Collection. NOTE: This field does not authenticate, so any spelling mistakes will not be automatically corrected. |
|
O365 |
Enter the O365 account that will be the Owner/Site Collection Administrator of the new Site Collection. |
8.For SharePoint Online tenants: If different than the default(s), adjust the values for:
§Storage Quota (the amount of storage allocated to the site collection by Microsoft), and/or
§Server Resource Quota (the amount of resources―such as CPU and RAM―allocated to the site collection by Microsoft).
9. If you want to copy Master Pages, Page Layouts, and/or Other Resource from the Master Page Gallery on the source site, select Copy Master Page Gallery.
By default, Content Matrix will copy all three components Pages, Layouts, and Resources), but you can choose components to include/exclude by clicking the [ ] button and selecting/deselecting individual components.
Depending on the source and target SharePoint version(s), there are limitations on how Master Pages are migrated. For details, see Master Page Migration.
Note that, if you choose to Copy Master Pages, you also have the option to Correct Links on Master Pages (that is, so links point to the same relative path on the target). If you leave this box unchecked, links will continue to point to the source.
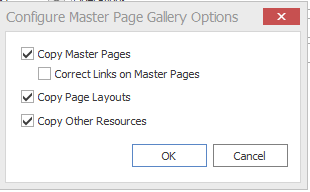
For more detailed information on link correction, see Link Correction.
10.If your source and target use either the same version of SharePoint or you are migrating from 2010 to 2013 using the 2010 experience and you want to Copy List Template Gallery, check this box.
NOTE: This option
§Requires an Object Model (OM) connection on both the source and target environments, and
§is not available if you are migrating to a different version of SharePoint (unless you are migrating from 2010 to 2013 using the 2010 experience).
For more information on this option, see List Template Gallery Migration.
11.For a SharePoint On Premises target: If you want to set a Site Quota:
§select Set Site Quota, and
§Click the [ ] button to display the Set Site Quota dialog, and select the appropriate option:
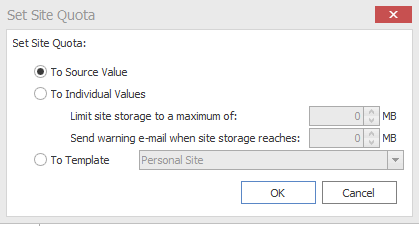
§To Source Value (default) - the quota value from the source site will be used.
§To Individual Values:
§Limit site storage to a maximum of: "X" Mb - The maximum size of the new site collection., in megabytes (Mb)
§Send warning e-mail when site storage reaches: "X" Mb - The size at which to send a warning e-mail to the Site Collection Administrator, that the site collection is getting near it's set volume capacity.
§To Template - Match the same value for a site template on the target side.
NOTE: This drop down list will only display site templates that contain a site quota value.
12.If you want to Copy Site Collection Admins from the source site collection, make sure this option is selected. Click the [ ] button to view the Site Collection Administrator(s) on the source Site Collection.)
This option is separate from the Primary Administrator and the Secondary Administrator fields, as it will copy all of the users that are set in the Site Collection Administrators field in the SharePoint Users/Groups section and requires an Object Model connection for both source and target. If removing all of the users from this list users will not be able to add a new user value unless the account that is running the migration has permissions (on the target Site Collection) to add any new accounts. If the migrating account does not have permissions to add a new account, then it is recommended that at least one of the old user accounts that is currently set as a Site Collection Administrator is left in the dialog.*
13.If you want to preserve the source Site Collections audit settings on the target, select Copy Audit Settings.
14.If you are migrating to SharePoint Online and want to Promote first level of subsites to site collections on the target, check this box.
NOTE: This option is only enabled if the site you want to promote has at least one subsite.
For more information, including prerequisites and limitations, see Promotion of First Level Subsites to Site Collections.
15.If you have chosen to promote first level subsites to site collections on the target, and you want to Associate site collections with Hub, check this box and either:
·select Register root site as a Hub site, and associate promoted subsites to it (to create a new hub, which will use the name of the site from which subsites were promoted)
OR
·select Associate root site and promoted subsites to Hub Site and select an existing hub site from the drop-down.
MySite Options
|
Navigation: Configuring Copying Options > MySite Options |
If you initiated a MySite migration, select the MySite Options tab and specify the options described below.

Because language packs are not included in the migration action, the base language setting of the MySite being migrated must already be installed on the target environment. If it is not, an error message containing the language code of the missing language pack will be displayed.
NOTE: Only sites that are using a MySite template (such as SPSPERS#0) and that the current user account has access to are available for migration. Any MySites that do not meet these requirements will not be displayed. It is also possible that a MySite might not appear because it has run into a timeout issue, but if a Refresh is done for the server, the MySite may then be displayed.
|
For a SharePoint Online target: |
The MySite Target Web Application and MySite Target Managed Path are pre-populated.
|
|
For a SharePoint On Premises target: |
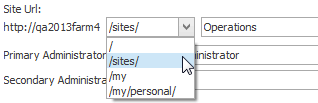
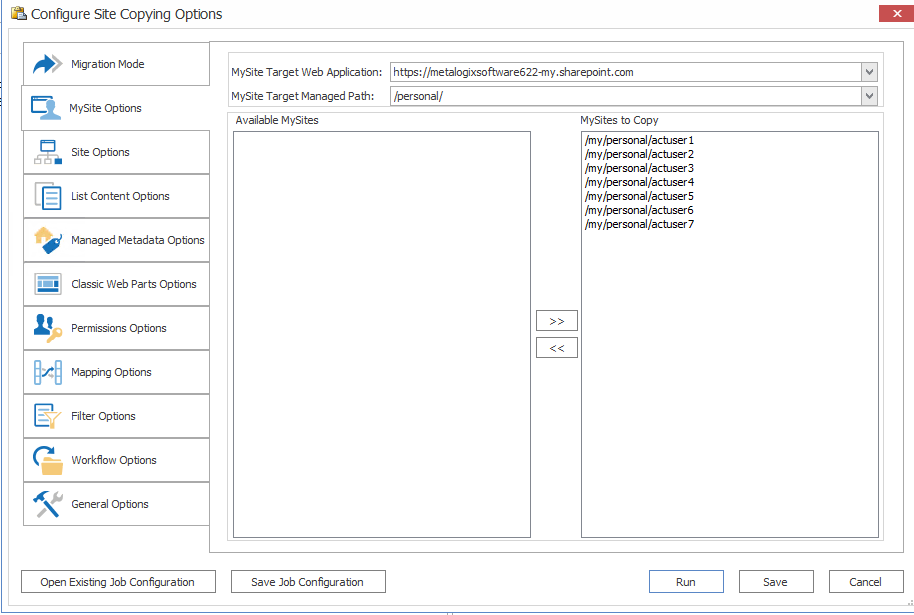
1.From the MySite Target Web Application drop-down, select the Web application in the target environment into which you want to migrate the MySites. NOTE: When selecting a web application to use for the migration be sure that the selected target web application contains the MySite host site collection (the site collection that hosts all the MySites). If it doesn't then you won't be able to link the user profile to the site collection. However, different managed paths under the same web application will link the user profiles. 2.From the MySite Target Managed Path drop-down, select the managed path (which already exists on the target server) that you want to use In most cases you can select between /sites/ and /my/personal/ for the path, provided these exist in your environment: §Any sites pasted with the /sites/ option will be displayed as "[Server Name]/sites/[MySite Name]." §Any sites pasted with the /my/personal/ option will be displayed as "[Server Name]/my/personal/[MySite Name]." |
To remove a MySite from the copy action, move it from the MySites to Copy panel back to the Available MySites panel.
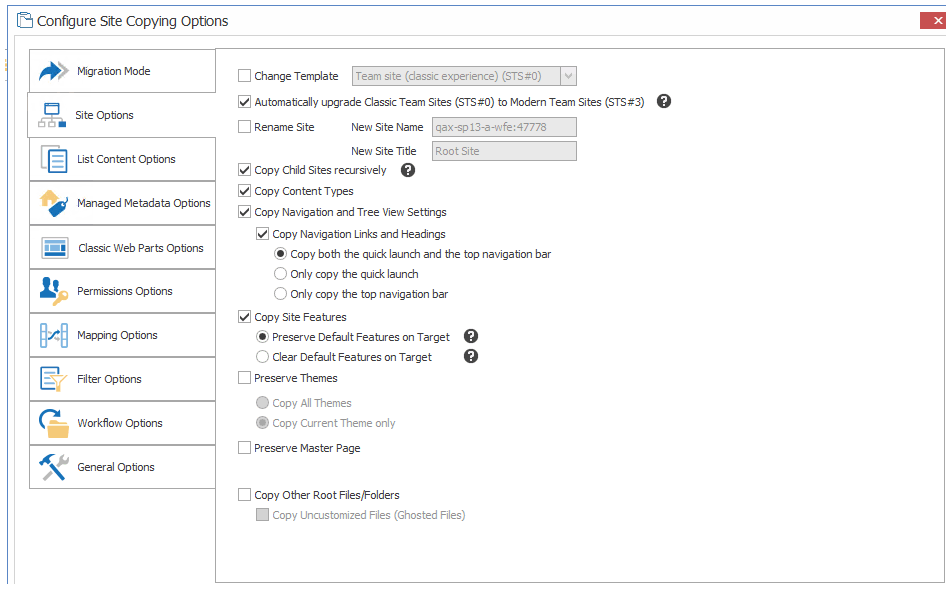
Site Options
|
Navigation: Configuring Copying Options > Site Options |
If you initiated a migration for a Site Collection or site, complete the Site Options tab as described below.
NOTES:
·Preservation of Search and Offline Availability settings is not supported when migrating to SharePoint Online
·If you are copying OneNote Notebooks as part of a site-level migration, there are some pre-requisites to consider. See OneNote Notebooks Migraion for details.
To configure Site Options:
1.If you initiated a copy at the site level and want to change the Site Template:
§Select the Change Template box, and
§Select a site template from the drop-down.
(This option is not available if you chose to Paste Site Collection or Paste MySites, as the template is selected as one of the Site Collection options.)
NOTE: For SharePoint Online and SharePoint 2019 targets, you also have the option to Automatically upgrade Classic Team Sites (STS#0) to Modern Team sites (STS#3).
See Team Site to Modern Team Site Migration for a complete explanation of this option.
2.If you want to rename the site at the target:
§Select the Rename Site option, and
§Enter a New Site Name and New Site Title.
NOTE: The Name is the internal name of the site and cannot include any spaces. The Title is the display name.
3.If you want to copy all child sites that are under the site or server node being migrated, select Copy Child Sites (recursively).
NOTE: If you select this option, migration options specified for the parent site will apply to child sites as well.
4.If you want to Copy Content Types, make sure that this box is checked.
NOTE: When this box is checked, all content types will be copied from the source to the target. You can also copy selected content types as a separate action.
5.If you want to Copy Navigation and (Tree View Settings), select this option.
See also Navigation Migration.
NOTE: When this option is selected, the settings for the navigation will be copied, not the actual navigation.
6.If you chose to Copy Navigation and Tree View Settings and want to also change the navigation items themselves, check the Copy Navigation Links and Headings box then select the appropriate option:
§Copy both the quick launch and the top navigation bar
§Only copy the quick launch.
§Only copy the top navigation bar.
NOTE: It is highly recommended that you select the Link Correction option in the General Options tab, to enable link correction for navigation links.
7.If you want to Copy Site Features, select this option, then select the appropriate option. Use the information in the following table for guidance.
NOTE: In order for a theme to be properly preserved in a migration, it must exist (be manually installed) on the target server before migration. See Site Features Migration for more detail.
|
If you want to . |
Select |
|---|---|
|
·preserve any existing features on the target side that are already active, and ·add and activate the features from the source to this list. |
Preserve Default Features (on Target). NOTE: Both the pre-existing features and the features being copied from the source, should be active on the target after migration. |
|
clear any features that are already active on the target before any features are copied over from the source |
Clear Default Features (on Target). NOTE: Any features on the target that are already active will be stopped and removed, and the features from the source will be copied over and activated to match the source side. |
8.If you want to Preserve Themes, check this box then select the appropriate option. Use the information in the following table for guidance.
NOTE: In order for a theme to be properly preserved in a migration, it must exist (be manually installed) on the target server before migration. See also Site Theme Preservation.
|
If you want to copy |
Select |
|---|---|
|
all of the existing source themes over to the target, even if they are not currently in use |
Copy All Themes. |
|
the currently used theme on the source over to the target. |
Copy Current Theme only. |
9.If you want to Preserve Master Page, check this box.
NOTE: By default, if the source and target connections are the same version of SharePoint, Metalogix Content Matrix will use the same Master Page on the target, as it exists on the source. If the source side Master Page doesn't exist on the target, the target side will then be set to use its default Master Page. See also Master Page Migration.
10.If you want to copy any files, folders, and sub-folders from the root of a site to the root of the target site. (for example, if some content (files/folders) has been deployed to the root of the source site) check the Copy Other Root Files/Folders box.
11.If you chose to Copy Other Root Files/Folders and also want to copy any "Uncustomized" or ghosted files that exist on the root of the site, check the Copy Uncustomized Files (Ghosted Files) box.
NOTE: Ghosted files are files that are not stored in the content database but are read from a definition file instead, and in this case these definition files are stored on the root of the site. These are generally template files. If this option is not selected, Metalogix Content Matrix will instead skip these files when migrating content. See also Ghosted and Un-Ghosted Page Migration.
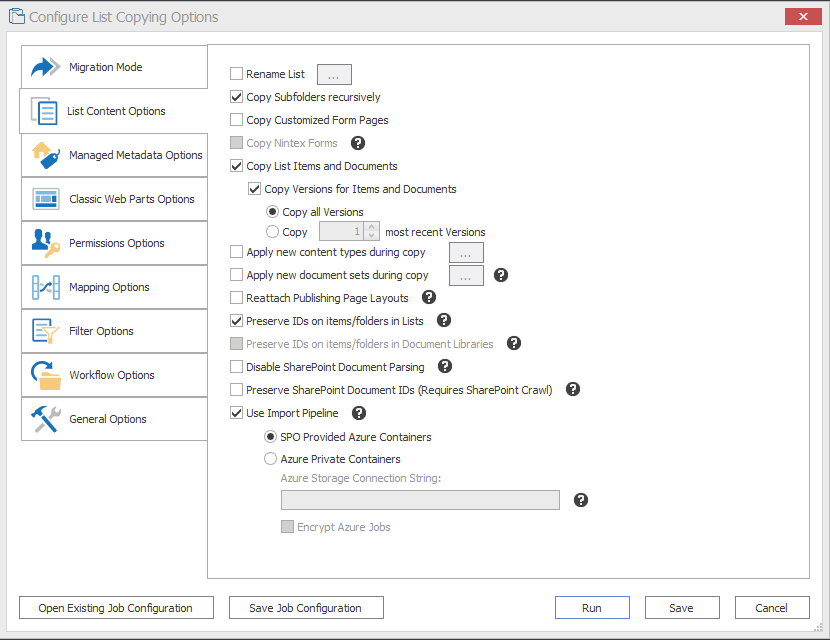
List Content Options
|
Navigation: Configuring Copying Options > List Content Options |
If you want to copy lists as part of the migration, select the List Content Options tab and select the applicable options.
NOTE: Depending on the level at which the migration was initiated, and whether you are migrating to a SharePoint on premises or Online target, options may vary.
To configure List Content Options:
1.If you initiated a site collection or site level migration, make sure the Copy Lists option is selected.
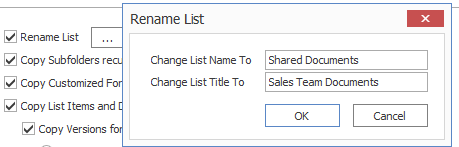
2.If you initiated the migration of a single list, and want to rename the list at the target:
a)Check the Rename List box.
b)Click the [...] button to display the Rename List dialog.
c)Enter the new list name and/or the list title.
3.If you want folders and sub-folders to be copied recursively, down through any existing levels of a site, list, or item copy operation, make sure the Copy Subfolders recursively box is checked.
NOTE: Make sure this box is checked if you are migrating OneNote Notebooks. See OneNote Notebook Migration for prerequisites and special considerations.
4.If you want Form pages that have been customized using SharePoint Designer (SPD) to be migrated, make sure the Copy Customized Form Pages box is checked.
NOTE: When selected, this option will cause the Copy Web Parts on Form Pages option to be selected on the Classic Web Parts Options tab, because web parts must be copied if migrating Form page customizations. See Customized Form Page Migration for requirements and limitations.
5.If you want to Copy Nintex Forms, check this box.
NOTES: Please review Nintex Workflows and Forms Migration for supported SharePoint versions and connection types, prerequisites, and current limitations.
6.If you want to Copy List Items and Documents, make sure this box is checked.
NOTES:
§This option does not apply if you initiated a migration at the item level.
§Meetings Workspace Attendees List and Meeting Workspace Instances are not migrated to SharePoint Online.
§This option must be selected if you want to migrate Document Sets.
7.For lists and libraries that have versioning enabled, if you want to Copy Versions for Items and Documents, select the appropriate option. Use the information in the following table for guidance.
NOTE: The option you select also applies for snapshots (versions) of any Document Sets being migrated.
|
If you want to copy . |
Then |
|---|---|
|
all existing versions of an item or document |
select Copy all Versions. |
|
a specified number of versions of an item or document |
·select Copy [number] most recent Versions, and ·select the number of versions you want to keep. NOTE: This number includes both major and minor versions. |
8.If you want content types to be applied to SharePoint lists, libraries, and items during a migration:
a)Check the Apply new content types during copy box.
b)Follow the instructions in the topic Applying Content Types to Lists and Libraries.
9.If you want libraries, folders, or document libraries to be migrated as a SharePoint document set:
a)Check the Apply new document sets during copy box.
b)Follow the instructions in the topic Applying Document Sets to Libraries, Folders, or Documents.
NOTE: Metalogix Content Matrix automatically migrates existing document sets in SharePoint 2010 and later. See Document Sets Migration for requirements and limitations.
10.If you are migrating within the same version of SharePoint, and want any un-ghosted Publishing pages from the source to be ghosted on the target, check the Reattach Publishing Page Layouts box.
NOTES:
§If you are migrating to a different version of SharePoint, this option will be checked and disabled as Publishing pages will always be re-ghosted on the target.
§For more information on this option, see Ghosted and Un-Ghosted Page Migration.
11.If you want to preserve IDs for any folders and items in SharePoint lists, so each item and folder will have the same ID on the target as it does on the source, make sure the Preserve IDs on items/folders in Lists on the target option is selected.
NOTES:
§If this option is not selected then SharePoint will assign an item ID automatically.
§This option is used for Incremental Migrations, and does not apply to Document Libraries.
§For more information on incremental copying and preserving IDs, see Preserving SharePoint List Item IDs When Migrating to SharePoint Online.
12.If you want to Preserve IDs on items/folders in Document Libraries, select this option.
NOTES:
§This option is used for an Incremental Migration and only includes SharePoint Document Libraries, not Lists.
§This option is different from the Preserve SharePoint Document IDs option. For more information on this feature, please contact Quest Support.
13.If you want Metalogix Content Matrix to disable the normal document parsing methods for SharePoint in order to fetch all of the metadata properties for files, check the Disable SharePoint Document Parsing box.
NOTES:
§This option is only required in some very specific cases. In some cases customer document parser may be used on the source SharePoint instance, or there may be some heavily customized metadata creation that can affect a normal migration. These cases are usually determined by a special error message when migrating documents ("Unable to update the information in the Microsoft Office document").
§This option affects all items within the scope of the migration. If the Preserve Configuration Options (in the Settings tab of the ribbon) are enabled, this option will need to be turned off for any subsequent migrations if you no longer want the SharePoint document parsing methods to be disabled.
CAUTION: Disabling the SharePoint document parsing methods can potentially cause issues if migrating InfoPath forms.
14.If you are migrating from SharePoint 2010 or later, and want to preserve the values in the Document ID field that is enabled with the Document ID Service feature (which must be activated at the Site Collection level on the target), check the Preserve SharePoint Document IDs (Requires SharePoint Crawl) box.
NOTES:
§If you select this option and the Document ID Service feature is not activated on the target site collection, a warning message will display informing you that you will not be able to use this option. If you enable the feature after initiating the migration, you will need to refresh the connections before continuing.
§Please see the Migrating with Document IDs FAQ for more details on the differences between the item and folder IDs (in the ID field) and Document IDs (in the Document ID field).
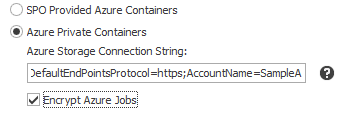
15.If you want to migrate to a SharePoint Online target using the Import Pipeline, check the Use Import Pipeline box and either:
·keep the default option - SPO Provided Azure Containers
OR
·select Azure Private Containers (if configured), and enter the Azure Storage Connection String in the following format:
DefaultEndpointsProtocol=https;AccountName={your account name};AccountKey={your account key}
NOTE: When using Azure Private Containers, you also have the option to Encrypt Azure jobs. (When using SPO Provided Azure Containers, jobs are always encrypted.) See also Migrating to SharePoint Online Using the Import Pipeline.