
Adding External Connections When Migrating Nintex Workflows
|
Navigation: How Content Matrix Handles Various SharePoint Components > Nintex Workflows and Forms Migration > Additional Considerations for Nintex Workflows > Adding External Connections When Migrating Nintex Workflows |
In Metalogix Content Matrix it is possible to add a connection to an external database to help with migration actions, such as migrating workflows. Currently this option is only available for Nintex Workflows databases, and is needed when preserving Nintex Workflow database entries, when migrating workflows. After an External Database connection has been made, it can then be attached to a SharePoint site node in Metalogix Content Matrix.
To add an external database connection when migrating Nintex workflows:
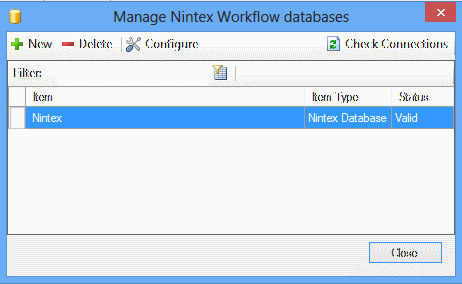
1.In the ribbon toolbar choose Settings > Manage Nintex databases.
The Manage Nintex Workflow databases lists any existing external database.
Note that the Configure option can be used to modify any selected connection's Authentication credentials. The SQL Server and SQL Database data cannot be configured through this option. After the credentials have been modified the connection can be made again.
2.To add a new connection:
a)Click New.
b)Complete the Connect to SQL Server dialog, making sure that you select a valid Nintex database.
NOTE: Currently, Use SQL Server login is the only valid option for an Azure SQL server.
3.If you want to use an encrypted connection to the database, check the Encrypt Connection box.
NOTE: If the certificate used for encryption is not trusted, you will also need to check the Trust Server Certificate box.

To attach Nintex Databases to a SharePoint node:
NOTE: Multiple databases can be attached to a single SharePoint site, and a single database can be mapped to multiple SharePoint sites.
1.In Explorer View, select the SharePoint site to which you want to attach the database.
2.Right-click and choose External Connections > Attach Nintex Workflow Database to display the Nintex Database Picker dialog.
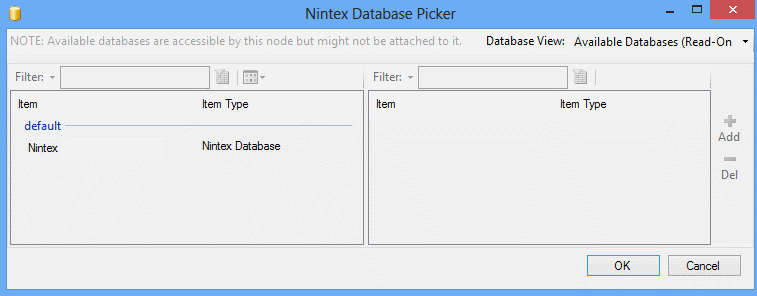
3.From the Database View drop-down, select Attached Databases.
4.Move any databases that you want to attach from the list of available databases in the left pane to the right pane using the Add option. (You can also use the Del option to move an already attached database and make it available again.)
5.Click [OK].
Migrating Nintex Workflows to an On Premises Target
|
Navigation: How Content Matrix Handles Various SharePoint Components > Nintex Workflows and Forms Migration > Additional Considerations for Nintex Workflows > Migrating Nintex Workflows to an On Premises Target |
When migrating Nintex Workflows between SharePoint on premises site collections and sites, if Nintex Features are not activated on the target site collection, duplicate site columns may be created. Therefore, when an option that includes the migration of Nintex workflows is enabled on the Configure Copying Options - Workflow Options tab, Metalogix Content Matrix will check to ensure that Nintex Features are activated on the target site collection(s). If they are not activated, a warning message will display. You have the following options:
·Activate the Nintex Features on the target before the migration.
·Exclude Nintex workflows from the migration.
·Proceed with the migration of Nintex workflows without the features activated on the target.
NOTE: If you chose this option, after migration you will need to activate Ninte Features on the target then fix any duplicate columns issues manually.
Migrating Nintex Workflows to SPO
|
Navigation: How Content Matrix Handles Various SharePoint Components > Nintex Workflows and Forms Migration > Additional Considerations for Nintex Workflows > Migrating Nintex Workflows to SPO |
Metalogix Content Matrix can facilitate the migration of Nintex sites and lists workflows to SharePoint Online. Individual sites and site content can be pasted with ease.
NOTE: Currently, Metalogix Content Matrix does not support Nintex workflow migration if the migration was initiated at the list level.
Prerequisites
·Two configuration keys in ApplicationSettings.xml relate to Nintex workflow migration to SharePoint Online, namely:
§NintexWorkflowsTempStorage: The temporary local path where Nintex workflow-related files will be stored prior to being migrated to SharePoint Online. If the value of this key is not modified, the files will be stored in the default temp folder on the system.
§NintexCleanupWorkflowsTempStorage: The value of this key determines whether or not the temporary storage folder described above will be cleaned after the migration completes. The default setting for this key is True.
·The Nintex Workflows for O365 app must be deployed to target site collections prior to migration.
IMPORTANT: Because this app is deployed at the site collection level and must be present before workflows are migrated, it will be necessary to create first create the site collection on the target, deploy the Nintex app(s), then migrate the content (using the Paste Site Content option).
Supported Actions
For a list of supported Nintex actions available when migrating from SharePoint On-Premises to SharePoint Online, refer to Supported Nintex Actions for SPO Migration.
NOTE: If the workflow contains an action that is not supported, this unsupported action will be created as a comment in the migrated workflow. The comment will contain the name of this unsupported action.
Deploying Nintex Apps to SharePoint Online
|
Navigation: How Content Matrix Handles Various SharePoint Components > Nintex Workflows and Forms Migration > Additional Considerations for Nintex Workflows > Migrating Nintex Workflows to SPO > Deploying Nintex Apps to SharePoint Online |
Before you can migrate workflows (and forms) to SharePoint online you must deploy them to your SharePoint Online tenant to make it available to specified site collections, as described below.
To deploy Nintex apps to SharePoint Online:
1.Sign into your tenant's SharePoint Admin Center using an account that is a Global Administrator.
2.From the left navigation bar, select More Features.
3.Under Apps, click [Open].
4.Select App Catalog.
NOTE: If the App Catalog site does not open, select Create a new app catalog site, and then click [OK]. On the Create App Catalog Site Collection page, enter the required info, and then click [OK].
5.If you do not have Nintex Workflows for O365 or Nintex Forms for O365 as part of your Site Contents, then select Add an App and install the application(s).
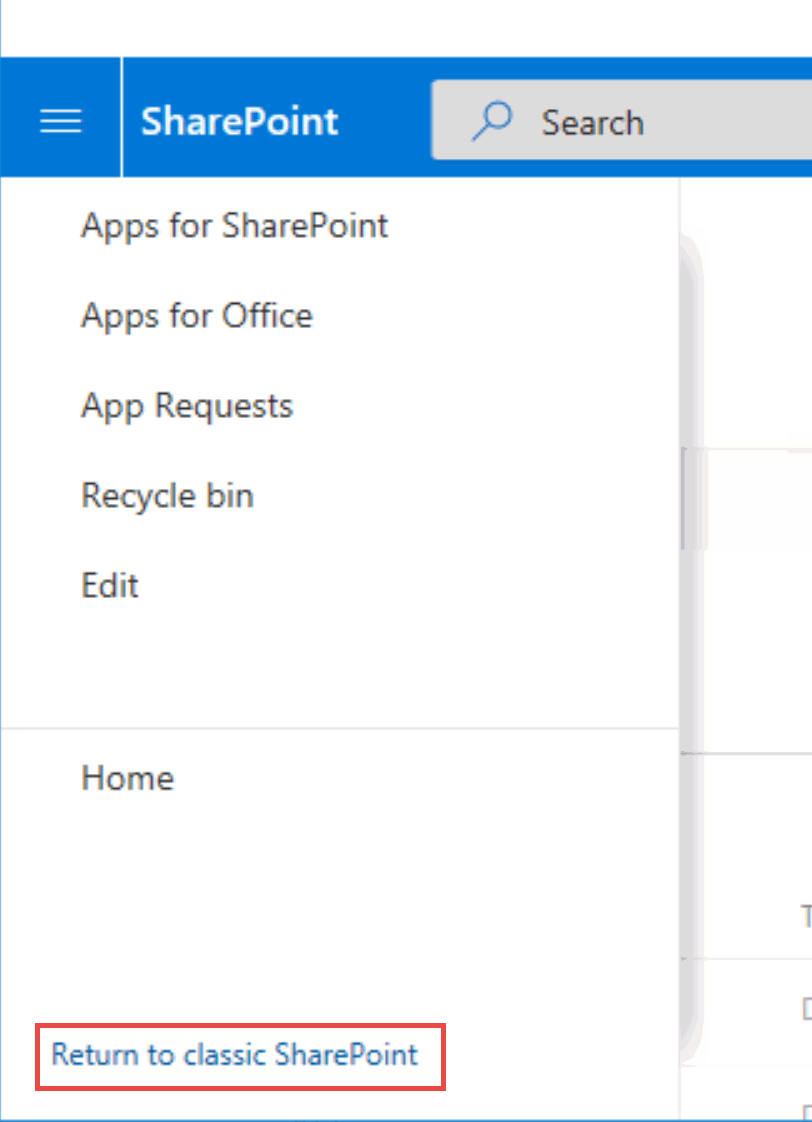
NOTE: Make sure you are in classic view in order to perform the deployment, as deployment cannot be done in modern view.
6.On the Site Contents page, Select the ellipses (...) next to the installed Nintex application, and click on Deployment.
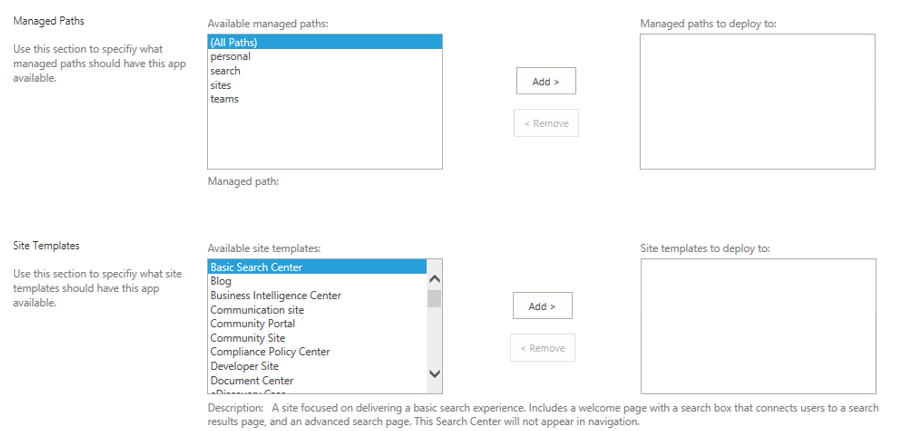
7.On the Manage App Deployments page, enter the site collection URL or select one from the list available, select and add the managed paths to deploy to, and select and add the templates to deploy to.
8.Click [OK] to apply your selections.
9.When asked whether you trust workflow0365.nintex.com click Trust It. This will start the actual deployment.
NOTE: Microsoft is now deploying the Nintex app to your tenant. It may take from a minute to hour(s) depending on the complexity of your site collection structure. Please verify your site collection for apps before starting a migration.