
Deleting SharePoint Objects
|
Navigation: Preparing for a Migration > Deleting SharePoint Objects |
You can delete one or more SharePoint objects via Content Matrix as long as the connection type is not read-only. SharePoint objects that can be deleted via Content Matrix are:
·SharePoint Sites
·SharePoint Lists
·SharePoint Document Folders
·SharePoint Documents
·SharePoint List Items
If the action is not valid for the connection type, it will be disabled.
NOTE: Document versions and list item versions cannot be deleted via Content Matrix.
To delete one or more SharePoint Objects:
WARNING: When this action is used at the site level or below, the object will be deleted permanently (i.e., it will not be sent to the Recycle Bin). However, a pop-up dialog will display that allows you to cancel the action.
1.Select the SharePoint object(s) to be deleted.
NOTE: Depending on the type of object, this may be in the Explorer View or in the Items View.
2.Either:
§Press the Delete key on the keyboard.
§Right-click on the object and choose Delete [Object].
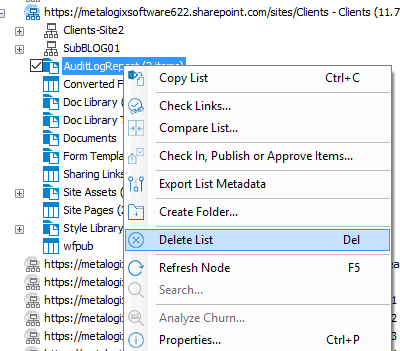
You will be prompted to confirm the action before continuing.
Comparing SharePoint Objects
|
Navigation: Preparing for a Migration > Comparing SharePoint Objects |
Metalogix Content Matrix can compare SharePoint sites and lists for differences, including sites and lists between live sites and database connections. The comparison action lists any new, deleted, edited, or missing items between the two locations, gives the specific location for each file, and identifies the basic nature of the difference(s).
You can, for example, compare a development site with a production site to determine whether the content matches or there are any updated differences between the two.
A compare can be done within SharePoint sites, lists, or folders, but not within items. However, the compare action itself runs down to the item level, and Metalogix Content Matrix shows results for everything under the selected node.
NOTE: A compare is only possible between lists of the same type. For example, two "Shared Documents" lists can be compared, but a "Shared Document" list cannot be compared to an "Announcements" list. This is not the same for sites. Any site type can be compared to any other site type. For example, a "Team Site" can be compared to either another "Team Site" or to a "Publishing Site."

To compare SharePoint objects:
1.In the Explorer View, select the site, list or folder that you want to use as the base for the comparison.
2.Right-click and choose Compare <Object>.
3.In the Compare <Object> dialog, under To, navigate to the site/list/folder that you want to make a comparison with.
NOTE: If you want to change the base location (site or list node) of the comparison, click [+ Show Explorer] to switch to a tree view from which a new comparison base node can be selected. To return to the To tree, select [ Hide Explorer].
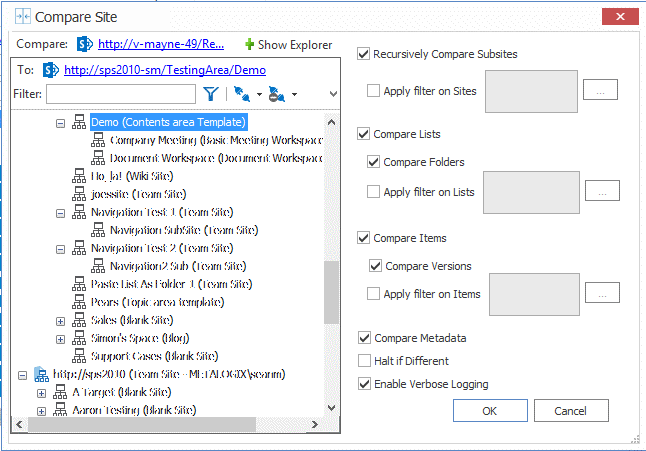
4.On the right side of the dialog, select the appropriate Compare options. Use the information in the following table for guidance.
|
If |
Select |
|---|---|
|
·you are comparing sites AND ·you want all subsites under the selected node to be included in the compare |
Recursively Compare Subsites, and optionally, Apply filter on Sites. |
|
·you are comparing sites AND ·you want all lists under the selected site to be included in the compare (including lists in subsites if the Recursively Compare Subsites option is checked ). |
Compare Lists.
|
|
you want all folders under the selected node to be included in the compare |
Compare Folders, and optionally, Apply filter on Folders. |
|
you want all items under the selected node to be included in the compare |
·Compare Items, and ·optionally, Apply filter on Items. |
|
you want all item versions under the selected node to be included in the compare |
Compare Versions. |
|
you want all item metadata to be included in the compare |
Compare Metadata. |
|
you want the compare action to halt when it encounters and differences between the objects being compared |
Halt if Different. |
|
You want more detailed logging to be taken during the compare |
Enable Verbose Logging. |
5.After all the desired options and filters have been set, click [OK].
A status box displays the progress of the comparison between the selected objects. In the bottom left corner of the status box, results of the compare display, including the number of completions and some differences that may have been detected.
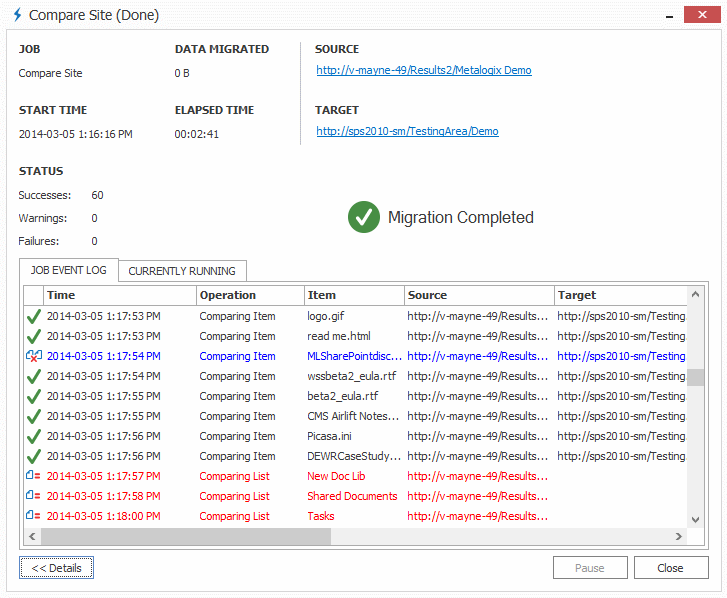
6.To display a live view of the operation log, click [Details>>].
The compare log contains useful information, such as:
§time copied,
§item name,
§item type,
§source and target locations of items,
§status of the item, and
§the nature of the difference(s).
Working with SharePoint Object Comparison Results
|
Navigation: Preparing for a Migration > Comparing SharePoint Objects > Working with SharePoint Object Comparison Results |
Differences in the log are marked, both with color and by icon, which help you quickly determine, at a glance, discrepancies between the base and target sites/lists/folders/items, along with information to help resolve these differences. The significance of icons and color is described in the following table.
|
Item |
Description |
|---|---|
|
Compare Icons | |
|
Green Check mark |
There are no differences between the object(s) on the base and target site/list. |
|
Two boxes with an "X" between them |
The object on the base site/list and the object on the target site/list are different. |
|
An "=" sign with a box on the right |
there is missing content on the target site/list side. |
|
A box with an "=" sign on the right |
There is missing content on the base site/list side. |
|
Compare Text | |
|
Black Text |
The object(s) in the base and target site/list match |
|
Blue Text |
The object(s) on the base and target site/list are different. |
|
Red Text |
The object(s) on the base and target site/list are missing from one side |
To view more detail about an individual object:
1.Select the object for which you want to view detail.
2.Either:
§Double click the object
OR
§Right-click and choose View log item.
NOTE: You can also copy any selected results to the clipboard, and paste them into another application.
To navigate to the source or target location of an object:
1.From the log, select the object to which you want to navigate.
2.Right-click and choose either:
§Navigate > to Source (to display the source-side object in the left side of the Explorer View).
OR
§Navigate > to Target (to display the target-side object in the right side of the Explorer View).
3.When finished with the log, click [Close].
Checking Links
|
Navigation: Preparing for a Migration > Checking Links |
Metalogix Content Matrix can check links within a SharePoint site, list, folder, and item, either before or after a migration.
Unlike Link Correction, which will correct and update links that have been migrated to the target, the Check Links feature runs a check of the links to see if they point to valid URLs inside lists and web parts. Results are returned in an XML file that contains a summary, and lists successes, failures, and flagged links.
The Check Links action can be run on any SharePoint node in the Explorer View tab, regardless of the connection type.
To run a link check:
1.In the Explorer View, select the node whose links you want to check.
2.Right-click and choose Check Links.
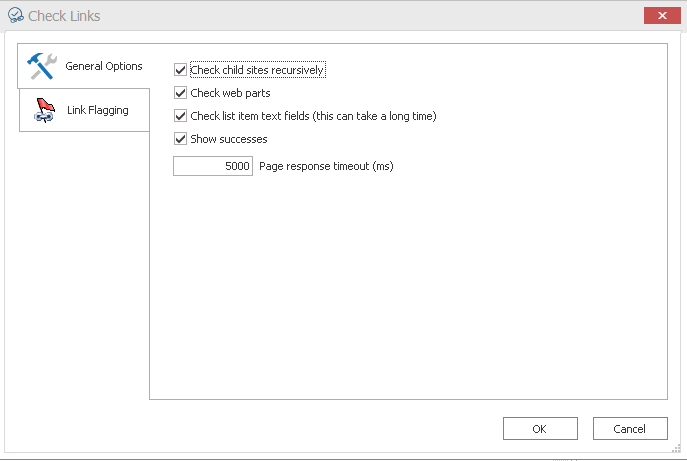
3.Make sure the applicable options on the Check Links General Options tab are selected. Use the information in the following table for guidance.
|
If |
Then make sure the following option is checked |
|---|---|
|
·you are checking links at the site level AND ·you want to recursively check links through any sub sites. |
Check child sites recursively. NOTE: If you uncheck this box, the Check Links action will be performed on the selected site only. |
|
·you are checking links at the site level AND ·You want to check links on web parts, including the links in the web part's properties. |
Check web parts. NOTE: This option is also useful for identifying links you may not have known were present in the web parts. |
|
you want the Check Links action to: ·parse through all of the "text" type fields columns (single line of text, multi-line, etc.) for the selected SharePoint node AND ·run the check on any absolute URLs This check will only work on absolute URLs (such as "http://Metalogix/Production" but it will not work for relative URLs (such as "./Production"). |
Check list item text fields (this can take a long time). If this option is selected, it can significantly increase the amount of time it takes to run the Link Check action. This is because Metalogix Content Matrix will have to parse all the text values, for the included "text" type field columns, and look for links within that content before it can check them. The amount of time taken will be dependent on the amount of data within the text columns. |
|
you want to include successful URL checks in the XML output file |
Show successes. NOTE: If you uncheck this box, only failed or flagged URLs will be included in the output file. |
In addition, you can change the "X" Pages response timeout (ms) value, which represents number of miliseconds after which Metalogix Content Matrix will wait before it considers the URL data request to be failed due to a timeout.
4.If you want to flag URLs based on specified conditions, select the Link Flagging tab.

5.To Add a URL flag to the list:
a)Click [Add].
b)In the Check Link Flags Editor dialog, select a Condition from the drop-down.
c)For Value, enter the string within the URL that should be flagged.

6.For Flag Type, choose how the condition is to be applied. The options are:
§OR - When multiple "OR" conditions are set, only one of them need to be present in the checked URL for it to be flagged. For example, if one condition is "OR Ends with .aspx" and a second condition is "OR Ends with .docx" then the checked link will be flagged if it ends with either ".aspx" OR ".docx" file extensions.
§AND When multiple "AND" conditions have been set, then ALL of these conditions must be met in order for the link to be flagged.
7.Once of the flag conditions have been set, click [OK].
The conditions display in the window.
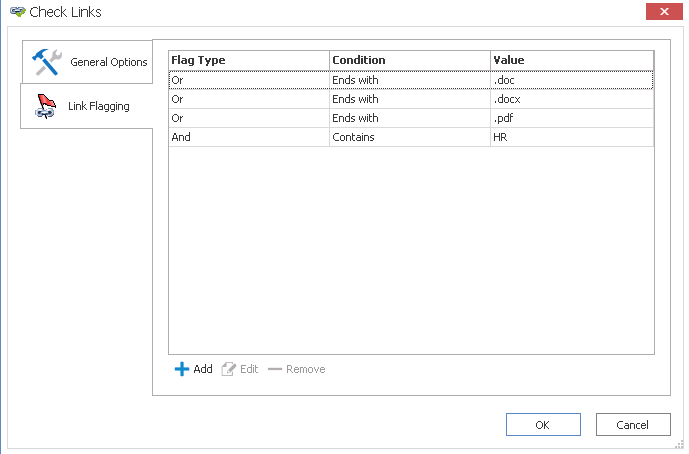
NOTE: You can also Edit and Remove previously created flags.
8.To start the Link Check action, click [OK].
The Link Check will start and a status box will be displayed.
The Log Files can be viewed (in progress or after the migration is finished) by clicking the [Details>>] button. After the action has completed a note will be displayed in the bottom left corner of the dialog stating the number of completions, as well as any warnings or errors that may have been encountered.
Once the check is complete, a dialog window will open giving users the option to view the XML results. Click [Yes] to review the XML log, or click [No] to close the dialog. The dialog window will also display the location of the generated XML from the Link Check.
Additionally, you can access the results log of the resultsd3de at a later date from the Job List section.