
Managing self-service recovery
The Metalogix Backup for SharePoint Self-Service Recovery feature lets SharePoint site collection administrators and other users download SharePoint library items from Metalogix Backup for SharePoint to their hard disk.
Before you can use the Self-Service Recovery feature, the administrator must deploy it and configure the options. After deploying the feature, the site collection administrator of each site collection where the feature is enabled can download backed-up library item files. The site collection administrator can also delegate authority to individual users to download files.
Delegated users can download files from the backup sets that Metalogix Backup for SharePoint creates if both their current permissions for the files and their permissions at the time of the backup allow them to view the files.
See the following topics to manage the Self-Service Recovery solution:
·Steps to deploy the Self-Service Recovery solution
·Steps to repair the Self-Service Recovery solution
·Steps to remove the Self-Service Recovery solution
·Steps to upgrade the Self-Service Recovery solution
·Delegate permission for self-service recovery
|
|
NOTE: Self-Service Recovery is not supported for SharePoint 2019 |

About site collection and SharePoint
Metalogix Backup for SharePoint Self-Service Recovery extends the Metalogix Backup for SharePoint platform to support SharePoint user experience by default. When you create a site collection using a specific SharePoint version, you can select a user experience for that version by selecting version-specific templates.
Look and feel of the SharePoint Self-Service Recovery feature
The Self-Service Recovery feature adopts the new look, feel, and capabilities of SharePoint including transparent dashboards, searching items within filters, and custom background images.
Site collections from different SharePoint versions
Metalogix Backup for SharePoint allows you to deploy the Self-Service Recovery feature inside a Web application, even if the application includes a mix of site collections from different SharePoint versions.
After you activate the deployed solution as a SharePoint feature on the parent Web application of the site collections, follow the steps described below:
1.Login to SharePoint and go to the Central Administration page.
2.From the top right corner, click Settings 

3.The Site Settings page opens.
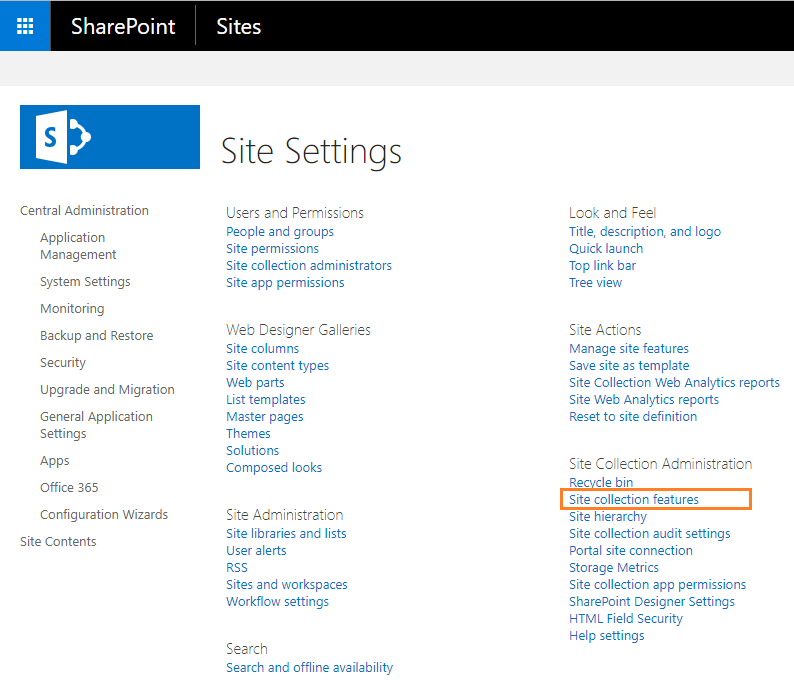
4.Click Site collection features. The Site Settings - Site Collection Features page opens.
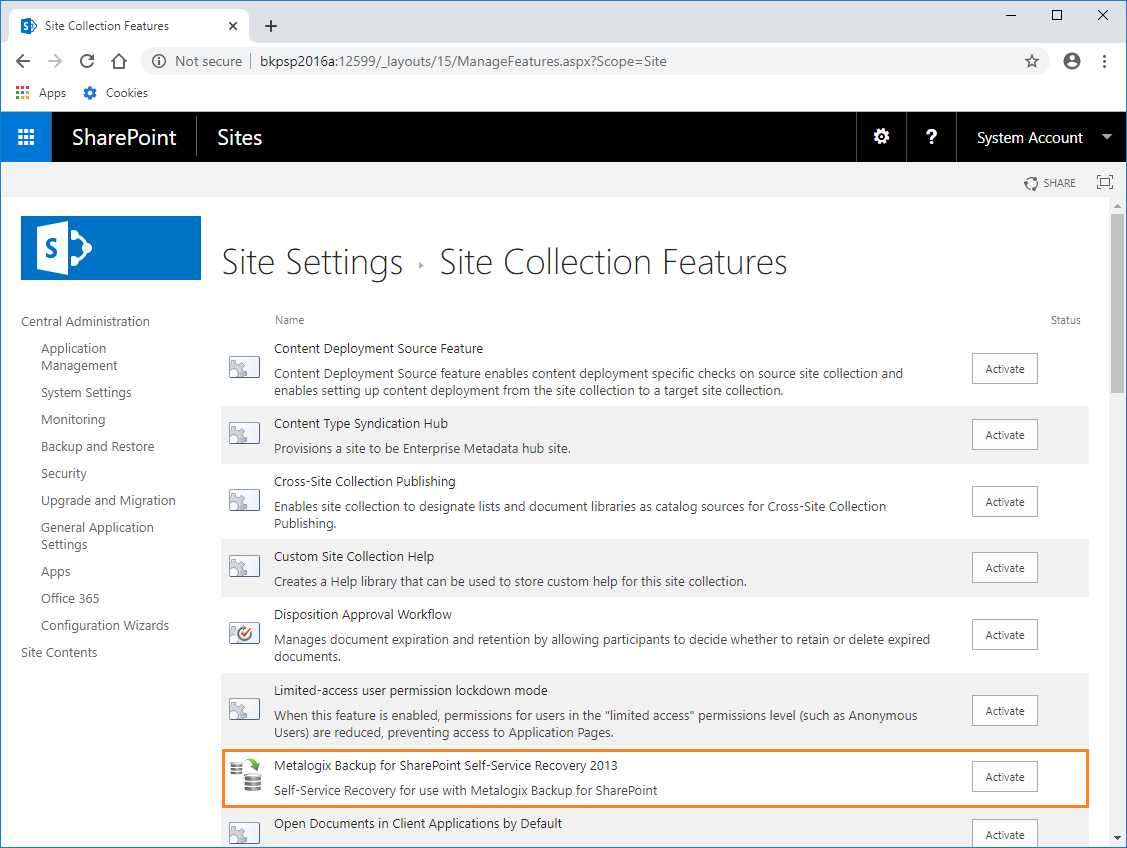
5.Click Activate to activate the Metalogix Backup for SharePoint Self-Service Recovery solution.
Deploying the Self-Service Recovery solution
The user must have adequate SharePoint permissions to access the library items. In addition, the user must have had adequate SharePoint permissions to access the item when it was backed-up.
When you deploy the Self-Service Recovery feature, Metalogix Backup for SharePoint does the following automatically:
·Copies the Self-Service Recovery SharePoint Solution package (.WSP file) to the SharePoint Farm Solution store.
·Deploys the solution to the Web application that is the parent of any site collections that you specify.
·Activates the deployed solution as a SharePoint feature on the site collections.
The Self-Service Recovery feature is optional. You do not have to deploy it to use Metalogix Backup for SharePoint. You should deploy the Self-Service Recovery feature on every site collection where you want to use it.
Steps to deploy the Self-Service Recovery solution
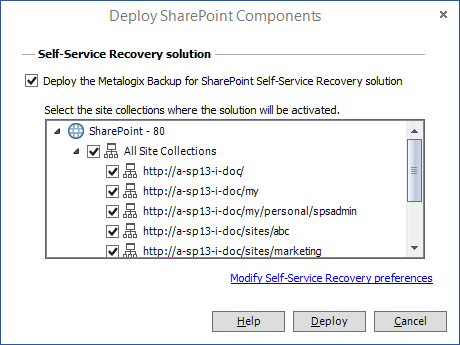
1.Open the Management Console.
2.OPTION 1
a.From the Management Console workspace selector click either Farm backup/Restore or Granular Restore.
b.From the Farms tab, click Deploy SSR. The Deploy SharePoint Components dialog appears.
OPTION 2
a.From the Management Console workspace selector click Configuration.
b.From the Configuration tab, click Deploy SSR. The Deploy SharePoint Components dialog appears.
3.From the list of site collections, select the site collection where the solution will be activated.
|
|
NOTE: To provide granular control, the Self-Service Recovery solution is installed as a common feature for the entire SharePoint farm. You can manually activate or deactivate the solution for each site collection. |
4.Verify that the Deploy the Metalogix Backup for SharePoint Self-Service Recover Solution check box is selected.
5.Click Deploy. Otherwise click Cancel to exit the deployment.
6.If the deployment is successful, a confirmation dialog appears indicating the success of the deployment.
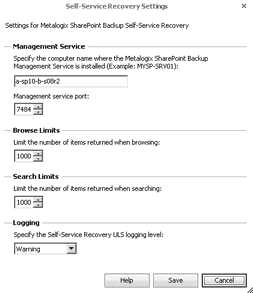
Configuring the Self-Service Recovery settings
Use the Management Console to configure the following settings for the Self-Service Recovery feature:
Management Service host name
You can specify the name of the Management Service host that the Self-Service Recovery feature should access. If you change the Management Service host name, the Self-Service Recovery feature uses backups from that Metalogix Backup for SharePoint deployment. If that Metalogix Backup for SharePoint does not backup the site collection, no content appears in the Self-Service Recovery feature in the site collection.
When you specify the Management Service host name, you can use any of the following formats:
·DNS name
·Fully-qualified name
·NetBIOS name
·IP address
Management Service port
The port that the Self-Service Recovery feature should use to contact the Management Service. You should ensure that your network configuration allows the Self-Service Recovery to use this port in order to access the Management Service. If you change the Management Service port here, you must also change the Management Service port on the Management Service.
Number of items that appear when you browse backed-up content
You can specify how many items appear in the Self-Service Recovery feature when you browse the backed-up content. The more items that appear in the list, the longer it takes SharePoint to display the page.
Number of items that appear when you search for content
You can specify how many items appear in the Self-Service Recovery feature when you search for backed-up content. The more items that appear in the list, the longer it takes SharePoint to display the page.
The ULS logging level that Self-Service Recovery uses
When it encounters an error, the Self-Service Recovery feature logs the error to the SharePoint Unified Logging System (ULS) logs. You can specify the level of the content added to the ULS logs. You can select one of the following log levels:
·Undefined
·Exception
·Critical
·Warning
·Informational
When you select a level, items of that level and more serious are added to the ULS logs.
To configure the Self-Service Recovery settings
1.Open the Management Console.
2.OPTION 1
a.From the Management Console workspace selector click either Farm backup/Restore or Granular Restore.
b.From the Farms tab, click Deploy SSR.
OPTION 2
a.From the Management Console workspace selector click Configuration.
b.From the Configuration tab, click Deploy SSR. The Deploy SharePoint Components dialog appears..
3.One of two Deploy SharePoint Components dialogs appear.
a.If the Self-Service Recovery solution is being deployed then the Deploy SharePoint Components dialog for a deployment appears.
b.If the Self-Service Recovery solution has already been deployed then the Deploy SharePoint Components dialog for an update appears.
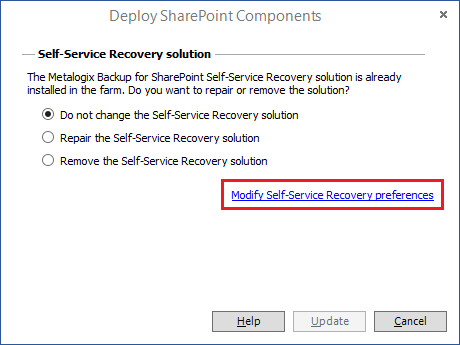
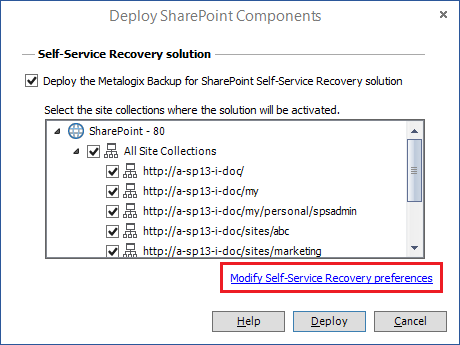
4.Click the Modify Self-Service Recovery preferences link.
5.In the Self-Service Recovery Settings window, configure the settings, then click Save.
6.In the Deploy SharePoint Components window, click Cancel.