
Automation and Importing Data
Summary
This tutorial teaches you how to automate the task of importing data into a database. You will build a script that uses the Import Wizard activity. First, the tutorial teaches you how to create three different Import Wizard templates, and then how to automate them.
In this tutorial you will learn:
- How to create an Import Wizard template that imports data from one of the following:
- an Excel file
- multiple files at one time
- from one database to another
- How to use the Import Wizard activity in Automation
You will need:
- A sample database
- An Excel file containing data that you want to import into your sample database
-
Multiple files containing data that you want to import into your sample database
Note: The files must be in the same folder and have the same file extension and the same configuration (same number of columns, same data types, etc.).
- data in a database that you want to import into your sample database

Introduction
At times you may need to import data into a database, such as a production database
For this tutorial, you will want to use a sample database or a sandbox area.
Create Import Wizard Templates
You will begin by creating three different Import Wizard templates. Each one imports data from a different source and can be used in a separate Automation script.
Template 1: Import Data from a File
-
Connect to your sample database (or the database into which you want to import the data).
Note: The Import Wizard automatically uses the currently-active open database connection. So, if you have multiple database connections open, you must select the database into which you want to import data as the active connection before opening the Import Wizard.
- Select Tools | Import Export Data | Import Wizard to open the Import Wizard.
- Click Next on the Welcome page.
- On the Import File page, click Add File.
- Browse to and select your Excel file containing the data you want to import into your sample database.
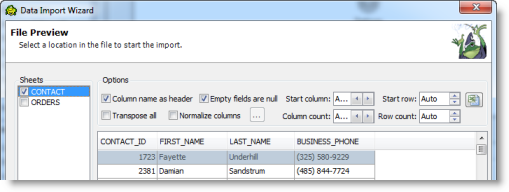
- On the File Preview page, you can specify some import options, for example:
- Select Column name as header to use the column names from the file.
- Select Empty fields are null to treat empty fields as null when the data is entered into the database.
- Use the Start column and Start row fields to specify where in the file your data starts.
Select the sheet to import and specify the import options, then click Next.
- On the Define Columns page, remove or add columns using the following methods:
- To remove a column, select the column and click Remove.
- To add a column, click Add. Then manually enter a name for the column or select one of the naming options.
Click Next when finished.
- On the Select Target page, choose a table into which you want to import the data. Select from the following:
- A single existing table—Allows you to select an existing table in your sample database.
- A single new table—Allows you to create a new table by manually entering a new table name. Toad automatically enters the data type for each column, however, you can manually edit the data type.
Click Next when finished.
-
On the Import File page, click Next.
Note: If you have additional files from which you want to import data, click Add File on the Import File page and then specify import, column, and target options. Repeat the process for each file.
-
On the Save Settings as Template page, select the Save template option to save your Import Wizard settings as a template.
Click
to select a location and name for your new template. You will use this template with the Import Wizard activity later in this tutorial.
- Deselect the Import Data now option. In this example, the purpose of using the Import Wizard was only to create a template. Select this option if you want to test the import now.
- Click Finish to close the dialog.
- To start building your script using your new Import Wizard template, skip ahead to Build Script.
Template 2: Import Data from Multiple Files
In this template you will use multiple files (located in one folder) as your data source. Using this option of the Import Wizard allows you to select all files of the same file type and the same configuration (same number of columns, same data types, etc.) in one folder. You can also narrow your selection by file name or date modified. This is very useful if you need to import data from a large number of files.
-
Connect to your sample database (or the database into which you want to import the data).
Note: The Import Wizard automatically uses the currently-active open database connection. So, if you have multiple database connections open, you must select the database into which you want to import data as the active connection before opening the Import Wizard.
- Select Tools | Import Export Data | Import Wizard to open the Import Wizard.
- Click Next on the Welcome page.
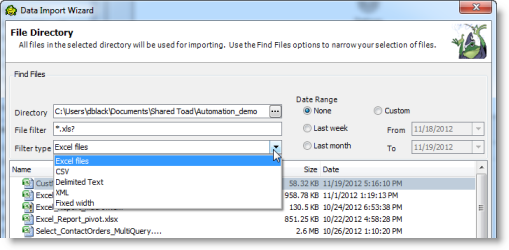
- On the Import File page, click Add Folder.
- On the File Directory page, browse to and select a folder.
- Toad will use all files in the folder for importing data. If you want to narrow your selection of files, use one or more of the following options:
- File filter—Use this field to filter by file name (including file extension) or partial file name using a string and wildcard characters.
- Filter type—Filters the list by file type. Select a file type from the drop-down list.
- Date Range—Filters the list by date range (date modified).
Note: The filters you select are applied at execution time, so Toad uses the most-current files in the directory, including new files that match the filter criteria.
Click Next when finished.
-
On the File Preview page, specify the import options (see Template 1 for more details). Click Next when finished.
Note: The import options you specify will be used on each and every file. That is why each file must have the same configuration.
- On the Select Target page, choose an existing table into which to import the data, or create a new table (see Template 1 for more details). Toad imports the data from all files into the table. Click Next when finished.
- On the Import File page, click Next.
-
On the Save Settings as Template page, select the Save template option to save your Import Wizard settings as a template.
Click
- Deselect the Import Data now option, or select this option if you want to test the import now.
- Click Finish to close the dialog.
- To start building your script using your new Import Wizard template, skip ahead to Build Script.
Template 3: Import Data from a Database
In this template you will import data from one database to another database. The databases can be similar or different platforms. For example, you could import a table from an Oracle database into a SQL Server database. The Import Wizard handles creating the table and columns in the SQL Server database.
-
Connect to your sample database (or the database into which you want to import the data).
Note: The Import Wizard automatically uses the currently-active open database connection. So, if you have multiple database connections open, you must select the database into which you want to import data as the active connection before opening the Import Wizard.
- Select Tools | Import Export Data | Import Wizard to open the Import Wizard.
- Click Next on the Welcome page.
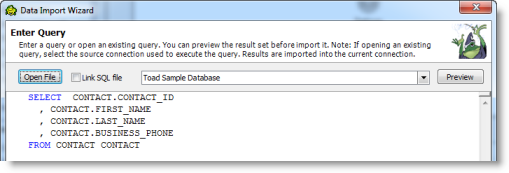
- On the Import File page, click Add Query.
- On the Enter Query page, select the database connection you want to query against.
-
Enter a query in the editor box or click Open File to select a file.
Notes:
- The wizard executes the query against the database you specify here on the Enter Query page. But the data is imported into the currently-active database connection (see step 1).
- It is a good idea to fully-qualify your SQL.
- Click Preview to see a preview of the data. Click Next.
- On the Select Target page, choose an existing table into which to import the data, or create a new table (see Template 1 for more details). Click Next when finished.
- On the Import File page, click Next.
-
On the Save Settings as Template page, select the Save template option to save your Import Wizard settings as a template.
Click
- Deselect the Import Data now option, or select this option if you want to test the import now.
- Click Finish to close the dialog.
Build Script
Now build a script using one of the Import Wizard templates you created.
- Select Tools | Automation to open a new Automation window.
- Click the Import Wizard activity to add it to the Automation design window.
- On the Activity Input tab, in the Import Template field, click
- (Optional) To import data into a database connection that is different from the one selected in the template, select the Use Automation Connection option and select a connection from the list.
-
Click
Create a Template Using the Import Wizard Activity
As an alternative method, you can use the Import Wizard activity to create your template. To do this, add the Import Wizard activity to your script. In the activity, click 
Troubleshooting
Varchar Field
Background: When using the Import Wizard, if you choose to import data into a new table, Toad reads the first 1000 rows and uses this data to assign the data types that you see displayed on the Select Target page. If your data includes a VARCHAR field, Toad assigns a VARCHAR length based on the longest VARCHAR entry in the first 1000 rows of that column.
Issue: If your full data includes a VARCHAR entry that exceeds the length assigned by Toad, you will encounter an error when importing the data.
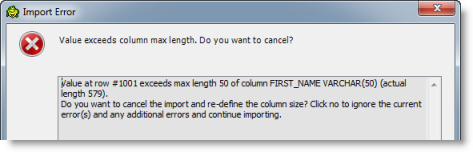
If the Import Wizard template is part of an Automation script, the script will fail to import that data value.
Workaround: If you know the length of your VARCHAR field, when creating the Import Wizard template, on the Select Target page, manually edit the data type to reflect this length. Or, if the template or script errors, open the Import Wizard template and modify the data type to reflect this length.
Schedule A Script
See Schedule Your Script to learn how to schedule the Automation script.
Note: See Import Data for more information about using the Import Wizard.