
Automate Sending Email
Summary
This tutorial teaches you how to automate the task of sending an email, either to distribute a report or as a notification of script execution.
In this tutorial you will learn:
- How to use the Send Email activity in Automation
- How to use a file as the source for the body of an email
You will need:
- A sample database
- A query or query file

Note: Toad Automation supports only SMTP email transmission.
Introduction
The Send Email activity is an important activity in Automation. Most Automation scripts end with a Send Email activity, for example, whenever you need to share reports with end-users or send a notification of successful script execution.
Create Script
- To get started, connect to your sample database.
- Select Tools | Automation to open a new Automation window.
- Click the Select to File activity to add it to the Automation design window. You will use this activity to create a file to be used as an email attachment later in this tutorial.
- Enter a SQL query or select a SQL file. (If you are entering a SQL query, you must first deselect Link to SQL file.)
- Select Excel in the Type field in the Export to File section.
- Click
in the Name field. Select a location and file name for your output file.
- Click the Send Email activity to add it to the Automation design window just after the Select to File activity.
-
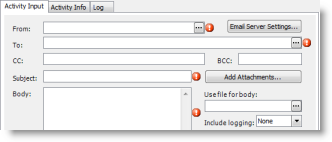
Take a look at the Activity Input tab. The fields tagged with a red exclamation mark are required fields.
-
In the From field, click
Note: If you encounter a security alert message from your email application, and you want to use this auto-populate feature, grant Toad access (at least temporarily).
- In the To field, enter an email address or click
- Click Email Server Settings to enter information about your email server. This step is also required.
-
Enter the address of your SMTP email server, or click
- Enter the port number if other than 25. And enter your credentials if using an SSL or TLS connection.
-
- In the Subject field, enter a subject line, and in the Body text box, enter a message.
-
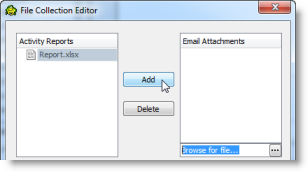
Click Add Attachments to attach one or more files to the email. The File Collection Editor opens and displays the list of files that your script creates in the activities that precede this one. In this case, the output file you specified in the Select to File activity is listed.
- Select the output file generated by the Select to File activity and then click Add to add it to the list of attachments. (You can select multiple files if necessary.)
- You can also click
- Click OK when finished.
-
Click
- After the script executes, verify that you received the email, including the message and the attachment.

Use File for Email Body
You can use a file as the body of your email instead of entering a message in the text box.
- To demonstrate this, in your current Automation script change the file type of the Select to File activity output to HTML, and then use this file as the body of your email.
- Click the Select to File activity in the design window to select it.
- In the Activity Input tab, select HTML in the Type field in the Export File section.
- Click Run to save and run your script. This creates the HTML file so you can select it in the Send Email activity.
- Select the Send Email activity in the design window.
-
In the Activity Input tab, in the Use file for body field, click
Note: The Select File dialog opens with the HTML file type selected. To select other types of files, change the file type.
-
Click
- After the script executes, verify that you received the email, and verify that the email body is generated from your source file.
Tip: If you want to use a form letter as the body of your email, you can create a form letter template and then use the Find and Replace activity to change the placeholder text to suit the purpose of your email. See Automate Find and Replace for more information.
Send Email on Error
With any script, you can instruct the script to send an email if an error occurs.
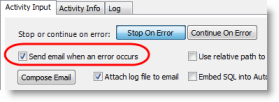
- Using your current Automation script, select the Settings icon in the Automation design window.
-
In the Activity Input tab, select the Send email when an error occurs option.
-
Then click Compose Email to configure the error email settings.
- Enter a To and a From email address or click
-
Click Email Server Settings to enter information about your email server.
Note: After configuring Email Server Settings in script Settings for the first time, Toad saves this information as the default values for the Send Email activity and error emails in all subsequent scripts.
- Enter a message in the Body field and click Add Attachments to attach files to the email.
- Click OK when finished.
- Enter a To and a From email address or click
-
It is also a good idea to select the Attach log file to email option for your error emails. This allows you to see any error messages and assists in debugging the script.
If you do get an error, it is also a good idea to change the Logging level for the error email log to Verbose. This allows you to get more detail in the log about the error and may be helpful to use if you post a question about your error in the Toad Data Point forum on Toad World.
The Send Email activity is a very useful activity. Including it in your Automation scripts is easy, and you may find that it proves to be an integral part of every script.
Schedule A Script
See Schedule Your Script to learn how to schedule the Automation script.