
Object Explorer
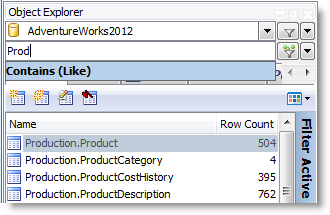
You can view database objects for the current connection with the Object Explorer. This feature is useful for dragging and dropping database objects into an open Editor, Query Builder, or other document window. Right-click the objects in the Object Explorer to access additional features such as multiple tasks and actions.
To open the Object Explorer
- Select View | Object Explorer.
-
Review the following for additional information:
Schema (first field)
Select the schema you want to view. You can filter the list of schemas that display. See Filter Databases and Objects for more information.
Object Filter (second field)
You can quickly set a filter in this field. To do so, enter a name or partial name of an object and press ENTER. Any advanced object filters you set display in this field.
You can also perform advanced filtering based on case sensitivity, statistics, or other options. See Filter Databases and Objects for more information.
Tip: You can enable an option to filter using regular expressions in Tools | Options | Explorer | General.
Note: For tables and views, the columns, data types, and comments display at the bottom of this window.
Tips:
- To navigate to a previously selected object, click
. You can also click
to move to the next selected object.
- To locate objects including procedures, functions, views, variable names and comments in an object's source code, use Object Search. See Search for Objects for more information.
- To use a different method to select objects such as tabs, drop-downs, or a tree view, click
.
- To generate reports, export data, create SQL statements, or send objects to the Project Manager, SQL Modeler, or Master Detail windows, right-click the objects and select an option.
- To open the Background Processes window and cancel a query, click the progress bar at the bottom of the window.
Filter Databases and Objects
Toad allows you to filter the list of databases or objects that display in the Object Explorer. You can use filters to reduce the number of databases and/or objects to work with.
Types of Filters
You can create a Quick filter by entering a search string in the object filter field. You can also use the Filter dialog (click 
| Filter Type | Description | Behavior |
|---|---|---|
| Quick (unnamed) |
Can be used to quickly filter objects for a single connection or schema. Create a Quick filter by entering a search string in the object filter field. |
Applies to the current schema (or to objects in the current schema) only. Once applied, a Quick filter is in effect on that connection when you reconnect or relaunch Toad. Because Quick filters are not named, they cannot be applied to other connections by selecting from the filter list. You must recreate the Quick filter for each connection/schema. |
| Detailed (unnamed) |
Use like a Quick filter, but add more detail by using the Filter dialog to enter filter criteria. Use this method to create an unnamed database filter. |
-- same behavior as a Quick filter -- |
| Named | Create and save named filters to reuse and to apply to other connections |
Once applied, a Named filter is in effect when you reconnect or relaunch Toad. Can be re-used on other connections of the same data source type (DBMS). |
Note: If you rename a table that has a filter defined, it results in an orphaned filter. Orphaned filters are automatically removed unless you used a tool other than Toad to remove them.
Before Creating a Filter
A filter is associated with a specific list of objects from a specific database. Consider the following guidelines when setting filters:
-
A filter applied to a set of objects such as tables in one specific database connection is not automatically applied to the list of objects in another database connection.
-
A filter applied to a list of tables on one schema in the database is not automatically applied to the list of tables for a different schema in the same database.
-
A filter set for a specific schema or object is applied when altering objects, using the SQL Editor, Master Detail Browser, etc., for that schema or object.
Tip: To apply any currently-set filters to the code completion list in the editor, select the Apply explorer filters option in Tools | Options | Editor | Code Completion.
Create Filters
To create a Quick filter (objects only)
-
Enter a search string to use for filtering in the object filter field (below the database field) in the Object Explorer.
Note: As you enter a search string, the currently specified Search Condition displays in a blue banner below the object filter field. This Search Condition will be used in your filter. To change the Search Condition, click
To create a Detailed filter
- Click
-
Specify criteria for the filter in the Properties tab. Review the following for additional information:
Search String Enter a text string and search characters to use for filtering. Search Condition Select a search type to use in this filter.
Note: You can set a default value for this field in Tools | Options | Explorer | General. If you don't specify a default value in Options, this field defaults to the search type you specified the last time you created or modified a filter (includes previous sessions).
Tip: To include in your text string certain characters normally used in search logic, such as the underscore (_), use one of the following Search Conditions:
- Contains (Exact)
- Starts With (Exact)
- End With (Exact)
Case Sensitive In DB2 connections, this property is set to True by default.
- To create custom SQL, select the SQL tab and then select the Enable custom SQL option. Modify the existing SQL. (The existing SQL reflects the criteria you specified in the Properties tab).
- Select the Preview tab to review the list of databases or objects that are selected based on your filter criteria.
To create a Named filter
- Click
- Enter a name for the filter and click
. Creating a name for the filter allows you to use it on other database connections.
Creating a new Quick filter from a current filter
- If you apply a filter and then enter a search string into the object filter field without completely clearing the current filter in the field, the new search string is applied, as well as the properties specified for the old filter.
-
If you apply a filter and then completely clear the object filter field before entering a new search string, all properties return to the default values.
Note: The Search Condition also returns to the default value. This default is either the Search Condition you specified the last time you created or modified a filter or it is the new default you specified in Options.
Use Filters
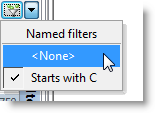
To use Named filters
- To apply a Named filter, click the down-arrow beside
-
To clear a Named filter, click the down-arrow beside
and select <None>.
-
To determine if a filter is applied, observe the filter icon.
Icon
Indicates
No filter is applied (all databases/objects display).
A filter is applied.
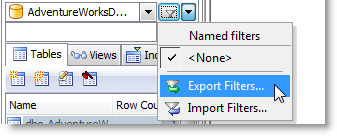
Import/Export Filters
You can export all named filters and you can export all filters defined for the current connection.
-
To export Named filters or all filters defined for the current connection, click the down-arrow beside
- To import filters previously exported from Toad, click the down-arrow beside
Tip: Click 
Understand a Table Using the Database Explorer

|
Scenario You need to build a query listing customers and want to know more about the table before writing the query. Note: This exercise uses the Toad Sample Database. This connection does not have the relationship and script tabs. The tabs available can differ depending on the type of connection. |
Note: This topic focuses on information that may be unfamiliar to you. It does not include all step and field descriptions.
To understand a table using the Database Explorer
-
Connect to the Toad Sample (Access) database in the Navigation Manager.
- Right-click the CONTACT table and select View Details.
- View information for the following:
- Click the Indexes tab and view the index information.
- Click the Primary Keys and Foreign Keys tabs to view relationships.
- Click the Data tab.
-
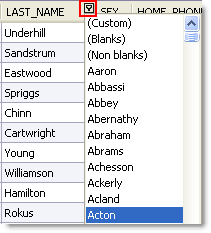
Place the cursor over the LAST_NAME column, click
The only row that now displays is the one with Acton as the last name.
- Click
- Click the CONTACT_ID column to sort the rows in ascending or descending order.
-
Click
-
Create the following filter in the Where Clause tab:
CONTACT_ID > 2000
The filter string displays at the bottom on the grid. Click
to remove the filter.
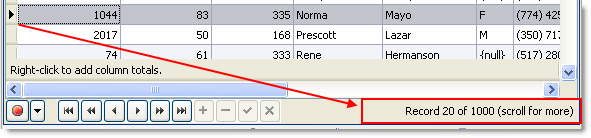
-
Select a row of data in the grid. Notice that the row number changes in the bottom right of the status bar:
- Under the SEX column, right-click the area below the last row in the grid that says "Right-click to add column totals" and select Count. The total number of rows that have either a M or F value display.
- Click
- Click
-
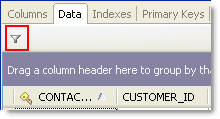
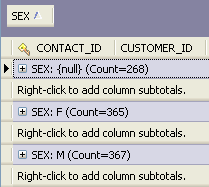
Select the SEX column header and drag it the area above the columns that says "Drag a column header here to group by that column":
You can expand each group to view the row data.
- Switch the default view:
- Right-click within a group or row on the grid and select Show | Card View.
- Scroll through some records.
- Click Customize in the Card View window.
- Click Filter beside the ADDRESS_ID column and select 100. Notice how the card view is filtered, but not the grid view.
- Close the Card View window.
- Edit a row:
- Select a row in the FIRST_NAME column and edit the value.
- Press ENTER to update the row.
-
Go to the BIRTH_DATE column and use the date picker to change the date.
Each data type have an appropriate editor.
Note: If you are using Oracle or a database that does not have auto commit on, you will need to press Commit at the left hand bottom of the window.
- Update the number of rows in in the data:
- Select Tools | Options | Database | General from the menu.
- Enter 50 in the Number of rows to initially fetch in data tab.
- Click OK.
-
Press F5 in the data grid. Notice the bottom right status bar now says "1 of 50 (scroll for more)".
The option you set controls the number of rows fetched in the Data tab.
- Click the scrollbar and hold down to retrieve more.
- Right-click the grid and select Read All Rows.
Search for Objects
You can quickly locate an object rather than browsing through a list of objects in the Database Explorer orObject Explorer. Object Search locates the following:
-
Names of objects for a string.
-
Text in objects that include source code, which typically includes procedures, functions, triggers, data types, and views. However, the database provider determines which objects include source code.
-
Variable names and comments in the object's source code.
-
Column names for tables and views.
To search for objects
- Click
on the toolbar (F4).
-
Specify search criteria and click Search.
Note: To append additional search results to the current search, click Append instead. If you click Search, new results replace the previous search results in the data grid.
Tips:
-
To remove objects from the search results, right-click the objects in the data grid and select Remove Items. This is useful if you want to narrow the list of results to relevant objects.This does not remove the objects from your database.
-
To create a DDL script from the search results, right-click the data grid and select Create DDL Script. You can then paste the results into the Editor.
-
To perform any actions available for the object, such as creating, altering, dropping, exporting, and generating reports or SQL, right-click the results in the data grid and select an option.