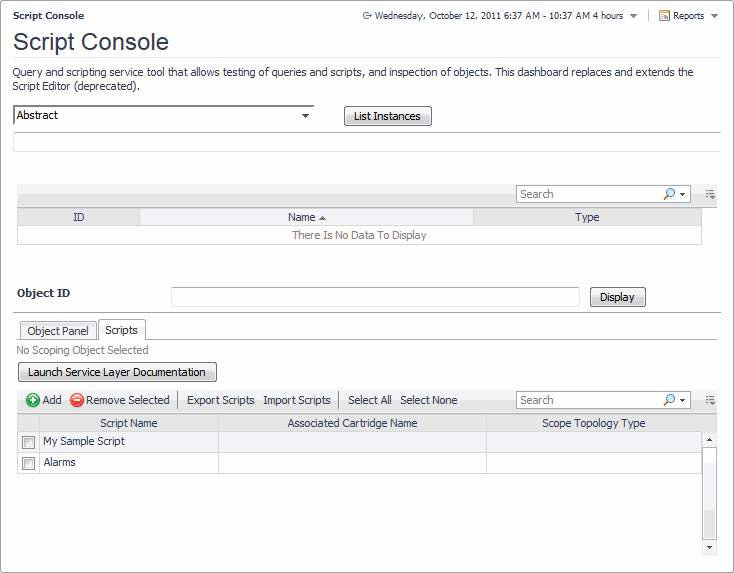
In some cases, you may be required to run scripts, at the request of Quest Support, or for other maintenance functions. You can use the Script Console dashboard to test sample scripts. This dashboard is accessible to users with the Administrator and Cartridge Developer roles only. To access this dashboard, from the navigation panel, click Dashboards > Administration > Tooling > Script Console.
|
a |
In the Foglight login page, in the User box, type your Foglight user name. |
|
b |
In the Password box, type your Foglight password. |
|
c |
Click Login. |
|
• |
If your Management Server has a valid license, the Welcome to Foglight or the Environment Overview page appears in the browser interface. |
|
• |
If your user account includes the Administration role, in the Unlicensed Server View, click Install a License. In the Manage Licenses dashboard that appears, install the license for the Management Server. For more information, see Install licenses. |
|
• |
The Management Server supports integration with external LDAP directories. In a Kerberos-based environment, such as Microsoft® Active Directory®, most web browsers can authenticate users against the web server using their current credentials.
When this feature is configured, if you log in to a machine running a Windows® OS and then log in to the browser interface, the Management Server uses your Windows account credentials to authenticate you as a Management Server user.
Complete the following configuration steps to enable the Windows single sign-on (SSO) feature:
If you were using the VSJ SSO that was provided in earlier versions of Foglight, you must also migrate your settings to the Windows OS-based SSO. For more information, see Migrate to Windows SSO from VSJ SSO.
Microsoft® Active Directory® provides a directory service supporting the Lightweight Directory Access Protocol (LDAP), and a Kerberos KDC (key distribution center) to authenticate users. It allows organizations to share and manage information about users and network resources. When properly configured, Active Directory® provides an SSO environment that can be integrated with the standard Windows® OS desktop login.
|
TIP: When setting up the Kerberos Service Principal Name (SPN), use the following instructions to create mappings between the user account and SPNs, and to create a keytab file to configure in krb5‑auth.config. For example: ktpass -princ HTTP/<fmshost.example.com>@REALM -mapuser "<domain>\<user>" -pass <password> -out <keytabFilePath> And: Use setspn to set up the mapping for just the host name. For example: setspn -A HTTP/<fmshost> <user> |
|
NOTE: Duplicate SPNs cause Kerberos authentication to return an NTLM token and fallback to Form authentication. To search for duplicate SPNs: setspn -X -F If you locate duplicate SPNs for “HTTP/<fmshost>”, you can remove them with the following command: setspn -d HTTP/<fmshost> <user> |
Foglight provides SSO for the Management Server using Active Directory® as its identity store. It includes an enterprise-wide method of identification and authorization that can be administered in a consistent and transparent manner. This method allows users to access only those Management Server components for which they are authorized.
Enabling the Windows® SSO feature in Foglight requires the configuration of the following components:
|
The Active Directory® service principal. | |
|
Include the Active Directory® Domain name in the user principal name. | |
|
By default, the server gets the LDAP URL from krb5.config (see the Krb5ConfigFilePath property). This property can be used to override that value. The domain name must be set as lowercase ASCII. | |
|
AdditionalContextParameters = { | |
|
UserQueryFilter = "(&(objectClass=user)(sAMAccountName={0}))"; NOTE: If this property is not set, the default setting is: UserQueryFilter ="(&(objectClass=user)(sAMAccountName={0}))" | |
|
For example, to import direct groups: GroupQueryFilter = "(&(objectclass=group)(member={0}))"; For example, to import all nested groups: GroupQueryFilter = "(&(objectclass=group)(member:1.2.840.113556.1.4.1941:={0}))"; |
|
NOTE: The first KDC in krb5.conf will be used as the LDAP server for the related domain by default. If that is not appropriate you should configure LDAP URLs for each of their domains relevant to Foglight SSO in the LDAPURLOverides element in krb5-auth.config. |
|
IMPORTANT: Only Microsoft® Internet Explorer®, Google Chrome™, and Mozilla® Firefox® browsers can be configured to support SPNEGO authentication currently. |
|
3 |
|
4 |
Scroll down to the Security section. Select the option: Enable Integrated Windows Authentication (requires restart). |
|
5 |
|
• |
|
7 |
Select Local Intranet > Custom Level. |
|
8 |
Select the Security Settings > User Authentication option for Automatic logon only in Internet Zone option. |
|
1 |
From the Start menu, open the Control Panel. |
|
2 |
Select Internet Options. |
|
3 |
Select the Security tab. |
|
4 |
Click Local Intranet > Sites > Advanced. |
|
5 |
|
6 |
Click OK to close all the dialog boxes. |
|
3 |
In the address bar of a blank tab, type about:config. |
|
5 |
In the Filter field, type: negotiate. Locate the entry network.negotiate‑auth.trusted‑uris. This entry is used to configure the sites that are permitted to engage in SPNEGO authentication with Firefox. |
|
6 |
Double click network.negotiate‑auth.trusted‑uris. |
|
8 |
Click OK to close the dialog box, and restart Firefox to enable the new configuration. |
|
1 |
Make a backup of the vsj.properties file before you upgrade Foglight. You can find this file in the following location: <foglight_home>/server/default/deploy-foglight/console.war/WEB-INF/vsj.properties |
|
3 |
|
4 |
Edit the krb5-auth.config file to set the properties described in the following table. |
|
5 |
After you configure Windows® SSO, log in to your Active Directory® domain, start your web browser, and navigate to the Foglight browser interface. You are no longer required to provide your user name and password on the login page. The Management Server now uses your Kerberos credentials to log you in to the Foglight browser interface and grant you permissions associated with your Active Directory® account. This configuration allows you to bypass the common login page.
If you want to log in to the browser interface using an internal Foglight user account instead of your Windows account (for example, foglight/foglight), you have two options.
|
• |
If you are already in the browser interface, click Sign Out to navigate to the login page. Now you can enter the desired user name and password. |
|
• |
Start your web browser and navigate to: http://<host>:<port>/console/?nowinsso where host and port are the name of the machine on which the Management Server is running and the browser interface port number. |
|
1 |
|
2 |
Click Install. |
|
3 |
|
5 |
|
6 |
After a few moments, the Install License dialog box closes, and the Manage Licenses dashboard refreshes, showing the newly installed license in the list. |
|
1 |
|
2 |
Click Install Subscription License. |
|
3 |
In the Install Subscription License dialog box, input the Subscription License Number and click Install License. |
|
4 |
After a few moments, the Install License dialog box closes, and the Manage Licenses dashboard refreshes, showing the newly installed license in the list. |
|
1 |

|
4 |
Find out which capabilities each individual license provides. In the list of installed licenses, observe the Capabilities column. This column shows a set of icons, each representing a licensed capability. |
Users can export a license usage report by clicking the Export License Usage button.
|
1 |
|
2 |
Deleting a license disables the features defined in the license.
|
1 |
|
3 |
Click Delete. |
|
4 |