|
1 |
|
3 |
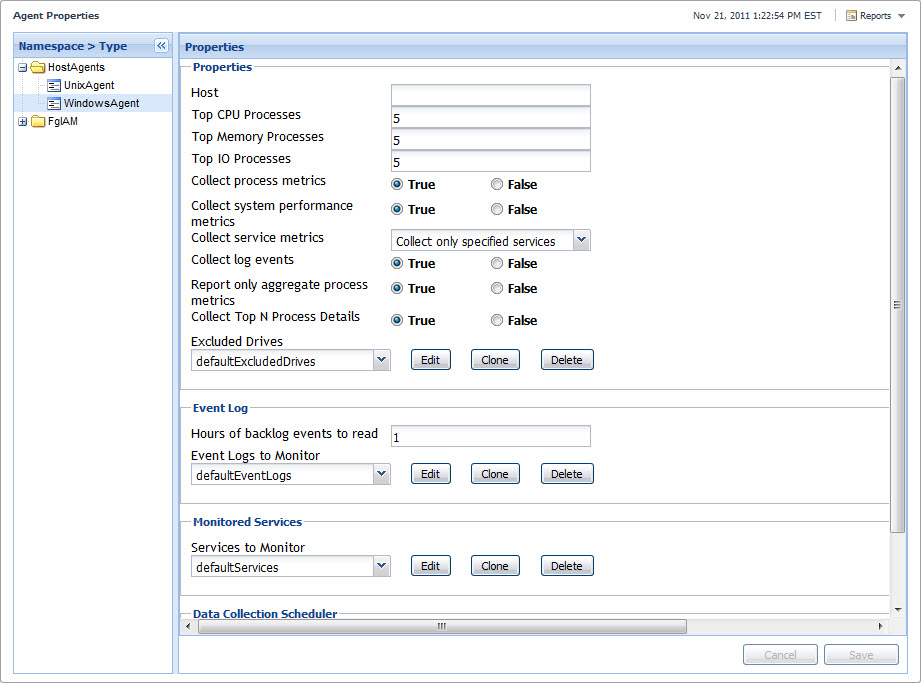
On the Agent Properties dashboard, in the Properties view, locate the primary property that you want to edit. |

|
5 |
Click Save. |
|
1 |
|
3 |
On the Agent Properties dashboard, in the Properties view, locate the secondary property that you want to clone. |
|
4 |
Click the Clone button to the right of the box that contains the property value. |
|
6 |
Click OK. |
|
7 |
|
1 |
|
3 |
On the Agent Properties dashboard, in the Properties view, locate the secondary property that you want to edit. |
|
4 |
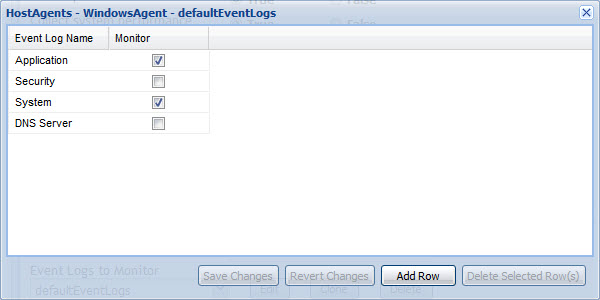
Click the Edit button to the right of the box that contains the property value. |
|
• |
To delete a row from the list, in the dialog box, select that row and click Delete Selected Row(s). |
|
6 |
Click Save Changes and close the dialog box. |
You can only remove cloned lists. Any lists that are included with Foglight cannot be deleted.
|
1 |
|
3 |
On the Agent Properties dashboard, in the Properties view, locate the list that you want to delete. |
|
4 |
Click Delete. |
|
5 |
Click Yes in the message box. |
|
6 |
|
1 |
|
2 |
On the Agent Properties dashboard that appears in the display area, in the Namespace > Type view, expand the FglAM node and click FglAMAdapter. |
|
3 |
In the Properties pane, view the FglAMAdapter properties. These properties control the FglAMAdapter polling rates. |
|
• |
Minimum Polling Interval: The minimum polling interval, in seconds. |
|
• |
Maximum Number of Polls (per minute): The maximum number of polls per minute. Client polling intervals are adjusted to adhere to this. |
|
• |
Polling Max Delay Factor: The multiplier for the maximum delay, based on the computed minimum delay. |
|
• |
Polling Min Timeout: The minimum length of time in seconds before FglAMAdapter checks to see if a host is considered disconnected. |
|
• |
Core Thread Pool Size: The size of the core thread pool. |
|
• |
Maximum Thread Pool Size: The maximum size of the adapter thread pool. |
Some Foglight dashboards have reports associated with them. This allows you to run a report based on the current dashboard. You can generate the report using the Reports menu in the top-right corner.
The Agent Properties dashboard is associated with the Agent Properties Report. Run this report by choosing Agent Properties Report from the Reports menu, and specifying the input parameters in the report wizard.
|
1 |
|
2 |

|
1 |
In the Disconnected Agent Manager(s) dialog box, select the disconnected agent manager(s) that you want to remove. |
|
2 |
Click Delete Agent Manager(s). |
To edit tags for the disconnected agent manager(s), see Edit agent tags .
|
• |
|
1 |
|
3 |
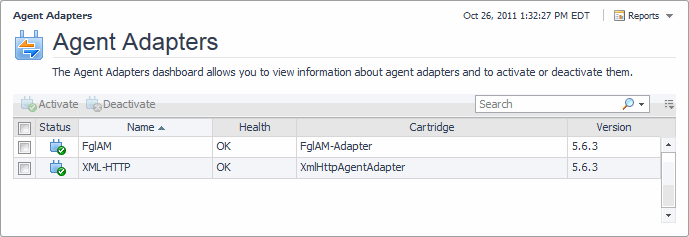
Click Activate. |
|
1 |
|
3 |
Click Deactivate. |
This dashboard is a starting point when creating credentials. Credentials are stored in lockboxes. Ensure that you have the appropriate lockboxes in place before creating credentials. The dashboard displays a list of all lockboxes that are defined on the server, in addition to the System lockbox that is included with the Management Server. This lockbox is not password-protected. Its contents are accessible to all clients in your system. The System lockbox is only intended for use with some agent types, and it is always available for selection in the flow for adding credentials initiated from the Manage Credentials dashboard. For that reason, any purpose-specific wizards included with cartridges whose agents do not support the System lockbox do not provide this lockbox as an option when creating credentials.
|
• |
Default: This lockbox is password-protected. The default password is foglight. Consider changing this password after the installation to protect its contents. |
By default, the following columns are displayed:
|
• |
|
• |
Alarms: The total counts of outstanding credential alarms, broken down by alarm types (Fatal, Critical, and Warning). |
|
• |
Name: The lockbox name. |
|
• |
Credential Count: The number of credentials contained in the lockbox. |
|
• |
Credential Clients: Lists the clients to which this lockbox is released. This column is populated only if the check box Show lockboxes currently assigned to each client is selected on the View Clients dashboard. For more information, see Explore the View Clients dashboard. |
|
• |
|
• |
Change Password: Click to change the lockbox’s password. For more information, see Change the password for a lockbox. |
|
• |
Release to Credential Clients: Click to release the lockbox. For more information, see Release lockboxes to credential clients. |
Use the Add button to add a lockbox to the existing collection.
For more information, see Add or delete lockboxes.
|
2 |
In the New Lockbox dialog box, in the Name box, type a unique name for the lockbox. For example, My Production Server Access. |
|
a |
Select the Secure using a password check box. |
|
b |
|
4 |
Click Add. |
|
2 |
Click Delete. |
|
3 |
|
2 |
In the Add Password To Lockbox dialog box, type the new password in the New Password and Confirm New Password boxes. |
|
3 |
Click Confirm. |
|
2 |
In the Remove Password of Lockbox dialog box, type the existing lockbox password in the Lockbox Password box. |
|
3 |
Click Confirm. |
|
2 |
In the Change Password of Lockbox dialog box, type the current password in the Old Password box, and the new password in the New Password and Confirm New Password boxes. |
|
3 |
Click Confirm. |
|
2 |
If the lockbox is password-protected, in the Release Lockbox to Credential Clients dialog box, type the lockbox password and select one or more credential clients for lockbox release. |
|
3 |
Click Release. |
|
4 |
Optional — Ensure the Credential Clients column is populated. |
|
b |
On the View Clients dashboard, ensure that the Show lockboxes currently assigned to each client check box is selected. |
|
f |
On the Manage Lockboxes dashboard, observe the Credential Clients column of the newly released lockbox entry. The column lists the credential clients to which the lockbox is assigned. |

