
Guest Users
What is a Guest User?
A guest user is an Microsoft Entra ID Business-to-Business account which is utilized to provide seamless collaboration between the Microsoft Cloud organizations.
For more context and details check out Microsoft’s document on the topic, What is guest user access in Microsoft Entra ID B2B?
How are Guest Users created, managed, and converted to standard user members with Power365 Tenant-to-Tenant?
Power365 Tenant-to-Tenant allows you create Guest user objects. For integrated Directory Sync projects, unmatched users can be created as either as regular members or as B2B guest users. By creating these users as guests, they may be granted access to shared resources during the coexistence phase prior to any migration activities.
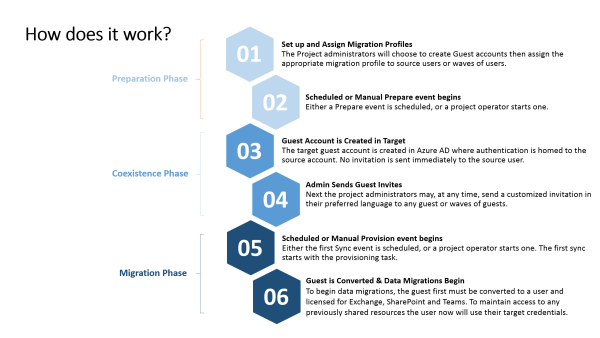
Preparation Phase
Set up and Assign Migration Profiles - The Project administrators will choose to create Guest accounts, then assign the appropriate migration profile to source users or waves of users. How to set the Migration Profile to create guest users
Scheduled or Manual Prepare event begins - Either a Prepare event is scheduled, or a project operator starts one. How to start the Prepare event
Coexistence Phase
Guest Account is Created in Target - The target guest account is created in Microsoft Entra ID where authentication is homed to the source account. No invitation is sent immediately to the source user.
Admin Sends Guest Invites - Next, the project administrators may, at any time, send a customized invitation in their preferred language to any guest or waves of guests. How to send Guest invites
Migration Phase
Scheduled or Manual Provision event begins - Either the first Sync event is scheduled, or a project operator starts one. The first sync starts with the provisioning task. How to begin provisioning
Guest is Converted & Data Migrations Begin - To begin data migrations, the guest first must be converted to a user and licensed for Exchange, SharePoint and Teams. To maintain access to any previously shared resources the user now will use their target credentials.
Does Preparing a Guest User in Tenant-to-Tenant send the user an invitation email?
No, creating Guest users with the Prepare action does not send the invitation email. Invitation emails can be sent by the operator at the appropriate time using the Send Guest Invite action. How to send Guest invites.
Are Guest Users created by Tenant-to-Tenant visible in the Global Address List (GAL)?
Yes, while Guest Users are hidden from the GAL by default, those Guests created by Tenant-to-Tenant are intended to be used for Coexistence phase prior to migration and therefore are made visible in the GAL by default.
Does a user who is migrated retain access rights and group memberships they were granted as a Guest User during the Coexistence phase?
Yes, migrated users will retain access to the resources and group memberships which they were granted as a Guest User during the coexistence phase.
How does matching work for Guest Users?
Guest users can either be matched on their UPN or mail attributes. The local portion of these attributes are matched to the part of the guest specific format of the address where the ‘@’ character has been replaced with ‘_’ and before the added ’#EXT#’. The matching of the domain portion of these attributes is controlled based off the domain mapping defined in the Tenant-to-Tenant project settings. If no domain mapping has been configured then matching on guest users will not work.
When can I match to Guest Users?
Matching to Guest Users is enabled in Power365 when the Tenant-to-Tenant project profile is set to create unmatched users as guests. Changing this setting will re-trigger matching. If matching to Guest Users is required in a project which cannot be set this way please contact Support.
Are hybrid guest users supported?
Hybrid guest users are supported for matching and conversion but must be created manually or with Power365 Directory Sync before matching in Tenant-to-Tenant.
Does a hybrid source user who is Prepared and created as a Guest User in Tenant-to-Tenant result in a hybrid Guest User?
No, Guest Users created as part of a Prepare action will be Cloud-only Guest Users regardless of the state of the source user. However, when that user is migrated and the Guest User is converted to a member user, the member user will retain the cloud or local home state of the source user.
Can cloud users be changed into hybrid users?
Cloud Users, post conversion, may be changed into hybrid users manually or with Power365 Directory Sync to create a local user with the same UPN and SMTP, which allows Microsoft Entra Connect to perform a soft-match to link the cloud and local accounts.
Can I export a list of users with the source and target types?
Yes. A CSV file of users with the source and target types can be exported by selecting users on the Users + Mailboxes screen and then selecting and applying the Export action. How to export a list of users
Can the job logs for the Guest Users be viewed?
Yes. The Prepare job logs that store all related activity messages for Guests Users can be viewed/downloaded on the User Details screen. How to view the job logs
Additional Information
How To Use Guest Users in Power365 Tenant-to-Tenant
Guest Users in Power365 Directory Sync
What is guest user access in Microsoft Entra ID B2B?
Microsoft Entra ID B2B best practices
Microsoft Entra ID B2B documentation
Properties of an Microsoft Entra ID B2B collaboration user
Settings
Environments
All Power365 Projects require at least 2 Microsoft 365 Multi-Tenants or environments be added to your Power365 Project to establish at least one source and one target environment for migration and integration activities. Additional environments can be added for more complex migration scenarios.
What is an Environment?
An "environment" or “tenant” or is this context is referring to an Microsoft 365 Worldwide subscription.
What should I prepare before adding an environment?
Before creating your project, it is recommended that an Application Service Account be created in each of your Microsoft 365 environments. This account will be used for the duration of the project or services requirement.
This account will be used to grant delegated permissions to Power365 on-behalf of the signed-in user. The administrator consents to the permissions that the app requests and the app has delegated permission to act as the signed-in user when making calls to Microsoft Graph. Some higher-privileged permissions require administrator consent. Power365 requires Global Administrator consent for 4 Graph permissions anytime a tenant is added or reconnected.
Follow these recommended steps to prepare your accounts for project setup:
- Create a cloud only Power365 Application Service Account in each environment.
- The recommended name of the account would be “Power365 App Services”.
- Set the account password expiration date to correspond with the project end date or set to “do not expire”.
- Assign Global Administrator Role to the account.
- Assign an Microsoft 365 License to the user. The minimal subscription should include Exchange Online.
- Login to the account for the first time in Microsoft 365 to verify access.
- Make the account information available to the authorized administrator for each client environment.
Please Note: It is acceptable to use an existing administrator account if that is preferred.
How do I add an environment to my project?
During the start of your project setup you will be asked to add your environments. Follow these steps to complete the process.
- Login to Power365 with your Microsoft account.
- Click the New Project button or open your existing project.
- Navigate through the setup wizard to the add a tenant step.
Click the Add Tenant button.

- When you add a tenant, you will be prompted for your Microsoft account.
- Enter the credentials of an administrative account for this Office365 tenant.
Read and accept the permission notice related to MS Graph permissions required to manage your migration and integration projects. For more details about required Graph permissions, see the Power365 Application Permission Requirements topic.

- You will then be returned to the Add Tenant screen. You will repeat this process for each tenant that is part of the project.
What happens when I add a Tenant to my Project for the first time?
When setting up your project for the first time, a Binary Tree PowerShell account will be created in each tenant added to the project and the Power365 App will be installed. This account is used for PowerShell related tasks and to provide full access to the source and target mailboxes for migration purposes.
To complete this process, each tenant must have at least 1 available Microsoft 365 license, so it may be assigned to the account.
Power365 will use your Application Service Account you created to connect to Microsoft 365. Credentials are never stored or transmitted between Power365 and Microsoft 365.
Power365 will add the Power365 App to your Tenant. See figure 2 below.
Power365 will create a cloud only account in your Microsoft 365 tenant for PowerShell.
Power365 will license your new account with the available subscription that has the Exchange Online plan. A lower cost license will be used if available. For example, if you have both E3 and E1; E1 will be used if a license is available.
Power365 by default will grant the Exchange and SharePoint Administrator Roles to this account.

Figure 2: Example Power365 App
What permissions am I granting to Power365?
Here is the list of minimal Graph permissions required to operate a Power365 project.
Sign in and read user profile (User.Read)
Read and write all users’ full profile (User.ReadWrite.All)
Read and write all groups (Group.ReadWrite.All)
Read and write directory data (Directory.ReadWrite.All)
Access directory as the singed in user (Directory.AccessAsUser.All)
Have full access to all files user can access (Files.ReadWrite.All)
Send mail as user (Mail.Send)
For more details about the required Graph permissions, check out the Application Permission Requirements topic.
How are these permissions being used?
The following lists the basic need for each Graph permission. For more details about required Graph permissions, see the Power365 Application Permission Requirements topic.
Sign in and read user profile (User.Read) - Used to connect a tenant.
Read and write all users’ full profile (User.ReadWrite.All) - Used for OneDrive Sync.
Read and write all groups (Group.ReadWrite.All) – Used for OneDrive Sync.
Read and write directory data (Directory.ReadWrite.All) - Used to discover Azure directory and automate licensing.
Access directory as the singed in user (Directory.AccessAsUser.All) - Used to provision the Binary Tree PowerShell account and assign the required roles.
Have full access to all files user can access (Files.ReadWrite.All) – Used to read and write OneDrive files during Sync.
Send mail as user (Mail.Send) - Used to send the User Cutover email notification.
Does Power365 save my account password?
Power365 will not ask you to save or transmit your administrator credentials in any cloud environment endpoint configuration.
What account roles are required to manage my project(s)?
For daily migration and integration operations and services, the minimum Microsoft 365 administrator roles required are:
- Exchange Administrator (Mailboxes, Archives, PFs)
- SharePoint Administrator (OneDrive)
For complete details about the required account roles, check out the Requirements.
What account roles are required to add or reconnect a tenant to my project(s)?
Anytime a tenant is connected for the first time or reconnect later, the minimum Microsoft 365 administrator role required is:
- Global Administrator
For complete details about the required account roles, check out the Requirements.
When should I reconnect my tenant?
There are a few reasons why you could be required to reconnect your Microsoft 365 tenant to your Power365 project. The following lists the most common reasons this action is required.
- Office 365 OAuth Token has Expired – After 90 days a standard OAuth token will expire. So, if your project is running longer than 3 months, please be sure to update your token by reconnecting your tenant to your project.
- Before a Domain Cutover Event – Before a domain cutover event, raise your application account’s role to Global Administrator to facilitate the domain move orchestration and automation.
- Application Account has Changed – If the Application Account is deleted, recreated or changed it will be required that you reconnect your tenant to the project to continue services.
Additional Information
Application Permission Requirements
Discovery
What is discovery?
The discovery service is used to collect user and group identity and properties for the purposes of migration preparation.
What is discovered?
When discovery is complete, it will have collected all user, group, and contact information within the configured Azure directory environments. It will use this data based on project configuration to find matching objects between environments for the purposes of data migration and synchronization.
When does discovery occur?
The Power365 Directory Discovery Service runs by default every twenty-four (24) hours. This frequency may be changed as needed.
Should I change the default discovery frequency?
After the initial discovery has successfully completed, subsequent discovery jobs will be deltas, which are quicker. Monitor the time it takes to run a delta sync. If the total discovery time exceeds 24 hrs., adjust the frequency to fit the environment size. The more directory objects, the more time a discovery will take. Be sure the initial discovery completed successfully. Otherwise, each new discovery job will run a full discovery again.
When can I run discovery?
The Power365 Directory Discovery Service may be run at any time by an authorized project administrator.
Can I run a full discovery?
Yes, a full discovery may be run after the initial discovery has completed when required. However, it is recommended that delta discovery be allowed to run to ensure new and modified object changes are processed quickly.
How do I run a full discovery?
To manually run Discovery and adjust the Discovery Delta Timestamp,
Click the drop-down menu located in the top left corner.

Click the Discovery link from menu.
- Hover over the desired tenant environment.
Click RUN DISCOVERY to begin the process.

In the pop-up window displayed, adjust the Delta Timestamp via the date time control text box.

When should I run a full discovery?
Full discovery should only be run when previously skipped objects are now required for the project. To discover the previously skipped objects, set the delta timestamp to a time before the initial discovery when the objects were created or last modified.
Who is authorized to run discovery?
The Client Administrator, Power User and Operator may manually run a new discovery.
Who is authorized to modify the Delta Timestamp?
Only the Client administrator role may adjust the Delta Timestamp.
What is the Delta Timestamp?
After the first full tenant discovery is completed, only new or modified objects are discovered during subsequent delta discovery jobs. The Delta Timestamp field allows authorized administrators to set the timestamp so that previously skipped objects will now be added to the scope of the project. Essentially, objects created, or modified before the timestamp will be skipped.
Can I suspend discovery?
Yes, the Power365 Directory Discovery Service can be disabled at any time by an authorized project administrator. Click DISABLE for the desired tenant while in the discovery management page.
How do I suspend discovery?
To manually disable all future discoveries, follow these steps.
Click the drop-down menu located in the top left corner.
Click the Discovery link from menu.
- Hover over the desired tenant environment.
Click DISABLE to stop all future the processes.

When should I disable discovery?
In most cases, discovery services should not be disabled during an active project. Inactive projects can either be archived if they are no longer required, which will end all related services, or the discovery service can be disabled until the project becomes active.
It is recommended that discovery services be disabled before a Domain Cutover event is started. For more information about Domain Cutovers, review this help article.
Is there a discovery log?
Yes, Power365 provides authorized administrators access to the discovery and tenant logs. To download the logs, simply navigate to the DISCOVERY section from your project dashboard then click the LOGS link for the desired environment.
After discovery has ran, is there a report?
Yes, after the initial discovery is complete there is a discovery report designed to help with migration planning.
What is in the discovery report?
The purpose of the discovery report is to provide an overall view of your environment’s data size and scope to help with migration planning.
Pages 1 – 3 focus on data derived from the designated source tenant environment(s). Providing an easy view of data in scope and user averages across different workloads. Data includes mailboxes, archives, OneDrive/OneNote files and other shared resources like, Office 365 Groups. You may also filter collections of data based on the desired project, on the tenants needed or by project type.
Page 4 goes beyond the scope of only the source environments. During discovery, Power365 collects all tenant environment information required to prepare for migration activities. This page lists all configured projects, all accepted domains, discovery history and tenant details to help keep track of all the different projects and environments configured. Select an item in any table to filter the other tables. For example, when selecting a single project, only the domains related to that project will be displayed.
Pages 5 – 8 provide exportable lists of directory objects by type and their corresponding known properties. Additional filter options are available based on object types. You can easily export all your environment data for migration planning and tracking activities.
Please note, all filters selected on a page will remain when navigating between pages.
How do I access the discovery report?
Authorized project users and administrators may go to the following URL to access reports for all their projects.
https://power365.quest.com/Reports
You may also click the Reports action in the dashboard menu. The default report is the discovery report. Additional reports can be selected from the dropdown menu in reports.

Can I export data from the report?
Yes, any visual that has an export option can be exported. Click the top right menu of the desired visual within the report for options.
For additional help with exporting data from visualizations, please read this MS article.