
Automate Find and Replace
Summary
In this tutorial you will learn how to use the Find and Replace activity to find text in a form letter or a report template and replace the text with run-time generated information.
In this tutorial you will learn:
- How to use the Find and Replace activity in Automation
- How to add a Find and Replace activity to the Loop Dataset activity in Automation
You will need:
- A sample database
- A query or query file
- A .csv file

Introduction
The Find and Replace activity in Automation allows you to customize form reports and emails. You can use the Find and Replace activity in a script to customize a single output or to generate a series of unique reports or emails using your template and inserting information retrieved by a query.
In the first part of this tutorial, you will learn how to build a basic Find and Replace script. In the second part, you will learn how you can use the Find and Replace activity inside a Loop Dataset activity.
Build Basic Find and Replace Script
In this example, you will build a script that uses a text file as a template and then replaces the placeholder text with values you specify.
Create Text File Template
First, you need to create a text file template.
-
Open a blank text file and add some generic content, such as a greeting, the body of a letter, and the closing. Then add the placeholder text to represent the content that you want to replace. Surround the placeholder text with characters that make it unique and easy to identify, as in the following example:
RE: Order number: <order number>
Dear <customer name>,
Thank you for your order. This email serves as confirmation that you ordered the following items:
<table>
Sincerely,
ABC Company
Note: To follow along with this tutorial, use the example above as your template.
- Save the template text file when finished.
Create Find and Replace Script
- Select Tools | Automation to open a new Automation window.
- Click the Find and Replace activity to add it to the Automation design window.
- In the Activity Input tab, click
in the Source file field and browse to and select the template you just created.
- Click
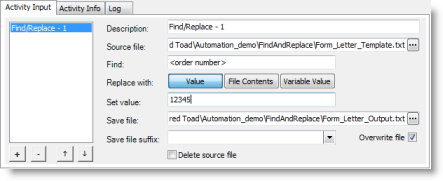
- In the Find field, enter the placeholder text for the first value you want to replace. Using our example template above, this would be <order number>.
-
In the Set value field, enter the value to use in place of the placeholder text. To follow along, enter 12345. The Activity Input tab should look something like this:
- Now click the + button to add a new Find/Replace task to the list.
- With this new task selected, repeat steps 5 through 8, with the following exceptions:
-
In the Source file field, enter the location and name of the output file. You want to perform the second Find/Replace task on the output file, not on the template.
- In the Find field, enter the next placeholder text, <customer name>.
- Then, in the Set value field, enter a name.
-
- Click the + button to add another Find/Replace task to the list. Fill in the Source file and Save file fields. In the Find field, enter <table>.
- This time, you will use the contents of a .csv file to replace the <table> placeholder text.
- From the Replace with options, select File Contents. The Set value field changes to include a browse button.
-
Click
Note: You must select a file type in which the contents are compatible with the output file type.
-
Click
- After the script executes, click the hyperlink in the Log tab to open the output file. Review the file to make sure that the placeholder text was replaced with the values or file contents you specified.

Use Find and Replace in a Loop Dataset Activity
The Find and Replace activity can be very useful in the Loop Dataset activity. In this example, you will learn how to add a Find and Replace activity to a Loop Dataset. The Find and Replace activity will be used to generate a series of unique reports from a report template.
This section of the tutorial requires an understanding of how to use the Loop Dataset activity. It is recommended that you read the Using Loop Dataset Activity tutorial or watch the Automation and the Loop Dataset Activity video prior to reading this section.
In this tutorial, the query examples provided are intended to be used with the Toad Sample Database (available with Toad Data Point). To follow along, copy and paste the SQL statements provided in this tutorial into the Automation activities in your script. If you are using a different sample database, use similar queries written for your database.
Background
In the Loop Dataset activity, you specify a driving query. The result set of the driving query is stored in the dataset variable. You can then assign one or more activities (like Find and Replace) to the Loop Dataset. For each row in the dataset variable, the Loop Dataset performs the activities that you assigned.
In this example the Loop Dataset will execute the driving query to find a list of orders.The Find and Replace activity will be used in the Loop to generate a unique report for each order in the driving query.
Create Loop Dataset Script
- To get started, connect to your sample database.
- Select Tools | Automation to open a new Automation window.
- Click the Loop Dataset activity to add it to the Automation design window.
-
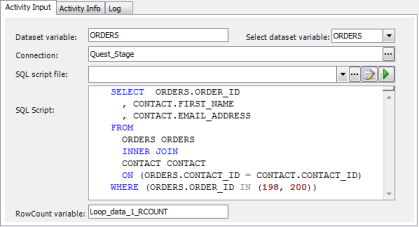
In the Activity Input tab, enter a SQL statement (or select a SQL file) to use as the driving query. When the script executes, the result set of the driving query will be stored in the dataset variable.
To follow along with this tutorial using the Toad Sample Database, enter the following query:
SELECT ORDERS.ORDER_ID
, CONTACT.FIRST_NAME
, CONTACT.EMAIL_ADDRESS
FROM
ORDERS ORDERS
INNER JOIN CONTACT CONTACT
ON (ORDERS.CONTACT_ID = CONTACT.CONTACT_ID)
WHERE (ORDERS.ORDER_ID IN (198, 200))This query will find a list of orders and, for each order, the name and email address of the contact.
-
Next, in the Dataset variable field, enter a name for the dataset variable. To follow along, enter ORDERS.
-
The purpose of this Loop Dataset is to generate a report for each order in the driving query. So, with the Loop Dataset activity still selected, click the Select to File activity in the Toolbox to add it to the Loop Dataset activity.
-
In the Select to File Activity Input tab, enter a query to select data (and then generate a report) for each order in the driving query. Use the dataset variable (ORDERS) in the WHERE clause. The ORDER_ID column of the dataset variable will provide the ORDER_ID values selected by the driving query. Use the following syntax to reference the ORDER_ID column in the dataset variable: ORDERS.ORDER_ID. In addition, use either bind syntax or surround the variable with hash symbols (#) to use it in a SQL statement.
To follow along, enter the following query:
SELECT ORDER_ITEM.QUANTITY, ITEM.ITEM_NAME
FROM
((ORDER_ITEM ORDER_ITEM
INNER JOIN ITEM ITEM
ON (ORDER_ITEM.ITEM_ID = ITEM.ITEM_ID))
INNER JOIN ORDERS ORDERS
ON (ORDER_ITEM.ORDER_ID = ORDERS.ORDER_ID))
INNER JOIN CONTACT CONTACT
ON (ORDERS.CONTACT_ID = CONTACT.CONTACT_ID)
WHERE (ORDERS.ORDER_ID = :ORDERS.ORDER_ID) - Select CSV File in the Export File Type field. Then click
- Now you will add the Find and Replace activity.
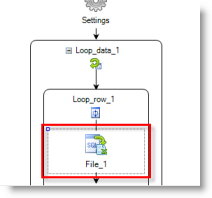
- Click the Loop Dataset activity in the Automation design window to select it. Then click the Find and Replace activity in the Toolbox to add it to the Loop Dataset activity, just after the Select to File activity.
- In the Activity Input tab, click
- In the Find field, enter the placeholder text for the first value you want to replace in the template. Using our example template, this would be <order number>.
-
The value for this field will come from the driving query, the results of which are stored in the dataset variable ORDERS. The order number will come from the ORDER_ID column. So, in the Set value field, enter #ORDERS.ORDER_ID#. This will replace <order number> with the value in the ORDER_ID column of the dataset variable ORDERS.
Note: Because ORDERS is a variable, you must surround it with the hash symbol (#).
-
Click
- Click the + button to add another Find/Replace task to the list. As in the previous tutorial, instead of selecting the template in the Source file field, select the output file. The output file is now the file where you want to continue to perform the find and replace tasks.
- Find the next placeholder text, which is <customer name>, and replace it with #ORDERS.FIRST_NAME#.
-
Click the + button to add another Find/Replace task to the list. Find the next placeholder text, which is <table>, but this time select File Contents from the Replace with options, and then browse to and select the output file generated by the Select to File activity.
Note: You may need to run the script to generate the output file from the Select to File activity before you can select it.
-
Click
- After the script executes, click the hyperlink in the Log tab to open the output file from the Find and Replace activity. Review the file to make sure that the placeholder text was replaced with the variable values and with the .csv file contents.
- The next task in the script will be to send an email.
- Click the Loop Dataset activity in the Automation design window to select it. Then click the Send Email activity in the Toolbox to add it to the Loop Dataset activity, just after the Find and Replace activity.
- In the Activity Input tab, in the To field, enter #ORDERS.EMAIL_ADDRESS# to use the value in this variable to populate the send to email address.
- Click
-
Complete the specifications for this activity by adding a Subject line. See Automate Sending Email for more information.
Note: To test the script, you might want to temporarily replace #ORDERS.EMAIL_ADDRESS# in the To field with your own email address. Then, replace your email address with #ORDERS.EMAIL_ADDRESS# before saving and scheduling your script.
-
Click

Schedule A Script
See Schedule Your Script to learn how to schedule the Automation script.