Chat now with support
Chat with Support

NetVault 13.0.1 - Administration Guide for Managed Service Providers

Introduction Getting started Configuring clients Managing catalog search Configuring storage devices
About storage devices SAN considerations Quest DR Series systems Quest QoreStor NetVault SmartDisk EMC Data Domain Systems Snapshot Array Manager Virtual Tape Libraries Virtual standalone drives Shared Virtual Tape Libraries Physical tape devices Storage tiers
Backing up data Managing policies Restoring data Managing NetVault dashboard Managing jobs Monitoring logs Managing storage devices
Role-based access to manage storage devices Monitoring device activity Managing disk-based storage devices in list view Managing disk-based storage devices in tree view Managing the Snapshot Array Manager Managing tape libraries in list view Managing tape libraries in tree view Managing tape drives in list view Managing tape drives in tree view Adding shared devices
Managing storage media Managing user and group accounts Managing Tenant Monitoring events and configuring notifications Reporting in NetVault Working with client clusters Configuring default settings for NetVault
About configuring default settings Configuring encryption settings Configuring plug-in options Configuring default settings for post-scripts Configuring default settings for Verify Plug-in Configuring Deployment Manager Settings Configuring Job Manager settings Configuring Logging Daemon settings Configuring Media Manager settings Configuring Network Manager settings Configuring Process Manager settings Configuring RAS device settings Configuring Schedule Manager settings Configuring Web Service settings Configuring Auditor Daemon settings Configuring firewall settings Configuring general settings Configuring security settings Synchronizing NetVault Time Configuring the reporting utility Configuring NetVault WebUI default settings Configuring NetVault to use a specific VSS provider Configuring default settings using Txtconfig
Diagnostic tracing Managing diagnostic data Using the deviceconfig utility NetVault processes Environment variables Network ports used by NetVault Troubleshooting
Common errors Safe Mode in NetVault

Viewing and managing a job

The Manage Job page, which is accessible from the Job Status page, lets you view, edit, and remove an existing job, as well as create a job.

2
On the Job Status page, select the job you want to view, and then click Manage Job.
The Manage Job page opens.
If you selected a restore job, click Edit Job and make your changes on the Edit Restore Job page.
On the Manage Job page, you can view the following information:
Job Details: This area shows the following information: job name, job ID, job type (backup or restore), and name of the client.
Configuration: This area lets you create, edit, and view the protection sets. It shows the selections, the plug-in options, schedule, source storage, target storage, and advanced options. To make changes to any of these details, click the corresponding edit icon.

To edit a backup job, you can understand more about the sets by previewing the set information. To preview the set summary, move the pointer over the information icons in the Job Details area on Manage Job page.

Recent Instances: This table lists the recent instances of the job. It shows the following information: Run time, duration, job size, instance ID, phase ID, and status (Succeeded, Failed, Aborted, and others).
3
To save your changes or submit the job for scheduling, click Save or click Save & Submit, respectively.
If a new name was provided, the Save Job dialog box displays.
Save changes creating a new job using the supplied name: Select this option to save the changes to a new job.
Save changes renaming this job to the supplied name: Select this option to rename the existing job.
5

Monitoring job progress

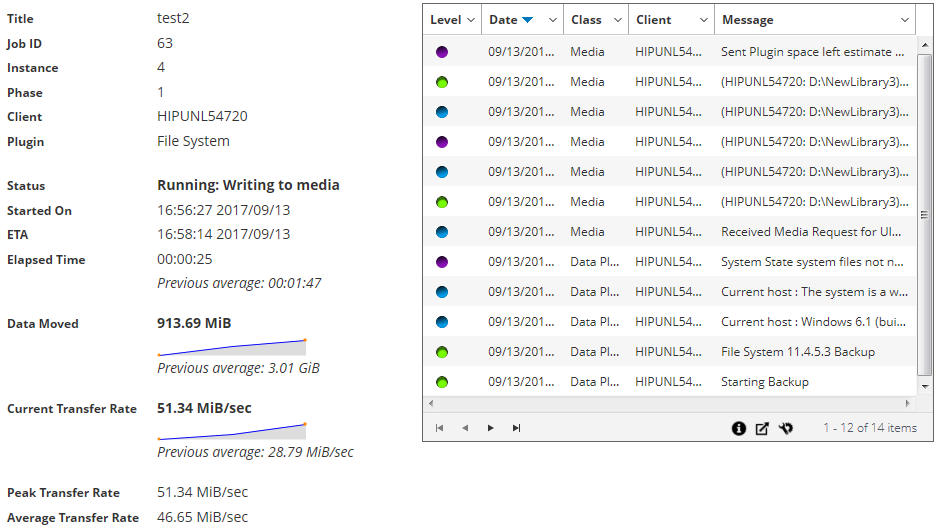
You can monitor the progress of a job from the Monitor Job page. The page displays the job status, data transfer rate, log messages, and other job details.

3
On the Monitor Job page, you can view the following information:
Figure 24. Monitor Job page

Job details: This area displays the following details: job title, job ID, instance ID, phase number, client name, plug-in name, status, start time, expected completion time, time elapsed, size of data moved and data transfer chart, current transfer rate and data transfer chart, peak transfer rate, and average transfer rate. The fields: waiting for device, elapsed transfer, estimated transfer remaining, and estimated time remaining are also displayed when running a job using Plug-in for NDMP. The fields: waiting for device and elapsed transfer are also displayed when running a job using Plug-in for SnapMirror to Tape. However, the field ‘expected completion time’ is not displayed when running a job using Plug-in for NDMP and Plug-in for SnapMirror to Tape.
Job logs: This area displays the log messages generated for the job. By default, the table is sorted by date and time. You can sort the table by one or more columns, as required. For more information, see Sorting records in NetVault WebUI.

Clearing job errors and warnings

Removing a job schedule

You can remove a job schedule if you do not want to run the job. When you remove the job schedule, the job definition is not deleted. You can resubmit the job definition to schedule it again.

Related Documents

The document was helpful.

Select Rating

I easily found the information I needed.

Select Rating