You can deploy InTrust agents on site computers to locally perform audit data gathering and monitoring. An agent is an executable that keeps track of events logged on the computer, filters data, compresses it and sends it to the InTrust server it responds to.
|
|
Caution: Agents are optional for audit data gathering, but required for real-time monitoring. Using agents for gathering, however, helps minimize network impact when communicating data from the target computer to the InTrust server. |
Usually, agents are installed automatically, but in some cases you need to deploy them manually (for example, if a computer is behind a firewall or if it is a Unix host).
For more details about agent installation, see Deploying Agents.
If using an agent on the target computer, you can set a limit for the agent so that its CPU usage does not go beyond the specified percentage. For that, do the following:
Besides, on the General tab of the agent's properties page, you can specify the location of temporary files and agent log backup (for more information on agent log backup, refer to the Keeping Event Data on the Agent Side topic). You can change these settings for a list of agents responding to the InTrust server that InTrust Manager is connected to.
In some parts of InTrust configuration, filters can be used for fine tuning. See below for details about setting up filters for data and objects.
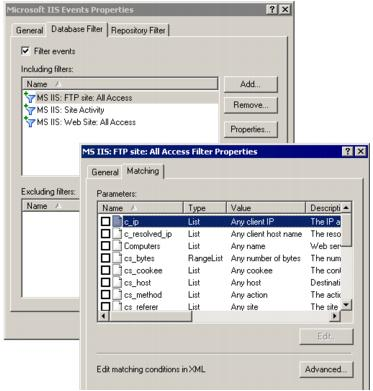
Data filters specify what kind of data is retrieved. Data filters are associated with individual data sources within policies. Data filtering is configured separately for repositories and databases.
When creating a new data source, the New Data Source Wizard will offer you to create the data filters you want to be used. There are two varieties of filters: including and excluding. Apply including filters to include the selected events in the data store. Apply excluding filters to ignore the selected events.
|
|
Note: You can configure excluding filters only if at least one including filter exists. |
To configure the data filters of existing data sources, expand the policy which involves the necessary data source, and from the data source’s shortcut menu, select Properties. Use the Repository Filter and Database Filter tabs to modify the filters as you need.
Object filters specify the objects from which data is retrieved. Object filters are associated with the following:
Object selection for the site filters is based on the logical operators AND, OR and NOT. Highlight an item in the Filter tab tree and select an expression or attribute to supplant or expand the item. Filter attributes are selected from an extensible list.
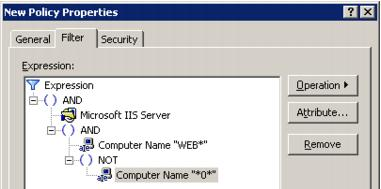
For example, if you need to include all IIS servers whose names start with “WEB” and do not contain the character “0”, do the following:
Click OK to save the changes and close the dialog box.
By default, after your InTrust installation is complete, the role-based administration feature of InTrust is disabled.
In large, complex environments, InTrust administration can require multiple people. Often, it makes sense to define several scopes of control, or roles, for these InTrust administrators to clearly delineate their responsibilities. For example, you might use the roles of auditing administrator, monitoring administrator, and InTrust server administrator.
A role can be represented by an Active Directory group. You implement roles by setting InTrust object permissions for each group, thereby granting or denying the group members access to InTrust configuration objects or InTrust features.
A user can belong to more than one group and so have more that one role. For example, a user might be both an auditing administrator and an InTrust server administrator.
It is up to you what roles you introduce in your InTrust framework. Consider that your roles can control the following:
This list is just a starting point. You may want to define your roles based on different criteria.
|
|
Caution: By default, after your InTrust installation is complete, the role-based administration feature of InTrust is disabled. After upgrade, the enabled or disabled state of this feature does not change. |
When role-based administration is disabled, the following object access configuration is in effect:
Accounts (users or groups) in the list of InTrust Organization Administrators are not affected by the security settings on InTrust objects; they have unlimited rights over the configuration in an InTrust organization.
To access this list, right-click the root node in the InTrust Manager treeview and select Properties. In the dialog box that opens, use the Add and Remove buttons to work with the list. Only users who are already in the list can add or remove accounts.
By default, the organization administrators list contains the following:
|
|
Note: If you decide that using roles is not justified in your environment, you can add to this list either the accounts of all your InTrust administrators or a group that they are members of. This way, you can disregard administration role considerations entirely. |
Importantly, in the current version of InTrust, several configuration objects can be created only by accounts that are listed as InTrust organization administrators. These are objects under the following Configuration nodes: Notifications, Data Stores, and Advanced. Other users, however, can be assigned any rights they need to access the configuration objects under these nodes.
By default, Everyone has Read access to InTrust configuration objects. However, to use InTrust Manager, a user must be a member of the AMS Readers computer local group on the InTrust server or an InTrust organization administrator. The AMS Readers group initially has no members. To enable users to view InTrust configuration in InTrust Manager, take the following steps:
Then, any time you need to grant Read access to another account, simply make it a member of the Configuration Readers group.


