
Creating Active Directory backup
| NOTE |
When the backup is triggered and any specified backup path is not available, no backup is created, neither in the DC storage nor in the Console storage. The backup creation session will fail. |
To create backups of all computers in a Computer Collection
-
In the console tree, select a Computer Collection, and then click Create Backup on the Action menu.
-
If prompted, confirm the operation.
You can also use the Backup Wizard to start a backup job:
-
In the console tree, click the root node, and then click Create Backup on the Action menu.
-
Follow the instructions in the Backup Wizard.
-
On the When to Back Up page click Now, and then click Next.
-
Click Advanced to view backup options. You can modify the options as needed. When finished, click OK to close the Properties dialog box.
-
Click Finish to start the backup job.
| Note |
By default, the wizard uses the default settings. You can view and modify the default settings using the Collection Defaults command that appears on the Action menu when you select the Computer Collections node in the console tree. |
With the Backup Wizard, backup jobs can be scheduled to run at a specific time. For more information, see Scheduling backup creation subsection of Task scheduler overview.
While a backup job is running, you can examine the progress of the operation and, if needed, stop the backup job. After a backup job is completed, you can view backup creation results:
-
In the console tree, click Sessions.
-
In the details pane, click the backup-creation session, and then click Properties on the Action menu.
-
In the Properties dialog box, click the Progress tab, and examine the displayed information.
-
By clicking Abort on the Progress tab, you can stop the selected session.
Creating BMR backup
-
This feature is supported only for Windows Server 2008 R2 or higher domain controllers.
-
Active Directory does not allow using a backup whose age exceeds the Active Directory tombstone lifetime (default is 180 days). But if there is a RMAD BMR backup that is older than 180 days and a more recent Active Directory backup, you can successfully perform the restore operation.
-
If the process of creating a Windows Server 2008 R2 BMR backup completes with the error like "The sector size of the physical disk on which the virtual disk resides is not supported.", make sure that the disk sector size on the target machine (NAS device or similar) is equal to 512 bytes.
For instance, NetApp ONTAP operating system uses the following command: vserver cifs options modify -file-system-sector-size 512.
To create a BMR backup
-
Create a computer collection.
-
Right-click the computer collection, and then click Properties to open the Computer Collection Properties dialog box.
-
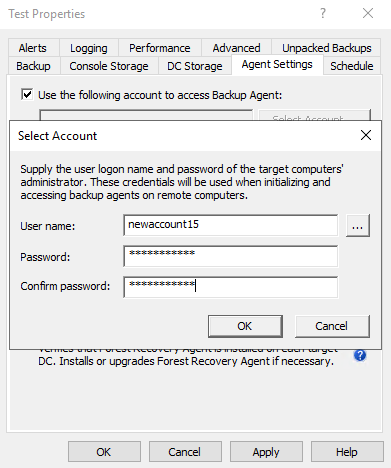
On the Agent Settings tab, select the option Use the following account to access Backup Agent and specify account credentials. In Recovery Manager for Active Directory, this account is used both to connect to the Backup Agent and to access the backup storage if you do not specify a separate account for the backup share on the DC Storage tab. For more details, see Usage of backup access credentials.
-
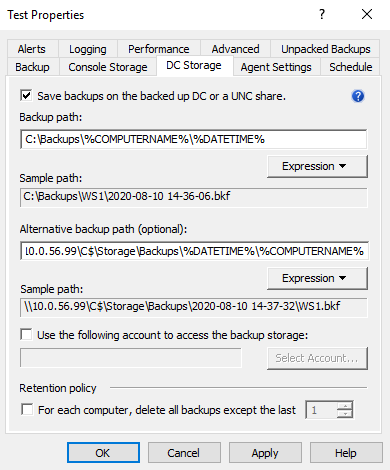
On the DC Storage tab, select the option Save backups on the backed up DC or a UNC share and enter the backup path. You need to specify path to the SMB share in the following format (
%DATETIME%variable is required ):\\RemoteHost\ShareName\%COMPUTERNAME%\%DATETIME%. -
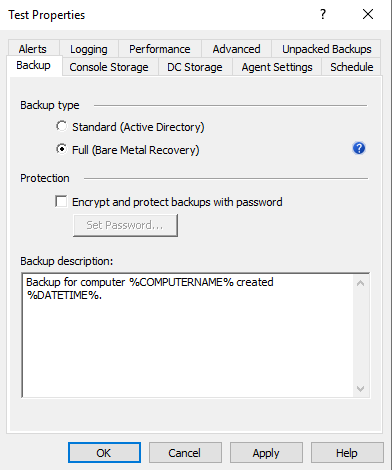
On the Backup tab, select the Full (Bare Metal Recovery) backup type. Now only system critical volumes are included in the BMR backup by default. For information on how to include additional volumes into a BMR backup, see below in this article.
Select the Encrypt and protect backups with password option to encrypt BMR backups and protect them with a password (Recommended). This password is used to generate a passphrase with which the backup is encrypted. The password cannot be used directly to unlock the backup container *.vhd(x) file.
| IMPORTANT |
If a customer restores encrypted volumes from a backup, the volumes are restored as unencrypted. |
- Right-click the collection node and click Create Backup.
Including additional volumes to a BMR backup
| NOTE |
Now only system critical volumes are included in the BMR backup by default, e.g. Active Directory database volume, SYSVOL volume, OS volume, etc. |
To include additional volume on several domain controllers
- Create the following registry key on the selected domain controller, or check if the key already exists in the directory:
HKEY_LOCAL_MACHINE\SOFTWARE\Quest\Recovery Manager for Active Directory
- Add the following string value under this registry key:
Name: WindowsBackupCommandLine
Data: wbadmin start backup -allcritical -quiet -backuptarget:"%s" -include:E:,G:
Where "E:,G:" - drives that will be included into the BMR backup.
To include additional volume on all domain controllers
On the Recovery Manager Console machine, add the new string value under both these registry keys:
-
HKEY_LOCAL_MACHINE\SOFTWARE\Quest\Recovery Manager for Active Directory -
HKEY_LOCAL_MACHINE\SOFTWARE\Wow6432Node\Quest\Recovery Manager for Active Directory
Name: WindowsBackupCommandLine
Data: wbadmin start backup -allcritical -quiet -backuptarget:"%s" -include:E:,G:
Where "E:,G:" - drives that will be included into the BMR backup.
Usage of backup access credentials
Recovery Manager for Active Directory uses the same credentials to access backup files on the remote share and to connect to Backup Agent. These credentials are specified on the Agent Settings tab of the collection properties (option "Use the following account to access Backup Agent").
If you need to specify a separate account to access the backup storage, use the option Use the following account to access the backup storage on the DC Storage tab.
When no credentials are specified in the collection properties, the Recovery Manager Console uses the account under which it is running to access the backup storage and Backup Agent.
To specify separate credentials to access the remote backup location and Backup Agent
-
Create a computer collection in Recovery Manager for Active Directory Console.
-
Right-click the computer collection, and then click Properties to open the Computer Collection Properties dialog box.
-
On the Agent Settings tab, select the option Use the following account to access Backup Agent and specify account credentials.
-
On the DC Storage tab, select the option Save backups on the DC being backed up or a UNC share and enter the backup path. You need to specify path to the remote share in the following format (%DATETIME% variable is required ):
\\<share name>\<backup folder>\%COMPUTERNAME%\%DATETIME%
| IMPORTANT |
According to the Forest Recovery best practices, the RMAD Active Directory backup should be stored on a domain controller. At the same time, the Alternative backup path option allows you to store the same Active Directory backup on remote backup storage. This can be useful if the DC is destroyed and you want to restore it from a BMR backup and the latest Active Directory backup. The retention policy is applied to both backup paths. So, if you set it to 10, and you have both paths configured - it means that there will be 5 backups on DC and 5 backups on the remote storage. |
- To specify a separate account for the backup storage, select the Use the following account to access the backup storage option and specify account credentials.
| NOTE |
This account is used to access both backup locations. Currently, separate access accounts are not supported. |
Using the Backup Wizard
You can start the Backup Wizard by selecting the console tree root, and then clicking Create Backup on the Action menu.
On the What to Back Up page, the wizard prompts you to specify what domain controllers or AD LDS (ADAM) hosts you want to back up. You can back up specific domain controllers or all computers that are in a specific container, such as an Active Directory domain or organizational unit.
On the Where to Store Backups page, the wizard prompts you to specify the path and name format for backup files. You can type the path and name manually, click Browse to locate a folder, and use the Expression button to have the path and name include macros enabling the automatic creation of separate subfolders and files for different backups.
On the When to Back Up page, the wizard asks you whether you want to schedule the backup creation operation. You can click Now if you want to start the operation immediately. Otherwise, you click Later and configure backup scheduling. If you choose to create backups without scheduling, you can optionally have the wizard create and retain a Computer Collection for the computers and containers you have selected. Later, you may use that collection to schedule backups. If you choose to schedule backups, the wizard creates a Computer Collection for the computers and containers you have selected, and schedules a backup creation task for that collection.
On the Computer Collection Name page, you can specify a name and description for the Computer Collection to be created.
By clicking the Advanced button on the Completed the Backup Wizard window, you can display the Properties dialog box to make changes to backup options. If you do not modify those options, the defaults are used. Default options are specified using the Collection Defaults command, which appears on the Action menu when you select the Computer Collections node in the console tree.