Managing automatic pauses
In a recovery project, you can create multiple automatic pauses, each having different settings. You can also modify the settings of existing automatic pauses or delete automatic pauses as necessary. To manage automatic pauses, click the Configure Pauses button on the Forest Recovery Console toolbar.
For each automatic pause, you can define the domain controllers to which the pause will apply and specify a recovery stage before which you want to activate the automatic pause on the domain controllers. The automatic pause becomes active when at least one domain controller specified in the pause settings reaches the recovery stage you specified.
You can configure an automatic pause to become active before one of the following recovery stages described below.
Prepare for restore from backup
During this stage, Recovery Manager for Active Directory verifies that the backup files you selected for recovery are available on the target domain controllers. If necessary, Recovery Manager for Active Directory copies the backup files that are missing.
Perform restore from backup
During this stage, Recovery Manager for Active Directory performs the following steps:
-
Detect current mode (DSRM or normal)
-
Reset DSRM administrator password
-
Restart domain controller in DSRM
-
Enable domain controller isolation
-
Disable custom password filters
-
Disable BitLocker
-
Restore data from backup
-
Restart domain controller in normal mode
-
Reset DSRM administrator password
Configure domain controller
During this stage, Recovery Manager for Active Directory performs the following steps:
-
Get information about domain controller
-
Select preferred DNS server
-
Remove global catalog (if you did not specify to keep the existing global catalog)
-
Raise RID pool
-
Invalidate RID pool
-
Seize FSMO roles
-
Clean up metadata of removed domain controllers
-
Reset the Krbtgt password
-
Reset password for users in privileged groups
-
Reset computer account passwords
-
Enable custom password filters
-
Restart domain controller in normal mode
-
Reset trust passwords
Make domain controller available
During this stage, Recovery Manager for Active Directory performs the following steps:
-
Ensure that domain controller isolation is disabled
-
Clean up metadata of unrecovered domains if necessary
-
Change global catalog partition occupancy level
-
Add global catalog (if you did not specify to keep the existing global catalog)
-
Wait for a global catalog server to become available
-
Restore initial global catalog partition occupancy level
-
Enable the use of global catalog for user authentication
-
Enable BitLocker
-
Remove temporary files
Reinstall Active Directory Domain Services
During this stage, Recovery Manager for Active Directory performs the following steps:
-
Select preferred DNS server
-
Wait for a global catalog server to become available
-
Reinstall Active Directory Domain Services
-
Remove temporary files
Creating an automatic pause
To create an automatic pause
-
Create or open a recovery project.
-
On the toolbar, click Configure Pauses.
-
In the dialog box that opens, click Create Pause.
-
Under Pause properties, do the following:
a. Use the Pause name box to type a descriptive name for the automatic pause.
b. Use the Activate pause before the specified stage list to select a recovery stage.
c. Under the Use this pause for domain controllers list, click Add, and then select the check boxes next to the domain controllers to which you want to apply this pause. When you are finished, click OK.
-
Click OK to apply your settings.
Releasing an automatic pause
After you start the recovery of your project or run the verify settings operation on the project, you can monitor active pauses in the project and release active pauses as necessary. After you release an active automatic pause, all paused domain controllers to which the pause applies resume their recovery.
You can view the number of active pauses next to the Active pauses link in the Project Summary area of the Forest Recovery Console. You can click the Active pauses link to view the details of and selectively release active automatic pauses.
To release an active automatic pause
-
In the Project Summary area of the Forest Recovery Console, click the Active pauses link.
-
Use the Active pauses list to select the pause you want to release.
After you select a pause, you can view a list of domain controllers to which the pause applies and current pause status for each of these domain controllers.
-
Click the Release button to resume the recovery of the paused domain controllers to which the pause applies.
Modifying an automatic pause
For each automatic pause, you can modify such settings as the pause name, the recovery stage before which the pause activates, and the list of domain controllers to which the pause applies.
To modify an automatic pause
-
Open the recovery project that includes the automatic pause you want to modify.
-
On the toolbar, click Configure Pauses.
-
Use the Pauses list to select the automatic pause you want to modify.
-
Under Pause properties, modify the pause settings as necessary.
-
When you are finished, click OK to apply your changes.
Deleting an automatic pause
To delete an automatic pause
-
Open the recovery project that includes the automatic pause you want to delete.
-
On the toolbar, click Configure Pauses.
-
Use the Pauses list to select the automatic pause you want to delete.
-
Click the Remove button. If prompted, confirm the deletion of the pause.
-
When you are finished, click OK to apply your changes.
Copying a backup file to a new location
You can copy a backup file registered with Recovery Manager for Active Directory to a new location. This may be required to meet a specific corporate policy or to provide faster access to the file.
To copy a backup to a new location
-
Unregister the backup file.
-
Copy the backup file to a new location.
-
Register the file at the new location in the Recovery Manager for Active Directory console or Forest Recovery Console.
-
The backup file path cannot be changed because it is read-only.
Recovery methods
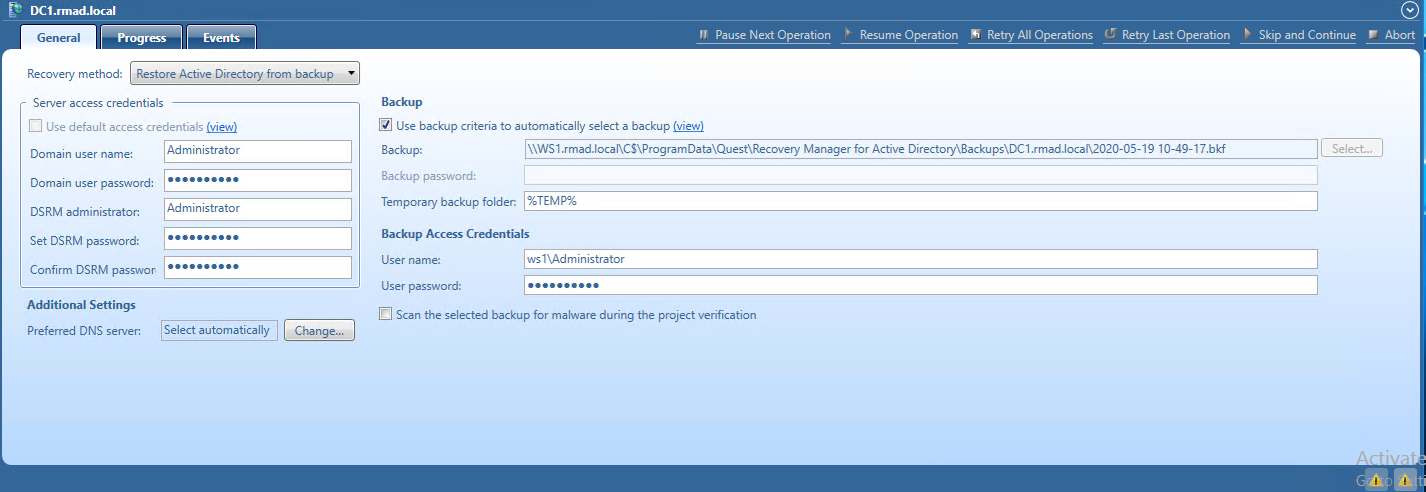
Restore Active Directory from backup method
The Restore Active Directory from backup method restores the domain controller from the backup you specified.
For more information on backup selection methods, see Selecting backups for recovery.
For details about recovery method settings, see Domain controller recovery settings and progress.
During recovery, Recovery Manager for Active Directory uses custom Internet Protocol security (IPSec) rules to isolate the domain controllers for which you selected this recovery method. For more information, see How does Recovery Manager for Active Directory isolate domain controllers during forest recovery?