Chat now with support
Chat with Support

Recovery Manager for AD Forest Edition 10.1 - User Guide

Overview Getting started
Permissions required to use Recovery Manager for Active Directory Recovery Manager Console Getting and using help Configuring Windows Firewall Using Computer Collections Managing Recovery Manager for Active Directory configuration Licensing
Backing up data
Permissions required for the Backup operation Managing Backup Agent Using a least-privileged user account to back up data Using Managed Service Accounts Active Directory backups vs Windows System State backups Creating BMR and Active Directory backups Using the Backup Wizard Retrying backup creation Enabling backup encryption Backing up AD LDS (ADAM) Backing up cross-domain group membership Backing up distributed file system (DFS) data Backup scheduling Setting performance options Setting advanced backup options Using Forest Recovery Agent Unpacking backups Using e-mail notification Viewing backup creation results
Restoring data
Getting started with Active Directory recovery Managing deleted or recycled objects Restoring backed up Active Directory components Integration with Change Auditor for Active Directory Using granular online restore Restoring AD LDS (ADAM) Selectively restoring Active Directory object attributes Restoring objects in an application directory partition Restoring object quotas Restoring cross-domain group membership Performing a restore without having administrator privileges Reports about objects and operations Using complete offline restore Offline restore implications Restoring SYSVOL authoritatively Performing a granular restore of SYSVOL Recovering Group Policy Restoring data from third-party backups Using the Extract Wizard Restoring passwords and SID history
Full Replication Consolidating backup registration data Monitoring Recovery Manager for Active Directory Recovering an Active Directory forest
Forest recovery overview Deploying Recovery Manager for Active Directory Forest Edition (Disaster Recovery Edition) Permissions required to use Forest Recovery Console Forest Recovery Console Managing a recovery project Recovery methods Phased recovery Managing Forest Recovery Agent Rebooting domain controllers manually Resetting DSRM Administrator Password Purging Kerberos Tickets Managing the Global Catalog servers Managing FSMO roles Manage DNS Client Settings Configuring Windows Firewall Developing a custom forest recovery plan Backing up domain controllers Assigning a preferred DNS server during recovery Handling DNS servers during recovery Forest recovery approaches Deciding which backups to use Running custom scripts while recovering a forest Overview of steps to recover a forest Viewing forest recovery progress Viewing recovery plan Viewing a report about forest recovery or verify settings operation Handling failed domain controllers Adding a domain controller to a running recovery operation Selectively recovering domains in a forest Recovering SYSVOL Deleting domains during recovery Resuming an interrupted forest recovery Recovering read-only domain controllers (RODCs) Checking forest health Collecting diagnostic data for technical support
Using Management Shell Creating virtual test environments Using Recovery Manager for Active Directory web portal Appendices
Frequently asked questions Best practices for using Computer Collections Technical characteristics Best practices for creating backups Best practices for creating backups for forest recovery Best practices for recovering a forest Descriptions of recovery or verification steps Ports Used by Recovery Manager for Active Directory Forest Edition (Disaster Recovery Edition) Backup Wizard Online Restore Wizard Online Restore Wizard for AD LDS (ADAM) Group Policy Restore Wizard Repair Wizard Extract Wizard Events generated by Recovery Manager for Active Directory Descriptions of PowerShell commands
Add-RMADBackup Add-RMADCollectionItem Add-RMADFEComputer Add-RMADReplicationConsole Add-RMADStorageServer Backup-RMADCollection Close-RMADFEProject Compare-RMADObject Convert-RMADBackup ConvertTo-RMADRecycledObject Create-RMADStorageManagementAgentSetup Expand-RMADBackup Export-RMADBackup Export-RMADFERecoveryCertificate Export-RMADFEResult Get-RMADBackup Get-RMADBackupAgent Get-RMADBackupInfo Get-RMADBackupObject Get-RMADBackupSecurityStatus Get-RMADCollection Get-RMADCollectionItem Get-RMADDeletedObject Get-RMADFEComputer Get-RMADFEConsole Get-RMADFEDnsCache Get-RMADFEDomain Get-RMADFEEvent Get-RMADFEGlobalOptions Get-RMADFEOperation Get-RMADFEPersistenceConnection Get-RMADFEProject Get-RMADFERecoveryAgent Get-RMADFESchedule Get-RMADGlobalOptions Get-RMADLicenseInfo Get-RMADObject Get-RMADReplicationConsole Get-RMADReplicationSchedule Get-RMADReplicationSession Get-RMADReplicationSessionItem Get-RMADReportObject Get-RMADReportObjectAttributes Get-RMADReportObjectChildren Get-RMADReportSession Get-RMADSession Get-RMADSessionItem Get-RMADSessionItemEvent Get-RMADStorageServers Import-RMADBackup Import-RMADFERecoveryCertificate Install-RMADBackupAgent Install-RMADFERecoveryAgent New-RMADCollection New-RMADFEProject New-RMADFERecoveryMedia New-RMADSchedule Open-RMADFEProject Publish-RMADBackupSecurityStatus Remove-RMADBackup Remove-RMADBackupAgent Remove-RMADCollection Remove-RMADCollectionItem Remove-RMADFEComputer Remove-RMADFERecoveryAgent Remove-RMADFESchedule Remove-RMADReplicationConsole Remove-RMADReplicationSchedule Remove-RMADReplicationSession Remove-RMADStorageServer Remove-RMADUnpackedComponent Rename-RMADCollection Restore-RMADDeletedObject Restore-RMADDomainController Restore-RMADObject Resume-RMADFERecovery Save-RMADFEProject Set-RMADCollection Set-RMADFEComputer Set-RMADFEDnsCache Set-RMADFEDomain Set-RMADFEGlobalOptions Set-RMADFEPersistenceConnection Set-RMADFERecoveryMode Set-RMADFESchedule Set-RMADGlobalOptions Set-RMADReplicationConsole Set-RMADReplicationSchedule Start-RMADFERecovery Start-RMADFEVerification Start-RMADReplication Start-RMADReportViewer Stop-RMADFEWorkflow Update-RMADBackupAgent Update-RMADFEProject Update-RMADLicense

Retrying backup creation

Recovery Manager for Active Directory allows you to retry selected backup sessions. You can retry the creation of backups for individual computers or for all computers with a particular backup creation result. Any backup session can be retried regardless of its result.

To retry a backup session
  1. In the Recovery Manager Console tree, click Sessions.

  2. In the details pane, click the backup session to retry, and then click Retry Backup on the Action menu.

  3. In the Retry Backup dialog box, select one of the following options:

    • Computers where errors or warnings occurred. Retries backup for the computers reported with errors or warnings.

    • Computers where errors occurred. Retries backup for the computers reported with errors.

    • All computers. Retries backup for all computers in the selected session, regardless of the previous backup results.

  4. Click OK and then click Yes.

To retry backups for individual computers
  1. In the Recovery Manager Console tree, expand the Sessions node and select a session.

  2. In the details pane, select computers.

  3. On the Action menu, click Retry Backup.

  4. Click Yes to start the backup creation.


Enabling backup encryption

Recovery Manager for Active Directory allows you to protect your backups by encrypting them. You can enable the backup encryption in the Defaults dialog box for the Computer Collections node or a Computer Collection (Computer Collection properties), as well as in the Backup Wizard.

To enable backup encryption
  1. Do one of the following:

    • Right-click the Computer Collections node, and then click Collection Defaults.

    • Right-click the Computer Collection, and then click Properties.

    • Click Advanced on the Completing the Backup Wizard page.

  2. In the Properties dialog box, click the Backup tab.

  3. On the Backup tab, select the Encrypt and protect backups with password check box.

  4. In the Set Password dialog box, type and confirm by retyping a password, and then click OK.

A password can contain any combination of letters, numerals, spaces, and symbols. Passwords are case sensitive, so if you vary the capitalization when you assign the password, you must type the same capitalization when entering the password. You can change the backup protection password later by clicking Set Password on the Backup tab. Write the password down and keep it in a secure place. If you lose the password, you cannot restore data from that backup since Recovery Manager for Active Directory asks you to type the password.

Active Directory backup encryption:

  • Recovery Manager for Active Directory uses Microsoft's implementation of the AES 256 algorithm from RSA, Inc. (Microsoft RSA Base Provider), with the maximal (normally, 128-bit) cipher strength.
  • If you specify a DC storage or UNC share for encrypted backups (DC Storage tab): A Backup Agent writes a backup directly to the storage to an encrypted temporary file. This temporary file is local or remote depending on the storage type. Data is encrypted in memory during a backup process. When the backup is done, the temporary file is renamed to the *.bkf file.
  • If you specify a console storage for encrypted backups (Console Storage tab): A Backup Agent writes a backup via RPC connection to the storage on the Recovery Manager Console machine, data is encrypted in memory.

Bare Metal Recovery backup encryption:

  • The specified password is used to generate a passphrase with which the backup is encrypted. The password cannot be used directly to unlock the backup container *.vhd(x) file.
  • Recovery Manager for Active Directory uses a virtual hard disk encrypted with BitLocker as a container for the backup (256-bit AES encryption). Only backup volume is encrypted on the VHD disk.
  • Data is encrypted in transport by the BitLocker engine on the DC being backed up.

NOTE:

  • Backup encryption does not depend on Active Directory in any way.

  • Recovery Manager for Active Directory does not send unencrypted data over the wire.

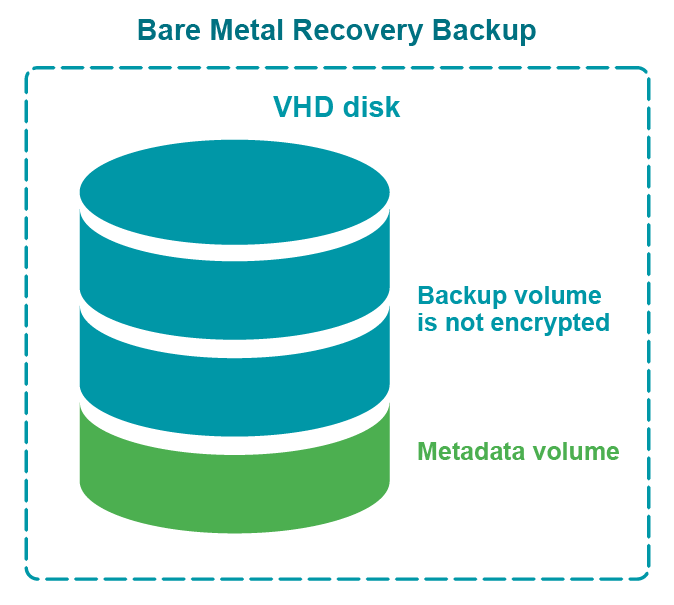
The BitLocker Drive Encryption feature should be installed on all backed up domain controllers and on the Forest Recovery Console machine to support encrypted BMR backups. But note that the BitLocker feature does not encrypt DC drives automatically.

Figure: Encrypted BMR backup

Resources/Images/EncryptedBackup-01.png

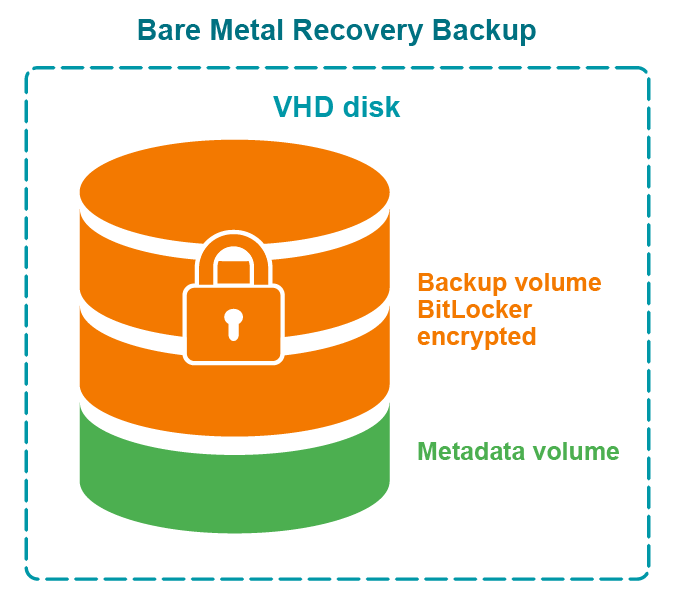
Figure: Not encrypted BMR backup

Resources/Images/EncryptedBackup-02.png


Backing up AD LDS (ADAM)

With Recovery Manager for Active Directory, you can back up Active Directory Lightweight Directory Services (AD LDS), previously known as Active Directory Application Mode (ADAM), by using one of the following methods:


Method 1: Back up AD LDS (ADAM) from the Recovery Manager Console

Complete these steps:


Related Documents

The document was helpful.

Select Rating

I easily found the information I needed.

Select Rating