The Benchmark Factory scripting feature known as BFScripts allows you to insert randomized data into the load testing process. You can use BFScripts when you add SQL transactions. See Transactions Tab for more information.
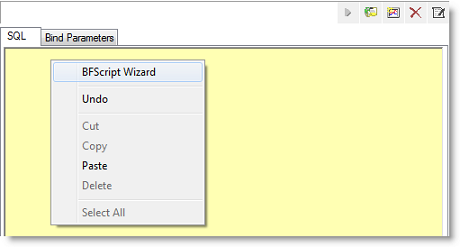
Script-enabled fields have a yellow background. A field has scripting capabilities if the field's right-click menu includes the BFScript Wizard option. The BFScript Wizard is a quick and easy way to use Benchmark Factory scripts. The BFScript Wizard provides you with a list of built-in script functions, grouped by category, from which to select. Each script function has a short description included, and if applicable, the function parameters. See About Scripts for an overview of BFScripts.
There are two features in Benchmark Factory that assist you when using scripting capabilities.
From within a script-enabled field (yellow background), right-click and select BFScript Wizard.
 .
.Select a category in the left pane to display BFScripts (functions) in the right pane.
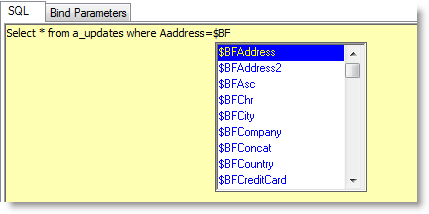
When entering a SQL statement, enter $BF. Script Assist automatically displays a list of scripts from which you can select.
SQL Preview allows you to preview the result set of an individual SQL statement when adding or editing a SQL transaction.
To run SQL Preview
 .
.
Latency is delay added to the execution of a transaction to control how fast transactions are submitted to the system-under-test. Latency is used to either make the transaction execution rate more like real-world executions or control the transaction rate. This delay can be added to the beginning and/or end of a transaction execution.
To specify latency values for an individual transaction, edit the transaction using the Transactions tab of the New/Edit Job Wizard. You can do this either at the time you add transactions/scenarios to a test or any time after the job is created.
You can also specify latency for all the child transactions of a test or user scenario at one time. See Replace Child Latencies for more information.
Benchmark Factory allows you to set default latency values for the transactions you add.
Real-World Delays: Add Keying Time and Think Time to create a workload that accurately simulates real-world users, as opposed to a workload that submits transactions as fast as possible. Using real-world delays allows for easier interpretation of the results. If you do not add delay, it might be difficult to equate N virtual users running with no delay to an accurate number of real users.
Interarrival Time: Specify Interarrival Time to create a workload in which transactions arrive at the system-under-test at a specific interval. This method allows you to set the timing relationship between the executing transactions and is commonly used when replaying a captured workload.
To modify latency values
Modify latency options. To specify no latency, select No Delay. To add latency, select one of the other options. Review the following for additional information:
| No Delay | Select to specify no latency. See No Delay for additional information. |
| Transaction Rate |
Select this option to set a transaction rate by specifying the interval between successive transactions arriving at the server. See Interarrival Time for more information. Interarrival Time—Select one of the following:
|
| Real-World Delays |
Use this option to simulate real-world processing by inserting a delay before and/or after each transaction execution. For each delay type, you can insert a fixed time by selecting Absolute, or you can select one of the distribution models for specifying time. To learn more about distribution models, see Latency Distribution Models. Keying Time—Inserts a delay before execution to simulate the amount of time spent performing data entry. See Keying Time for additional information. Think Time—Inserts a delay after execution to simulate the amount of time "to think" about the results of the previous transaction. See Think Time for additional information. |
No Delay means that transactions execute as fast as possible. As soon as one transaction is processed, the next transaction is issued against the server. In the case of a mixed workload test, each virtual user issues transactions as fast as possible.
The No Delay option is used when the goal of the test is to stress the system to its limits, without concern for accurately simulating users. With No Delay specified, a relatively low number of users can stress the system to its limits. However, there is no easy way to correlate N virtual users running with no delay to some number of real users.
Keying Time is used to simulate the amount of time spent performing data entry (entering information) before executing a transaction. In many cases, Keying Time is used with Think Time to provide a delay both before and after a transaction executes.
Specifying a Keying Time inserts a delay (either fixed or variable) before each transaction execution.
Think Time is used to simulate the amount of time spent thinking about the results of the previous transaction. This could be time spent performing analysis on the results of a database query.
Specifying Think Time inserts a delay (either fixed or variable) after each transaction executes.
Interarrival time is the time between two successive transactions arriving at the server. It is used to determine the average transaction rate as seen by the server (i.e., the rate at which transactions arrive at the server).
When you specify Interarrival time, Benchmark Factory is instructed to ensure that the transactions arrive at the server at the specified interval, regardless of how long a transaction actually takes to execute.
For example, if the Interarrival Time is set for 60 seconds and a transaction runs for 20 seconds, a delay of 40 seconds is added (60 seconds - 20 seconds = 40 seconds). If the next transaction takes 28 seconds, a delay of 32 seconds is added.
Transaction
Execution
Delay
Next Transaction
Execution
Delay --20 sec.--
--40 sec.-- --28 sec.-- --32 sec.-- 60 sec.
Interarrival Time
60 sec.
Interarrival Time
If a transaction takes longer than the Interarrival Time, the next interval is measured from the arrival of the next transaction.
Transaction
Execution
Next Transaction
Execution
Delay 60 sec.
Interarrival Time
60 sec.
Next Interarrival Time