
License information
The License page in the Admin Interface gives an overview of the usage to-date of Archive Shuttle against the purchased amount of licenses and license volume. It also shows key information about when the license will expire.
If required, a license can be extended and then added to the system. See Adding a New License.
Data on this page is refreshed hourly and shows exported data quantities at that time. User licenses are used when a user enters Stage 2.
A new license can be uploaded, if required.
License expiry notifications may be seen from time to time as the migration progresses. The notifications will appear as follows:
|
Notification |
Description |
|---|---|
|
Date |
When there is 7 days left before the license expires |
|
Volume |
When there is 3% left of the volume license |
|
Users |
When there is 5% of the user license count remaining |
Journal Transformation migration
Journal Transformation migrates a journal archive to a target environment in a special way that fans-out the recipient / custodian list. If an original message was addressed to three different people, then the item is exported, and ingested into up to four target containers.
Here are some reasons you might want to use Journal Transformation:
·It causes deliver/ingest messages to be sent to user mailboxes in the same way the Exchange or Office 365 modules do in regular migrations, rather than a separate mailbox.
·If a users data becomes corrupt or lost, journal archives can be used to recreate the users data.
·It can be used for leavers who lack archives.
·It is easy to distinguish external email addresses.
·It can help fulfill legal/compliance/regulatory requirements.
Requirements for Journal Transformation
All journaled Enterprise Vault content originating from Exchange or an SMTP stream is a supported source data and Archive Shuttle supports exploding data into Office 365. Connectors for PST as a source, and PST or Exchange as target are available through preview via Product Management.
Sizing information depends on several project details and should be reviewed within the scope of a project.
At a minimum, it is generally recommended to leverage a x64 EV Export module, a dedicated SQL Enterprise instance, and a minimum of 1 TB space for staging the data between source and target.
Procedure for a journal archive migration
There are a number of steps that need to be followed to configure and perform a journal archive migration. They are covered below.
Perform base configuration for Journal Transformation
Set up the base configuration of Journal Transformation (see how to do it here).
·Enable Modules
·Enable Domains
·Add EV Environment
·Add Source Links
·Add Staging Area
·Set Office 365 Credentials
Configure journal archive migration link
On the Configuration > Links page, select the Journal Explosion tab and create a new journal archive migration link.
The link can be given a name, and the target type must be selected from the available list.
Once the link has been created, an ingest module must be mapped to the link.
Office 365 environment configuration
If you will be migrating leavers, the Journal Explosion link must be configured in the Configuration > Office 365 Environment. This will include configuring the Office 365 Rolling license settings, the naming scheme for DL, Groups and E-Mail domain, and leaver mailbox settings; such as enabling Litigation Hold.
Confirm the general folder location for ingesting items
The Journal Transformation default folder location for active users, is the Recoverable Items Folder in the target container and for a leaver user, the default folder location is Journal Items in the target container
These folder locations can be overridden on an individual user mapping basis by creating a Folder Name Policy. On the Configuration > Naming Policies page, select the Folder Name Policy tab and create the required policy.
Journal Transformation system configuration
User Domain Whitelist
All exploded SMTP addresses are stored in Journal Transformation. However, only the user domains added to the Accepted Domains List will be enabled for further processing.
To configure the domain whitelist, go to Configuration > System Configuration > Journal Explosion Settings and add the allowed user domains that are required to the Accepted Domains List.
The Journal Transformation System settings at Configuration > System Configuration > Journal Explosion Settings will require configuration and are dependent on the migration project dependencies and requirements.
Ensure you plan and consider the relevant settings during the design phase of a project before embarking on a journal migration.
Check/confirm general location for ingest items
In the System Configuration section of the user interface, go to the Journal Explosion Settings tab.
On this page you can set a general folder to be used when ingesting the items into the target container. This can be overridden on an individual user mapping. If one is not specified then the Recoverable Items Folder is used in the target container.
Create mapping
The source environment, associated staging areas, and module mappings then need to be configured. Once those are done, a mapping can be created for the source container.
When creating the mapping, there is an option to use Journal Explosion, rather than normal migration.
|
|
NOTE: If you have a large source journal container, you may want to consider using date range filters to break down the source journal into smaller/multiple mappings. This should be carefully planned before creating any mappings. |

Export Starts
Journal archive migration is done during export. As the item is exported, the P1 information is reviewed for SMTP addresses. These addresses then need to be mapped, as described in the next section.
Journal Transformation user management
As items export from the source container and are analyzed for recipient information a list is built up that needs to be reviewed, mapped, and enabled for migration. This is done on the Journal Explosion User Management page in the user interface.
You can enable/add users for import manually or automatically.
To perform the process manually, you first need to add the user manually or by .csv import. Click here to view instructions on creating a .csv file.
Add an active user SMTP manually
1.Go to Archive Shuttle > System Configuration and select Journal Explosion User Management.
2.From the Select Journal Explosion Name drop-down, select All or the required Journal Explosion container mapping.
3.Click Add.
4.In the Enable Users for Journal Explosion window, select the required active user SMTP and click Save & Close.
5.The selected user SMTP is now enabled for use in Journal Transformation and is added to the User Mappings screen
|
|
NOTE: If you need to manually change the Mapped SMTP Address or assigned Folder Name Policy on the mapping, select the relevant mapping and use the appropriate toolbar button. |
Add active user SMTP using a .csv file
A .csv file can be used to add users for Journal Transformation.
The csv file requires the format to be: OriginalSMTPAddress,MappedSMTPAddress
1.Go to Archive Shuttle > Configuration and select Journal Explosion User Management.
2.From the Select Journal Explosion Name drop-down, select All or the required Journal Explosion Container Mapping.
3.Click Import from .csv.
4.Click Browse and select your .csv file.
5.Ensure the option, Update existing user mappings is NOT selected.
6.Click Import.
7.The selected user SMTP is now enabled for use in Journal Explosion and is added to the User Mappings screen.
|
|
NOTE: If you need to manually change the Mapped SMTP Address or assigned Folder Name Policy on the mapping, select the relevant mapping and use the appropriate toolbar button. |
Enable the users for import manually
Once the user mappings are made either from a .csv file or manually, and a folder policy is applied (if required), one or more of the user mappings can then be enabled for migration.
Manually enable for import an active user SMTP
To manually enable a user SMTP:
1.On the User Mappings page, select the required user SMTP.
2.Ensure the selected Sender-Recipient SMTP status is:
oHas Mailbox = Yes
oIs Ready for Import = Ready
oEnabled for Import = No
oIs Deleted = No
3.Click the Enable for Import button.
4.Ensure the Enabled for Import status changes to Yes (Enabled) for the selected Sender-Recipient SMTP.
Automatically Add and Enable Users
Rather than enabling users for import using .csv file mappings, you can set configuration rules and then auto-enable certain users and domains for import based on those rules.
Use wild card operators to create general rules that result in a larger number of Journal Explosion user mappings.
Create user auto creation rules
1.On the Auto-Creation Rules page, click Add.
2.Use the Add User Rule window to create rules. The rule editor works with these wild cards operators: *,%
3.Click Add.
4.The configured rules display on the Email Address Rules page.
The mappings that were created to existing users/target containers will progress as normal. For example, if you have mapped a source SMTP address of abc@somedomain.com to an existing mailbox with an address of abc@somedomain.com, then the import process will begin for that mapping.
Leavers
For leaver mappings, the configuration defined on the Office 365 Environment page will be used. Mailboxes will be created and licensed, as required, using a rolling license count. This operates in much the same way as the process for migrating ownerless archives to Office 365. The difference is that the Office 365 license will be added, and removed, as required, during Stage 1. The addition and removal of the license may happen multiple times.
|
|
NOTE: Bulk actions cannot be performed when you create manual mappings to external SMTP addresses. |
During a journal archive migration, leavers are handled on a global level. So, for example, you can ingest the same user from different journals or mappings into the same mailbox. You can manage leavers, including adding/removing/merging them, from the Journal Explosion Leavers Management page.
Leavers Finalization
1. Click the Manage Leaver(s) Finalization button on the Journal Explosion Leavers Management page.
2. The status page shows only leavers that are enabled for import. Each row represents an SMTP address (target mailbox).
3. After you click Finalize, mailboxes progress through these statuses:
·Finalization Started
·User Mailbox Licensed
·Placed On Hold
·Finalized
|
|
NOTE: When finalization is complete, the target leaver mailbox is removed (made into an InActive Mailbox), and no other actions can be performed against the leaver. |
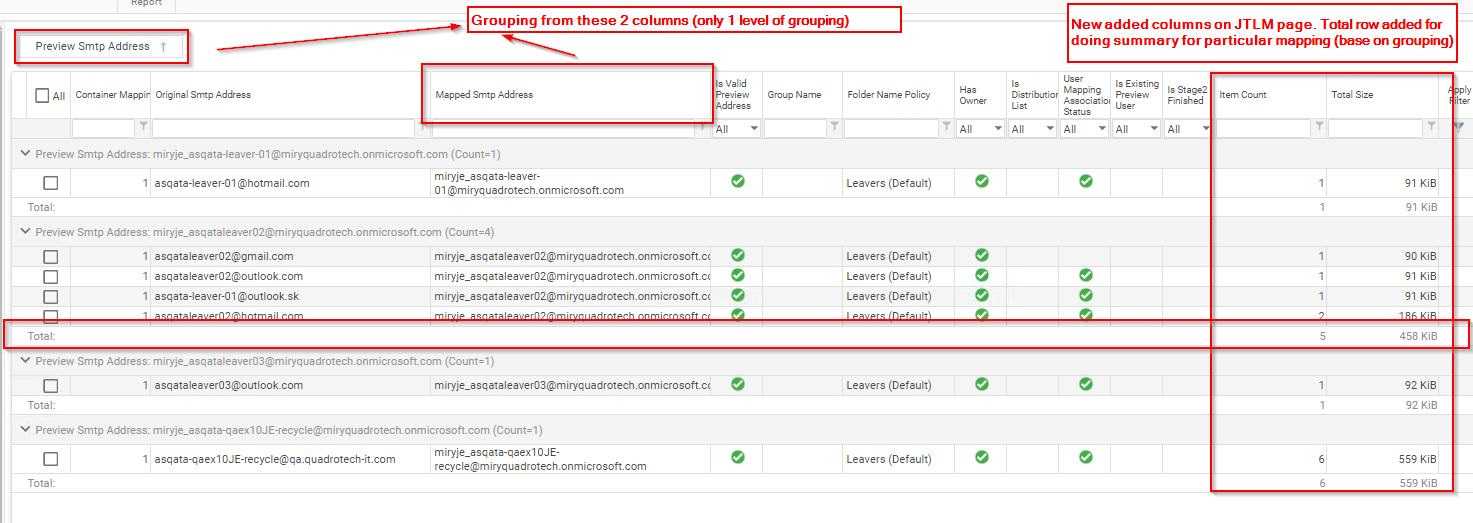
Viewing pre-migration statistics for Journal Transformation leavers
On the Journal Transformation leavers management page, it is possible to see statistics relating to overall item counts and overall item sizes. Having this information helps operators determine what actions might be possible with the leavers in terms of migration.
Here is how it looks in the user interface:
Management and Monitoring
Tracking Progress
A Journal Transformation mapping can be viewed on the Stage 1 page in the user interface. It is also possible on this page to expand the mapping and see the progress on a per user basis. This can also be exported to supported formats (ex. .xls, .pdf.)
Additional Notes
There are some additional notes to be aware of when using Journal Transformation:
·Items may be skipped on ingest. This happens when an item to be ingested into a user mapping is older than the creation date of the user. These can be reviewed in the log files and database. If assistance is needed, contact support.
·User mappings can be imported from .csv file to aid with the handling of a large list of recipients.
·In JE to Office 365 migrations, you can create user-defined mailbox naming tokens per container mapping using the Bulk Mappings Wizard.
·When an item has been imported into all applicable user mappings it will be removed from the staging area. Later, if a new user mapping is created, requiring that same item, it will be re-exported. This will not affect the license usage.
·When using Journal Transformation with Enterprise Vault as a source, you are able to process messages without P1 headers by enabling the option to Process messages without P1 header on the System Configuration > EV Export Module page.
·Enterprise Vault 9 and below is excluded from Journal Transformation selective migrations.
Enterprise Vault to Office 365
The following is a general recommendation for large journal migration projects using the journal transformation process based on the current understanding of the project. Additional hardware may be needed depending on expected performance of the migration.
High level requirements
·Bridgehead servers: 2 per EV server to run EV Export and Office 365 Import modules.
·Staging areas: 1 per EV server sized to the largest individual journal on the server (1.2-1.5x).
·Office 365 service accounts (five per Bridgehead server).
·Available Exchange Online licenses (around 100).
·Remote access for managed migration.
Machine specifications and additional information
Core server
·Windows Server 2012R2, 2016, 2019 and 2022.
·Minimum 4 CPU (recommended 8 CPU).
·Minimum 8GB RAM (recommended 16GB RAM).
·IIS 7.5 or later is required.
SQL server
·Windows Server 2016, 2019.
·SQL server 2016, 2017.
oEnterprise Edition highly recommended.
oUse the latest versions (Windows 2016/2019, SQL 2016/2017).
oMinimum 16 CPU, recommended 32 CPU (cores or vCPUs).
oIf using less than 32 cores, please ensure that CPU clock speed is equal to or more than 2.8Ghz.
oRecommended 512GB RAM (recommended 1TB RAM).
·SQL storage
oDisks should be configured as per Microsoft SQL server best practices with TempDB, databases and logs separate disks.
oAssume approximately 5K per item (as shown in the EV usage report) when sizing the storage for database. This is dependent of the number of recipients per message and is only an initial estimate.
oUse fast tier 1 disk arrays, SSD is recommended.
·The SQL server must be treated as you would a production server.
oMaintenance plans including full backups are the responsibility of the customer. Click here for more information.
Remote access for managed migrations
Customer must provide access to assigned Quadrotech staff with sufficient privileges to administer any system involved in the project. Specifically, the following:
·Required
oAccess to Archive Shuttle core server
·Optional, but highly recommended
oAccess to module servers (bridgehead servers)
oAccess to SQL server or MSSQL Management Studio
oAccess to staging areas
·Remote access to the on-premises server(s) for the Quadrotech Delivery and Operations teams is required, either through Citrix VDI, VPN, or other remote access technology.
|
|
NOTE: WebEx is not suitable nor is anything that requires the customer to initiate the session. |
Bridgehead servers (two per EV server)
·Windows Server 2012 R2, 2016 or 2019.
·Minimum 4 CPU (recommended 8 CPU).
·Minimum 16GB RAM (recommended 32GB RAM).
·.net 3.5.1.
·.net 4.6.2 or later.
Staging areas (one per bridgehead server)
·Volume sized to the largest individual journal on the EV server (1.2-1.5x).
oShared via SMB; can be attached to the bridgehead server, recommended on a datastore with a fast disk, or on fast NAS storage.
Available Office 365 (EXO) licenses
·The process of finalizing and managing leaver mailboxes in Office 365 requires Archive Shuttle to have licenses to work with during the migration.
·It is recommended to have around 100 licenses to ensure that Archive Shuttle can migrate to as many targets at once (parallelism), and finalize leaver mailboxes.
·These licenses would only be needed during the migration (finalization and management of leavers will be removed and and returned as soon as the migration is complete.
·The number of licenses Archive Shuttle has access to heavily affects the overall performance.
Office 365 throttling limits
In order to achieve the best migration performance possible, it is recommended to contact Microsoft and request that throttling be lifted. Click here for more information.
Globally increase message size limit from 25 MB (optional)
Click here for more information on size limits when ingesting into Office 365.
Anti-virus exclusions
Generally, Archive Shuttle requires anti-virus exclusions on any machine running the Archive Shuttle modules. This would include EV servers in addition to the bridgehead server (ingest server):
·Exclude staging area volumes
·Disable Real-time scanning
·Disable In memory scanning (if available)
Click here for more information.
Selective migration based on recipients collected from EV Index
Recipients can be collected separately. It has been seen to improve performance, and reduces the staging area space requirements.
A Journal Transformation setting enables this feature.
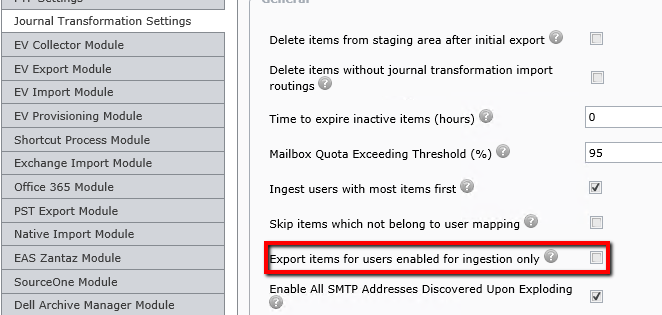
Once it is enabled, when the bulk mapping wizard is used part way through the wizard you will be asked if you want to export items for users enabled for migration only. This will now default to true, but you can disable it on that mapping if you wish, and the old way will be used.
On the summary screen, you will see confirmation that Archive Shuttle will use the EV Index.
Items are collected. Once some item data has been collected, the collection for sender and recipient information is handled via the EV Collector, and it will query the EV Index. All of the recipients will be collected and sent to the core. This collection can be retried if required.
The Existing Mapping page has an advanced view option. If this is selected the mappings will show export based on ev index if weve used this feature. It can be disabled on a mapping by mapping basis as well. This is dynamic and can be done on a mapping which is part way through being processed.

Selective migration is also visible on the Stage 2 screen, after adding additional columns:
·Export based on EV index
·Collecting count
·Collected count
·Retryable errors (Sender recipient collection)
·Permanent errors (Sender recipient collection)
The layout can be saved, if required.
If there are errors during collection, the mapping wont be marked in red as theyre only failures during the collection itself. Sender / Recipient collection can be retried from the Journal Transformation tab.
User mappings can be created based on this collected sender/recipient information, and the mappings enabled. When this is done, the EV Export module will then begin to export the data for those mappings. This reduces the storage area space needed for a Journal Transformation migration.
Leavers are supported in this scenario as well.
The EV Collector must run under a service account which has access to query the index for the archives mapping for migration.
Finally the failed item page has been enhanced to introduce a new tab Sender Recipient Collection. This will show any issues with collection of sender/recipient information from the EV Index. These errors can be retried, if required.
There is a fallback mechanism for collection. Collection will retry 10 times, before being marked as permanently failed. These items are exported in the old way, in order to get the sender/recipient information from the item itself, and the sender/recipient information gathered from that.