Using the Restore Active Directory with Install Active Directory method you can restore the entire forest or any of its domains on the freshly installed Windows® machines. This recovery method can be used, for example, when existing BMR backups contain the infected OS image. In this case, Active Directory® backups can be used due to they do not contain binaries (except Sysvol files). Active Directory backups can be also checked for viruses.
Domain controllers that are running on virtual machines in Amazon Web Services (AWS) or Microsoft Azure can be restored with the Restore Active Directory with Install Active Directory method.
| NOTE |
The first step of the Restore Active Directory with Install Active Directory recovery method is to promote the selected Windows® server to a domain controller. This operation cannot be performed for Windows Server® 2012 R2 or higher machines with FRS replication. So, Restore Active Directory with Install Active Directory is supported only for Windows Server® 2012 R2 or higher with DFS Replication. |
At the first stage of the Restore Active Directory with Install Active Directory recovery method, the DNS server role is installed on a domain controller. For this reason, it is recommended to use a backup that was made on the AD-integrated DNS server for Install Active Directory recovery. You can still use backups that were made on the non-AD-integrated DNS server but in this case you should not use Automatic DNS selection option on any domain controller in such a domain.
If your domain has AD-integrated DNS servers restored from backup, you need to specify the DNS settings manually.
After recovery, the domain controller that was restored by the Restore Active Directory with Install Active Directory recovery method synchronizes DNS partitions and continues to be a DNS server.
If your domain uses external DNS, you need to specify the DNS settings manually for every domain controller in the domain.
After recovery, the domain controller restored by the Restore Active Directory with Install Active Directory recovery method will run a non-functional DNS server so you can uninstall it.
If you are testing Forest Recovery in the lab environment and your production forest uses an external (non-AD integrated) DNS server.
You can prepare the lab by installing a new DNS server (e.g. on the RMAD server).
Create empty DNS zones on this server in accordance with your production DNS configuration.
Ensure that SOA and NS records created in the empty zone have the FQDN DNS name corresponding to this DNS server.
Create an A record pointing to this server IP address in each zone.
Ensure that non-secure DNS dynamic updates are enabled.
A blank host should comply with the following requirements:
The version of the Windows operating system must match the version deployed on the failed domain controller.
A blank host must have the same drive letters as the source domain controller if the Use AD paths from backup check box is selected or the drive letters must match the custom paths specified in the project.
A blank host should have enough free space for AD and SYSVOL data.
The account that is specified in Forest Recovery Console to access the target blank host should be the local Administrator on this machine.
As noted above, it is important that the version of the Windows operating system match the version deployed. During the Verify operation, a warning is given if the target windows version does not match the backup windows version. The versions are reported in the status.
The following image shows the operation succeeding.
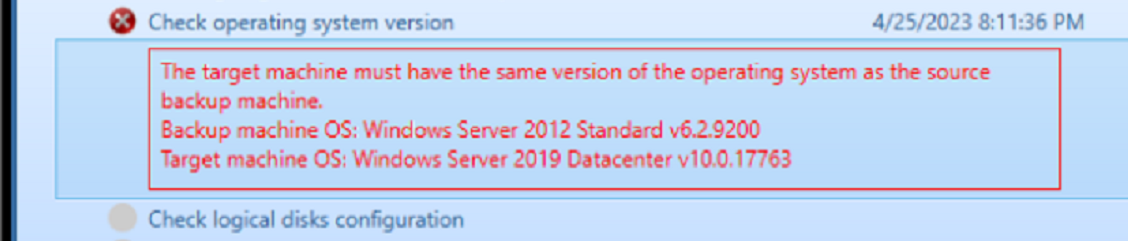
When the Major and Minor versions do not match, meaning that at least one of the OS versions is below 2016, an error is presented.
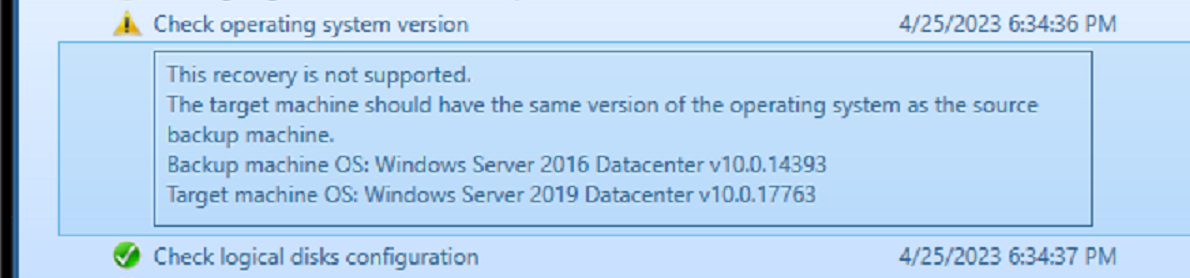
When both systems are 2016/2019/2022 but they do not match, a warning is presented. While it is possible that the operation will work, it is recommended that it should not be performed.
Select any appropriate Active Directory backup file ensuring it has the extension .BKF on the file.
Recovery Manager for Active Directory promotes the selected Windows server to a domain controller and then restores Active Directory® data.
The Install Active Directory method has an Infrastructure tab which allows you to create a system in Microsoft Hyper-V®, VMware ESXi®, or Microsoft Azure®. Select the Infrastructure tab and then select the wanted environment from the Infrastructure drop down.
To use the Install Active Directory Method and create it on a virtual machines in Microsoft Hyper-V®, see Create virtual machines in Microsoft Hyper-V®.
To use the Install Active Directory Method and create it on a virtual machines in VMware ESXi®, see Create virtual machines in VMware ESXi®.
To use the Install Active Directory Method and create it on a virtual machines in Microsoft Azure®, see Create virtual machines in Microsoft Azure®.
Using the Restore Active Directory on Clean OS method you can restore the entire forest or any of its domains on the freshly installed Windows® machines. This recovery method can be used, for example, when existing BMR backups contain the infected OS image. In this case, Active Directory® backups can be used due to they do not contain binaries (except Sysvol files). Active Directory backups can be also checked for viruses.
Domain controllers that are running on virtual machines in Amazon Web Services (AWS) or Microsoft Azure can be restored with the Restore Active Directory on Clean OS method.
| NOTE |
The first step of the Restore Active Directory on Clean OS recovery method is to promote the selected Windows® server to a domain controller. This operation cannot be performed for Windows Server® 2012 R2 or higher machines with FRS replication. So, Restore Active Directory on Clean OS is supported only for Windows Server® 2012 R2 or higher with DFS Replication. |
At the first stage of the Restore Active Directory on Clean OS recovery method, the DNS server role is installed on a domain controller. For this reason, it is recommended to use a backup that was made on the AD-integrated DNS server for Clean OS recovery. You can still use backups that were made on the non-AD-integrated DNS server but in this case you should not use Automatic DNS selection option on any domain controller in such a domain.
If your domain has AD-integrated DNS servers restored from backup, you need to specify the DNS settings manually.
After recovery, the domain controller that was restored by the Restore Active Directory on Clean OS recovery method synchronizes DNS partitions and continues to be a DNS server.
If your domain uses external DNS, you need to specify the DNS settings manually for every domain controller in the domain.
After recovery, the domain controller restored by the Restore Active Directory on Clean OS recovery method will run a non-functional DNS server so you can uninstall it.
If you are testing Forest Recovery in the lab environment and your production forest uses an external (non-AD integrated) DNS server.
You can prepare the lab by installing a new DNS server (e.g. on the RMAD server).
Create empty DNS zones on this server in accordance with your production DNS configuration.
Ensure that SOA and NS records created in the empty zone have the FQDN DNS name corresponding to this DNS server.
Create an A record pointing to this server IP address in each zone.
Ensure that non-secure DNS dynamic updates are enabled.
A blank host should comply with the following requirements:
The version of the Windows operating system must match the version deployed on the failed domain controller.
A blank host must have the same drive letters as the source domain controller if the Use AD paths from backup check box is selected or the drive letters must match the custom paths specified in the project.
A blank host should have enough free space for AD and SYSVOL data.
The account that is specified in Forest Recovery Console to access the target blank host should be the local Administrator on this machine.
As noted above, it is important that the version of the Windows operating system match the version deployed. During the Verify operation, a warning is given if the target windows version does not match the backup windows version. The versions are reported in the status.
The following image shows the operation succeeding.
When the Major and Minor versions do not match, meaning that at least one of the OS versions is below 2016, an error is presented.
When both systems are 2016/2019/2022 but they do not match, a warning is presented. While it is possible that the operation will work, it is recommended that it should not be performed.
Select any appropriate Active Directory backup file ensuring it has the extension .BKF on the file.
Recovery Manager for Active Directory promotes the selected Windows server to a domain controller and then restores Active Directory® data.
The Restore Active Directory on Clean OS recovery method has an Infrastructure tab which allows you to create a system in Microsoft Hyper-V®, VMware ESXi®, or Microsoft Azure®. Select the Infrastructure tab and then select the wanted environment from the Infrastructure drop down.
To use the Restore Active Directory on Clean OS recovery method and create it on a virtual machines in Microsoft Hyper-V®, see Create virtual machines in Microsoft Hyper-V®.
To use the Restore Active Directory on Clean OS recovery method and create it on a virtual machines in VMware ESXi®, see Create virtual machines in VMware ESXi®.
To use the Restore Active Directory on Clean OS recovery method and create it on a virtual machines in Microsoft Azure®, see Create virtual machines in Microsoft Azure®.
You can use the Forest Recovery Console to create Microsoft Azure Virtual Machines. You can then use the Restore Active Directory® to Clean OS recovery method or the Install Active Directory recovery method to restore Active Directory® on the virtual machine.
To create a virtual machine in Microsoft Azure®
In the Forest Recovery Console, create a new project or select an existing recovery project.
Select the Domain Controller to be created as a virtual machine in Azure®.
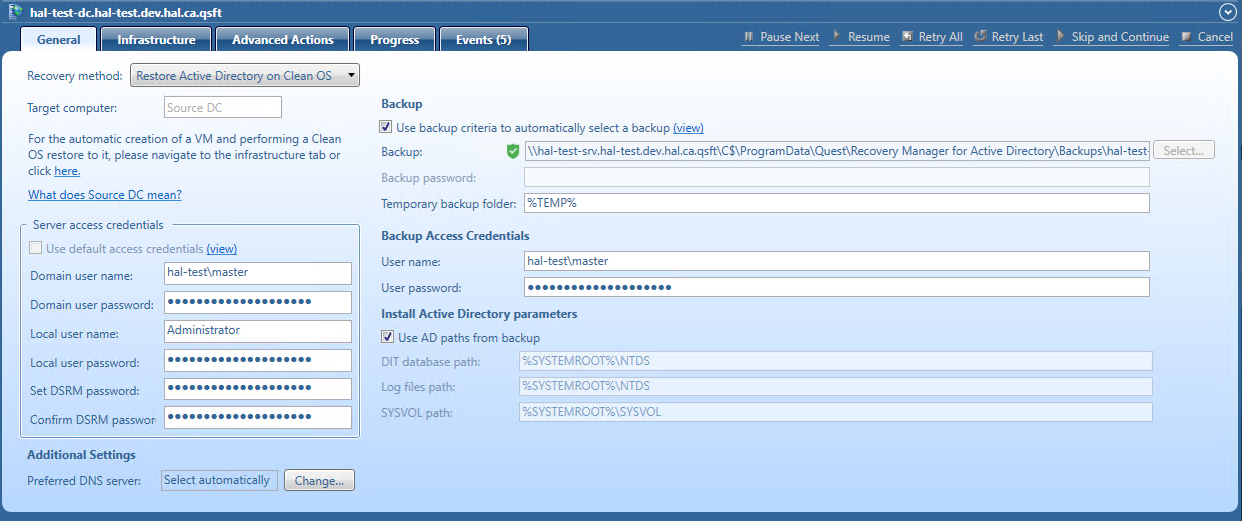
From the Recovery Method drop-down list, select Restore Active Directory on Clean OS.
In the Server access credentials section, type the user name and password that you want to be created as a local account on the new virtual machine in Azure®. These credentials are used during the Forest Recovery process.
NOTE: You cannot use 'Administrator' in the Local user name field as this name is reserved in Azure®.
In the Backup Access Credentials section, type the user name and password to access the selected backup file. Note that the Backup Access Credentials are not required if the backup is located on target domain controller. The backup file must be accessible from the Forest Recovery Console and from the newly created DCs in Azure®. For example, if your backup is located on a file share in Azure®, supply credentials with access to the file share.
NOTE: The backup file must be accessible from both the Forest Recovery Console server and the newly created DCs in the Azure® virtual network. For example, backup may be located on Azure® File Share or access to backup files located on premise from the Azure® virtual network may be configured by setting up a Site-To-Site VPN connection.
To create a virtual machine in Microsoft Azure®
In the Forest Recovery Console, create a new project or select an existing recovery project.
Select the Domain Controller to be created as a virtual machine in Azure®.
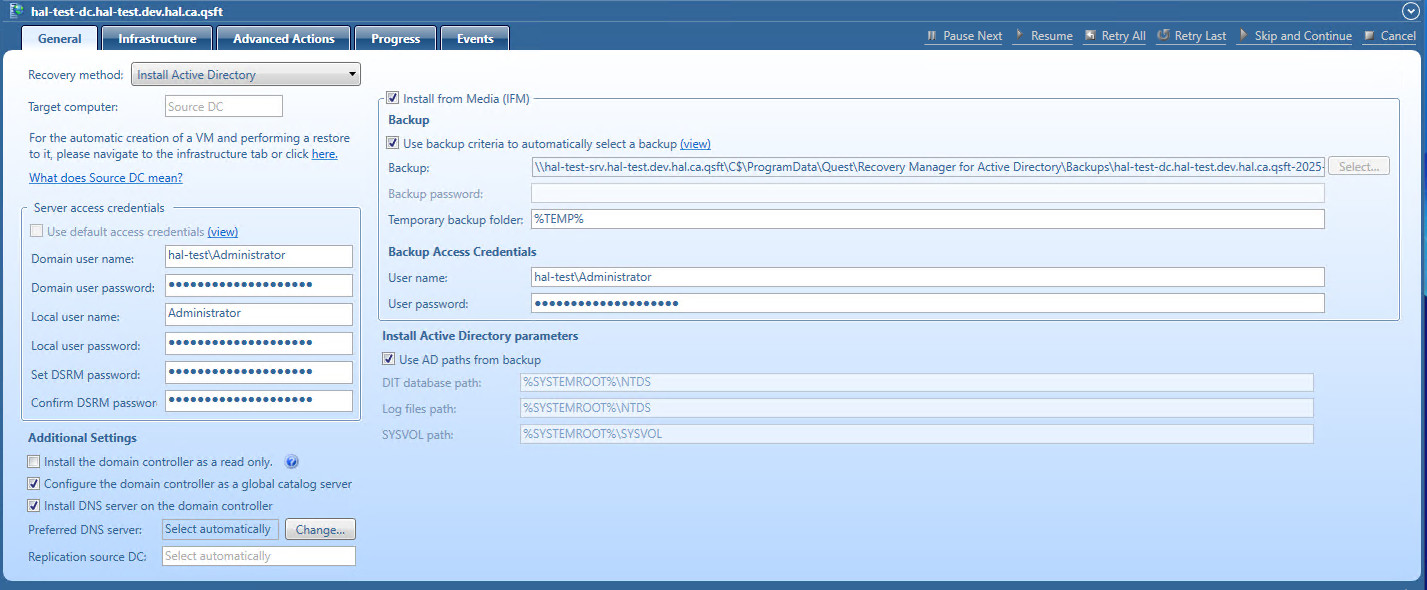
From the Recovery Method drop-down list, select Install Active Directory.
In the Server access credentials section, type the user name and password that you want to be created as a local account on the new virtual machine in Azure®. These credentials are used during the Forest Recovery process.
NOTE: You cannot use 'Administrator' in the Local user name field as this name is reserved in Azure®.
In Additional Settings section, make the selections for Domain Controllers.
Install the domain controller as a read only: Select the check box to install the domain controller as a read only domain controller.
Configure the domain controller as a global catalog server: Select the check box (default) to configure the domain controller as a global catalog server.
Install DNS server on the domain controller: Select the check box (default) to install the DNS server on the domain controller.
Preferred DNS server: The default is Select automatically. Click on the change button to change the settings.

Replication source DC: Displays the Replication source domain controller.
In the Backup Access Credentials section, type the user name and password to access the selected backup file. Note that the Backup Access Credentials are not required if the backup is located on target domain controller. The backup file must be accessible from the Forest Recovery Console and from the newly created DCs in Azure®. For example, if your backup is located on a file share in Azure®, supply credentials with access to the file share.
NOTE: The backup file must be accessible from both the Forest Recovery Console server and the newly created DCs in the Azure® virtual network. For example, backup may be located on Azure® File Share or access to backup files located on premise from the Azure® virtual network may be configured by setting up a Site-To-Site VPN connection.
Azure VM Creation - Users can set the DefaultOSVersion and DefaultNumberofCores for CPU (Only applicable for Azure VMs):
Set-RMADFEGlobalOptions -AzureVMDefaultOSVersion "10.0.17763" -Save
Set-RMADFEGlobalOptions -AzureVMDefaultNumberOfCores 4 -Save
NOTE: When Verify Settings is run, the .ISO image is created. If you wish to set the RMADFEGlobalOptions after Verify Settings, you must first delete the ISO Image from both the RMAD console server and storage location for the VM, run it again to re-generate the ISO:
For example:
The OS Image is found on the console server at:
C:\ProgramData\Quest\Recovery Manager for Active Directory\Cache\OSImage
The OS image is then copied to Storage location set from the infrastructure tab in The FRConsole.
for example
B:\vms\QuestRecoveryImages
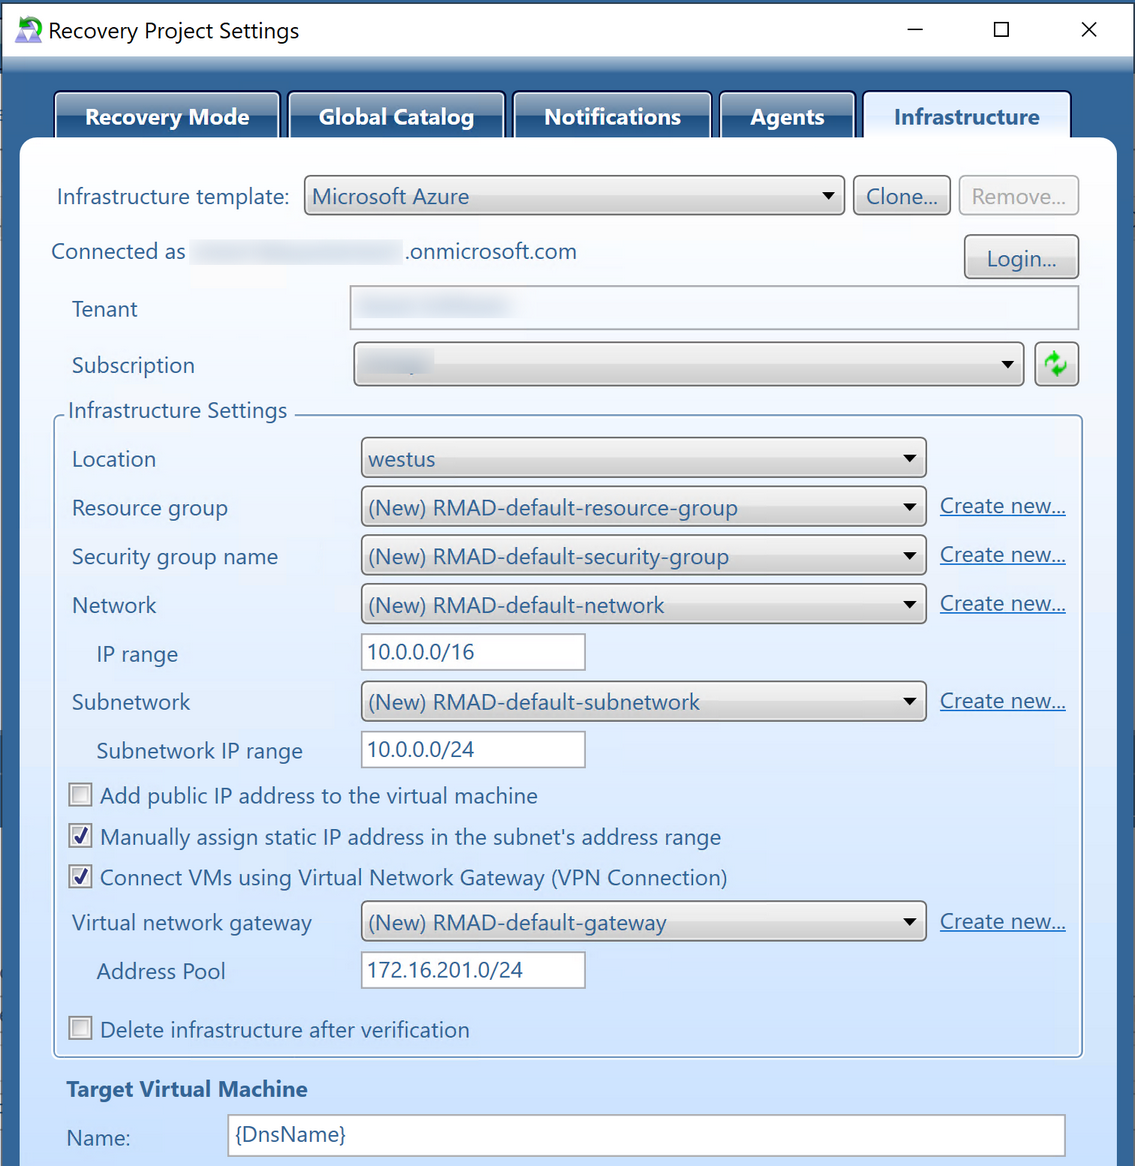
On the Infrastructure tab, from the Infrastructure drop-down list, select Microsoft Azure.
Click Edit to configure the infrastructure template and virtual machine settings.
In the Recovery Project Settings window, on the Infrastructure tab, click Login to sign in to the Azure® tenant. Provide a user account that is assigned an Azure role with create and write permissions for the required resource group and all other virtual machine resources. The Azure® built-in role of Owner or User Access Administrator on the subscription is recommended.
IMPORTANT: Support has been added for accounts that have access to multiple tenants. The tenant where the account exists will be displayed in the Tenant field. The subscription drop-down menu will display all of the subscriptions in all tenants that the account has access. When you select a subscription then the tenant which the subscription is a part of, will be displayed in the Tenant field. Use caution when selecting a subscription as you should ensure it is from the correct tenant.
IMPORTANT: To disconnect from the tenant you must use the Azure Az PowerShell module cmdlet Disconnect-AzAccount. To do this select Quest in the Start menu and then click on Management Shell. This opens the RMAD management shell and then enter Disconnect-AzAccount. It will take a few moments to disconnect from the Azure tenant and all of the settings will be cleared. To change to another tenant, without disconnecting, click Login, add the new tenant and authenticate.
The minimal required permissions are:
In case the target resource group does not exist:
| Permission | Scope |
|---|---|
| */read | Subscription |
| Microsoft.Resources/subscriptions/resourceGroups/write | Subscription |
| Microsoft.Authorization/roleAssignments/write | Subscription |
In case the target resource group exists:
| Permission | Scope |
|---|---|
| */read | Subscription |
| Microsoft.Authorization/roleAssignments/write | Resource Group |
The RMAD service principal is automatically granted "Owner" role for the target resource group.
NOTE: To create a virtual machine in Azure, the Az Powershell module is required. If the module fails to install automatically, click the link provided to download and install the module manually. After installation, click refresh to update the information on the Infrastructure tab.
NOTE: If the virtual network, network security group, or virtual network gateway resources are in a different resource groups than the one where the virtual machine is created, Owner permissions are required on each of these resources.
NOTE: The RMAD service principal is automatically granted "Owner" role for the target resource group. In case the virtual network, network security group, or virtual network gateway are located in the resource groups other than the resource group where the virtual machine is created, the RMAD service principal is automatically granted "Contributor" role for that resource groups.
After successful login, the fields on the Infrastructure tab are populated with information retrieved from the tenant. This includes available subscriptions, resource groups, networks, and security groups. If the resource already exists in the selected Azure® subscription RMAD will not create a duplicate. This reuse of resources is recommended for performance of your restore operation.
From the Subscription drop-down list, select the subscription to be used by the infrastructure template.
IMPORTANT: Support has been added for accounts that have access to multiple tenants. The tenant where the account exists will be displayed in the Tenant field. The subscription drop-down menu will display all of the subscriptions in all tenants that the account has access. When you select a subscription then the tenant which the subscription is a part of, will be displayed in the Tenant field. Use caution when selecting a subscription as you should ensure it is from the correct tenant.
In the Infrastructure Settings section, configure the following settings:
Location: Select the location where the virtual machine will be created. When Location is selected ALL resource groups, security groups, virtual networks and VM sizes within this location are populated and displayed.
Resource group: Select an existing resource group for the virtual machine or click Create new to create a new resource group.
Security group: Select a Network Security group from the drop-down list of the network security groups within the Location that are displayed. Click Create new to create a new Network security group within the selected Resource group.
Network: Select the virtual network from the drop-down list of all of the networks within the Location that are displayed. Click Create new to add a new virtual network within the selected Resource group.
Subnetwork: Select a subnetwork from the drop-down list of all of the subnetworks within the Location that are displayed. Click Create new to create a new subnetwork within the selected Resource group.
IP range: Specify a custom private IP address space using public and private (RFC 1918) addresses. Azure assigns resources in a virtual network a private IP address from the address space that you assign.
Subnetwork IP range: Specify a subnetwork address range in CIDR notation (for example, 192.168.1.0/24) and it must be contained by the address space of the virtual network.
To assign a public IP address for the virtual machine to be created in Microsoft Azure select the Add public IP address to the virtual machine checkbox. After the template settings are configured and the Azure® template is applied to domain controllers a Public IP address will be assigned to the newly created VM.
To manually assign a static IP address for the virtual machine to be created in Microsoft Azure select the Manually assign a static IP address in the subnet's address range checkbox. After the template settings are configured and the Azure® template is applied to domain controllers, click the Infrastructure tab for the domain controller, under Target Virtual Machine. Type a valid IP address within the sub-network IP range for the virtual machine in Azure®. When the virtual machine (Domain Controller) is created in Azure®, the IP address will be statically assigned.
The Forest Recovery Console should have access to the virtual network where the Azure® virtual machine will be created. If there is no Point-to-Site or Site-to-Site VPN connection to the Azure® virtual network exists, select the Connect VMs using Virtual Network Gateway (VPN Connection) check box to connect to Azure® using an existing Virtual Network Gateway, or to create a new Virtual Network Gateway. When this checkbox is selected, a VPN connection to Azure® will be configured automatically on the Forest Recovery console machine for communication.
When you select virtual network, all subnetworks for this network and virtual network gateways attached to this network are displayed.
Next, complete the following steps:
From the Virtual network gateway drop-down list, select an existing Virtual network gateway from all of the gateways listed for the Location. Click Create new to create a new Virtual network gateway.
In the Address Pool field, an IP address received from the client address pool is listed for VPN clients that connect to the virtual network using this point-to-site connection.
IMPORTANT: The Virtual Network Gateway(VPN connection) will take approximately 30 minutes to be created. If Connect VMs using Virtual Network Gateway (VPN Connection) and Delete Infrastructure after verification are both selected, the Virtual Network Gateway will be deleted as part of the infrastructure. Since the Virtual Network Gateway will need to be created again during the restore operation, the length of time required for the recovery will be increased by 30 minutes.
To remove only those resources created by the Verify Settings process, select the Delete infrastructure after verification check box. After the Verify Settings process is complete, only those resources created within the Resource group will be removed from the Resource group. This is useful for testing purposes or to manage cost. During recovery, the required Azure® resource will be created. If the Delete infrastructure after verification check box is not selected, resources created by the Verify Settings will remain and will be used for future verifications and recoveries.
NOTE: If unused resources are not deleted, this may incur additional cost for your tenant.
In the Virtual machine Settings section, configure the following settings:
Virtual machine name: Type a name for the virtual machine or use the {DnsName} template.
Overwrite the VM if exists: Select this check box if you want the new VM to overwrite an existing one with the same name.
Delete VM after verification: Select this check box to delete the virtual machine after the Verify Settings process is complete. This is useful for testing purposes or if the machine is expected to be unused and to manage cost. The check box is automatically selected when the Delete infrastructure after verification is selected. If a recovery process is started, the machine is recreated.
Virtual machine size: Select the instance type for the virtual machine size that you want based on the number of CPUs and amount of memory. A full list of all available instance types is provided for selection.
Auto select virtual machine size: Select this check box to have the virtual machine size automatically selected based on the original domain controller configuration. When automatically selecting the virtual machine size, Recovery Manager for Active Directory uses the Microsoft Azure® Virtual Machine D-series for general purpose computing. The number of cores is then read from the backup and the closest match found. For cost efficiency the smallest available memory size is selected.
Storage type: Select the storage type. This affects performance.
Disk size: Select Use Original Sizes for the disk size to be determined by the size of the Active Directory data size (DIT, LOGS, SYSVOL) in the back up. Select Set Size to customize the size of the disk for the virtual machine.
NOTE: The disk will have a minimum size (128 GB for an operating system disk and 8 GB for a data disk). If the selected disk size is not large enough for the restored data, the system will use the required size and this setting will be ignored.
Click Apply then click OK.
| note |
If the signed in user does not have sufficient permissions to create or write the resource group and resources, an error message will be displayed. If the user was recently granted permissions for the resource group, please refresh the credentials in the Recovery Project Settings window. |
A service principal containing the settings you configured is created for the connection to Azure®.
| note |
After you have configured the default infrastructure template named "Microsoft Azure", you can then clone the default template. That is, you can create a new template based on the Azure® template and apply it to other DCs in the Forest Recovery project. |
To start recovery of Active Directory to Microsoft Azure® virtual machines
Click Verify Settings to start the project verification. During verification, resources will be created in Microsoft Azure® based on the infrastructure template assigned to the Domain controller(s) in the project.
After Verify Settings has successfully completed, click Start Recovery.
During recovery, the Active Directory backups of the domain controllers defined in the recovery project will be restored to newly created virtual machines in Microsoft Azure®.
The process of booting the virtual machine with the Quest® Recovery Environment image can be automated by Microsoft Hyper-V®. You can then use the Restore Active Directory® to Clean OS recovery method or the Install Active Directory recovery method to restore Active Directory® on the virtual machine.
Hyper-V® Server 2016 or higher
| NOTE |
Recovery Manager for Active Directory does not directly support System Center Virtual Machine Manager (SCVMM) for this feature but you can work with SCVMM-managed Hyper-V® hosts. |
Virtual test environments created with this option can only be used for testing, training, or evaluation purposes. Never restore or copy any data from your virtual test environments to the production Active Directory®.
Ensure your virtual test environment is properly isolated from the source Active Directory® forest. Otherwise, the source forest may be seriously damaged after you enable the network adapters in the newly-created virtual test environment.
To create a virtual machine in Hyper-V®
In Forest Recovery Console, select the DC that you want to recover and open the Infrastructure tab.
Select the Domain Controller to be created as a virtual machine in Hyper-V®.
From the Recovery Method drop-down list, select Restore Active Directory on Clean OS.
In the Server access credentials section, type the user name and password that you want to be created as a local account on the new virtual machine in Hyper-V®. These credentials are used during the Forest Recovery process.
In the Backup Access Credentials section, type the user name and password to access the selected backup file. Note that the Backup Access Credentials are not required if the backup is located on target domain controller. The backup file must be accessible from the Forest Recovery Console and from the newly created DCs in Hyper-V®. For example, if your backup is located on a file share in Hyper-V®, supply credentials with access to the file share.
NOTE: The backup file must be accessible from both the Forest Recovery Console server and the newly created DCs in the Hyper-V® virtual network. For example, backup may be located on Hyper-V® File Share or access to backup files located on premise from the Hyper-V® virtual network may be configured by setting up a Site-To-Site VPN connection.
To create a virtual machine in Hyper-V®
In Forest Recovery Console, select the DC that you want to recover and open the Infrastructure tab.
Select the Domain Controller to be created as a virtual machine in Hyper-V®.
From the Recovery Method drop-down list, select Install Active Directory.
In the Server access credentials section, type the user name and password that you want to be created as a local account on the new virtual machine in Hyper-V®. These credentials are used during the Forest Recovery process.
NOTE: You cannot use 'Administrator' in the Local user name field as this name is reserved in Hyper-V®.
In Additional Settings section, make the selections for Domain Controllers.
Install the domain controller as a read only: Select the check box to install the domain controller as a read only domain controller.
Configure the domain controller as a global catalog server: Select the check box (default) to configure the domain controller as a global catalog server.
Install DNS server on the domain controller: Select the check box (default) to install the DNS server on the domain controller.
Preferred DNS server: The default is Select automatically. Click on the change button to change the settings.
Replication source DC: Displays the Replication source domain controller.
In the Backup Access Credentials section, type the user name and password to access the selected backup file. Note that the Backup Access Credentials are not required if the backup is located on target domain controller. The backup file must be accessible from the Forest Recovery Console and from the newly created DCs in Hyper-V®. For example, if your backup is located on a file share in Hyper-V®, supply credentials with access to the file share.
NOTE: The backup file must be accessible from both the Forest Recovery Console server and the newly created DCs in the Hyper-V® virtual network. For example, backup may be located on Hyper-V® File Share or access to backup files located on premise from the Hyper-V® virtual network may be configured by setting up a Site-To-Site VPN connection.
Users can set their OS default timezone, as well as Locale (Only applicable to Hyper V and VMWare):
Set-RMADFEGlobalOptions -OSImageDefaultTimeZone "Atlantic Standard Time" -Save
Set-RMADFEGlobalOptions -OSImageDefaultLocale "fr-FR" -Save
NOTE: When Verify Settings is run, the .ISO image is created. If you wish to set the RMADFEGlobalOptions after Verify Settings, you must first delete the ISO Image from both the RMAD console server and storage location for the VM, run it again to re-generate the ISO:
For example:
The OS Image is found on the console server at:
C:\ProgramData\Quest\Recovery Manager for Active Directory\Cache\OSImage
The OS image is then copied to Storage location set from the infrastructure tab in The FRConsole.
for example
B:\vms\QuestRecoveryImages
Select Microsoft Hyper-V from the Infrastructure drop-down list.
To configure infrastructure template, click Edit. For more information see, Specifying recovery project settings.
Specify the connection settings for the Hyper-V® host.
Specify the user name and password of the account that will be used to access the Hyper-V® host. This account must have the following permissions:
Be a member of the local Administrators group on the target Hyper-V® host
Be able to access admin$ share on the target Hyper-V® host
Be a member of the Hyper-V® Administrators group
Recovery Manager for Active Directory uses PowerShell® Remoting to manage the Hyper-V® server. The required permissions must be configured for users that are used to access the
Hyper-V® host, especially when the host is outside the domain where the Forest Recovery Console is running. For details, see Remotely manage Hyper-V hosts with Hyper-V Manager
Use the Name text box to type a name for the virtual machine on the target computer.
You can create a new virtual machine based on the configuration from backup (generation of Hyper-V® virtual machine, number of disks, disk sizes) and specified settings. For that, select the Create virtual machine option. The following settings can be specified:
Network - Specify the virtual network.
Storage - Select the storage in which to place the virtual machine files on the Hyper-V® host.
Space available - Shows free space in the storage.
Number of processors - Specify the number of processors you want to have on the target virtual machine.
Memory size - Set the amount of random access memory you want to allocate to the target virtual machine.
Disk size - Select Auto Size or set the specific size in GB you want to allocate to the target virtual machine.
Overwrite the virtual machine if exists - Check this box to overwrite any virtual machine which exists that has the same name as the one you are creating.
Specify the Windows image for the Operating System installation.
Image path - Specify the path for the Operating System image. The provided image should be in ISO/WIM format.
Edition - Select the edition (e.g. Standard, Datacenter + Core/UI) for the Operating System.
Product key - The product key should be provided for the installation. If no key is specified a generic volume license key will be used.
| NOTE |
A custom image, Golden Image, that has been configured with any other software considered standard can be used for deployment. The image may, or may not be prepared with sysprep ahead of time and must be in ISO/WIM format. |
To run the OS install process automatically without any user interaction, the answer files (unattend.xml) will be used. See Windows Setup Automation Overview
The Windows image + answer file are used to create the virtual hard disk (vhdx) with OS applies. The Virtual Disk is cached on the “%ProgramData%\Quest\Recovery Manager for Active Directory\Cache\OSImage” location to be reused for subsequent recoveries (cache can be disabled via EnableOSImageCache undocumented reg parameter). The Virtual Disk is then coped to the Hyper-V storage and used to create a new VM.
The initial Windows configuration includes the setting up the administrator credentials, disabling the firewall, configuring the locale. After the OS installation is complete, the network configuration setup is run based on the settings in the forest recovery project.
After the network setup the Clean OS recovery workflow will proceed with AD recovery the same way as it does now.