If database writing is enabled and you want to preserve workflow instance data for workflows that are not currently active or "In Progress," (including any complete, rejected, or terminated workflows), the Association content preservation options are enabled.
IMPORTANT: These options are only available for selection for an on premises environment, and Content Matrix is able to write data directly to the Database. However, database writing methods are not supported by Microsoft, and if used, will impact your Microsoft warranty. Please contact Quest Support for guidance
To configure Association Content Preservation options:
1.Check the Preserve current workflow instance data box.
When this option is selected a warning message about the Database write method will be displayed. Click [OK] to continue.
2.Use the information in the following table to determine the appropriate option to select.
|
If you want to ... |
Select ... |
|---|---|
|
preserve instance data that is still active within the workflows |
Preserve historical state (running workflows cannot be continued). NOTE: Any workflow instances in the "Running or "In Progress" state cannot be continued after migration. Rather, the preservation of "state" is only for historical purposes. |
|
cancel the status of any workflow instance that is currently running |
Cancel running workflows during migration. |
3.If you want to migrate any previous versions of a workflow instance to the target, check the Include previous version instances box.
NOTE: Content Matrix will first try to connect to an external Nintex Workflow database connection. If one exists, it will then check for any Nintex Workflow database entries corresponding to the list of SharePoint workflow instances that it has migrated. If corresponding entries exist inside the source external Nintex Workflow database connection, then Content Matrix will try to write the data directly into the specified target external Nintex Workflow database connection. This option is only available if the database writing option is enabled. For more information on enabling Database writing, please contact Quest Support.
IMPORTANT: Nintex workflow histories are currently always migrated from SharePoint 2010 and never migrated from SharePoint 2013 and later, regardless of whether the option Preserve Nintex Workflows instance history is checked. This is a known issue that will be addressed in a future release.
When migrating SPD 2013 platform workflows, the SuppressEvents property must be set to False in order for workflows to be published after migration.
To modify the SuppressEvents Property:
1.Close the Content Matrix Console, if it is not already closed.
2.Navigate to ServerAdapterConfig.xml (located by default in C:\Program Files\Common Files\microsoft shared\Web Server Extensions\15\ISAPI\ML) and open it in a text editor.
NOTE:: If the ...\ML folder does not exist, manually create the folder and create a text file inside it named ServerAdapterConfig.xml.
3.In ServerAdapterConfig.xml, copy and paste the following code:
<ServerAdapterConfig>
<SuppressEvents>False</SuppressEvents>
</ServerAdapterConfig>
4.Save and close ServerAdapterConfig.xml and reopen the Content Matrix Console.
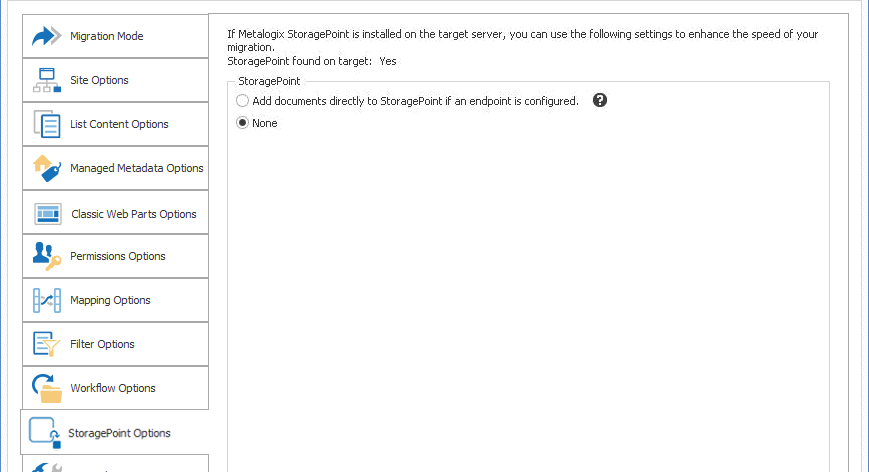
If this option is selected, then during the migration, any documents and attachments are added directly through the StoragePoint API if an endpoint profile is configured, and the end reference will be added in SharePoint. This can potentially improve migration speed when migrating data that contains a large number of documents and/or attachments.
Please review the StoragePoint Content Migration section for allowable connection types, pre-requisites, limitations, and expected outcomes.

The StoragePoint options will only affect documents and attachments that are being migrated into SharePoint. Other content will not be affected.
To configure StoragePoint options:
Use the information in the table below to determine the appropriate action to take.
|
If you are migrating ... |
Select ... |
|---|---|
|
to a target environment where StoragePoint is installed and you want to use StoragePoint as part of the migration |
Add documents to StoragePoint if an endpoint is configured. NOTE: Any of the files or documents that are included in the migration will call StoragePoint as they are being migrated, and will be externalized directly with the reference link left behind in the file or document's place (in the target SharePoint environment). |
|
to a target environment where you do not want to use StoragePoint as part of the migration |
None. NOTE: If this option is selected, content will be migrated directly into SharePoint with all StoragePoint-related features ignored. |
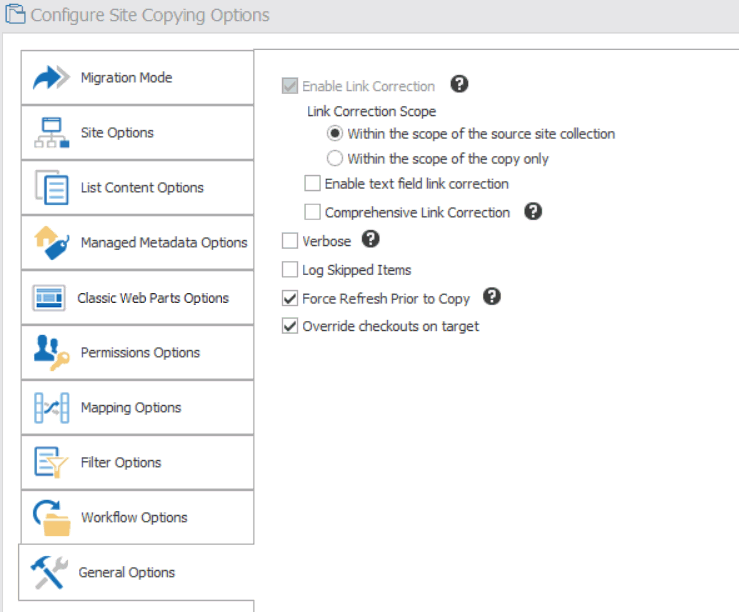
The General Options tab lets you specify a number of "other" migration options, such as link correction and logging.
1.Complete the Correct Links (Enable Link Correction) options using the procedure for Enabling Link Correction.
2.If you want more detailed logging for the migration action, check the Verbose box.
3.If you want any items that are skipped within the migration to be fully logged within the migration job/log file, check the Log Skipped Items box.
4.If you want Content Matrix to forces the source side to do a Refresh of the selected node prior to any copy actions, make sure the Force Refresh Prior to Copy box is checked.
5.If you want Content Matrix to ignore any item/document checkouts on the target and migrate content as if all documents are currently checked in, make sure the Override checkouts on target box is checked.