When migrating Nintex Workflows between SharePoint on premises site collections and sites, if Nintex Features are not activated on the target site collection, duplicate site columns may be created. Therefore, when an option that includes the migration of Nintex workflows is enabled on the Configure Copying Options - Workflow Options tab, Content Matrix will check to ensure that Nintex Features are activated on the target site collection(s). If they are not activated, a warning message will display. You have the following options:
·Activate the Nintex Features on the target before the migration.
·Exclude Nintex workflows from the migration.
·Proceed with the migration of Nintex workflows without the features activated on the target.
NOTE: If you chose this option, after migration you will need to activate Ninte Features on the target then fix any duplicate columns issues manually.
Content Matrix can facilitate the migration of Nintex sites and lists workflows from SharePoint on premises to SharePoint Online. Individual sites and site content can be pasted with ease.
NOTES:
·Nintex migration is not supported for SharePoint Online to SharePoint Online.
·Currently, Content Matrix does not support Nintex workflow migration if the migration was initiated at the list level.
Prerequisites
·Two configuration keys in ApplicationSettings.xml relate to Nintex workflow migration to SharePoint Online, namely:
§NintexWorkflowsTempStorage: The temporary local path where Nintex workflow-related files will be stored prior to being migrated to SharePoint Online. If the value of this key is not modified, the files will be stored in the default temp folder on the system.
§NintexCleanupWorkflowsTempStorage: The value of this key determines whether or not the temporary storage folder described above will be cleaned after the migration completes. The default setting for this key is True.
·The Nintex Workflows for O365 app must be deployed to target site collections prior to migration.
IMPORTANT: Because this app is deployed at the site collection level and must be present before workflows are migrated, it will be necessary to first create the site collection on the target, deploy the Nintex app(s), then migrate the content (using the Paste Site Content option).
Supported Actions
For a list of supported Nintex actions available when migrating from SharePoint on premises to SharePoint Online, refer to Supported Nintex Actions for SPO Migration.
NOTE: If the workflow contains an action that is not supported, this unsupported action will be created as a comment in the migrated workflow. The comment will contain the name of this unsupported action.
Before you can migrate workflows (and forms) to SharePoint online you must deploy them to your SharePoint Online tenant to make it available to specified site collections, as described below.
To deploy Nintex apps to SharePoint Online:
1.Sign into your tenant's SharePoint Admin Center using an account that is a Global Administrator.
2.From the left navigation bar, select More Features.
3.Under Apps, click [Open].
4.Select App Catalog.
NOTE: If the App Catalog site does not open, select Create a new app catalog site, and then click [OK]. On the Create App Catalog Site Collection page, enter the required info, and then click [OK].
5.If you do not have Nintex Workflows for O365 or Nintex Forms for O365 as part of your Site Contents, then select Add an App and install the application(s).
NOTE: Make sure you are in classic view in order to perform the deployment, as deployment cannot be done in modern view.
6.On the Site Contents page, Select the ellipses (...) next to the installed Nintex application, and click on Deployment.
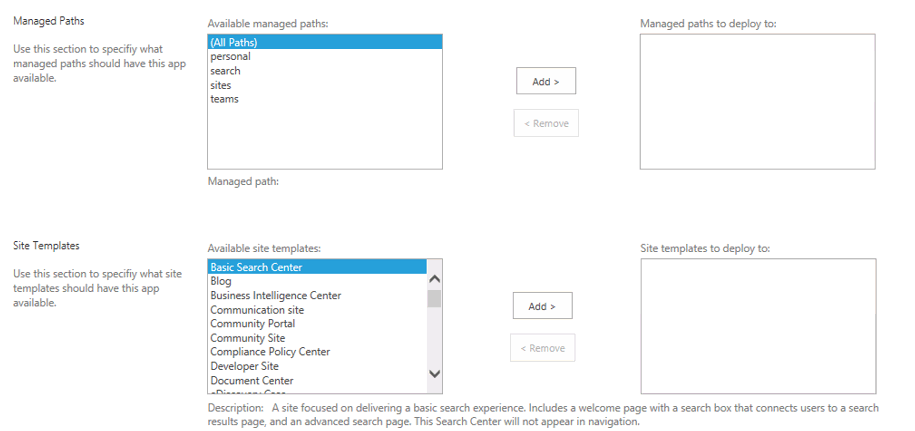
7.On the Manage App Deployments page, enter the site collection URL or select one from the list available, select and add the managed paths to deploy to, and select and add the templates to deploy to.
8.Click [OK] to apply your selections.
9.When asked whether you trust workflow0365.nintex.com click Trust It. This will start the actual deployment.
NOTE: Microsoft is now deploying the Nintex app to your tenant. It may take from a minute to hour(s) depending on the complexity of your site collection structure. Please verify your site collection for apps before starting a migration.
Content Matrix can correct links as a part of a migration. Link correction can only be done at the time of migration, and links will only be corrected for sites, lists, pages, and web parts within the scope of the migration. Any links within documents or files will not be corrected.
If the link that is being corrected is a relative link, Content Matrix will try to correct it as a relative link, and if it is an absolute link, then it will be corrected as an absolute link.
Each time a copy operation runs a central repository is created for link correction, and is populated with a list of link mappings. These mappings are found and determined based on the actions that are performed. If a site copy is performed, link mappings relevant to that site copy will be created and placed into the repository. If lists are included in this copy, then Content Matrix will also include list link mappings in the repository. Links will be identified on a case by case basis.
Any link correction that is done will access this repository set of link mappings, when correcting URL or HTML links.
Content Matrix gathers the link mappings at the start of each migration (copy) action, as soon as we know they might be needed. It then adds them to the central repository. For example, if a site is copied, then the link mappings for the site are added to the repository. Then when a list or web part is copied the link mappings specific for the copying of that object are added to the repository as well.
When a link is corrected, Content Matrix will check to see if that link is in the list of mappings in the central repository. If the link is found it will be corrected according to the mapping that exists for it. If the link is not found the last element of the link will be cut off to see if the shorter link address is in the mappings. This will continue on until all of the link's elements have been removed. Any time a link element is removed the Content Matrix will keep track of it, and then append all the removed elements on to the end of a link once a suitable mapping from the repository is found. If one of these higher level mappings is found, then use that mapping, and append all of the cut elements on to the end. If the last element is cut off and no mapping has been found, the link correction will stop, and fail.
Link Correction Examples
Example 1
If a link reads as Sales/FactsAndFigures/Output/default.aspx, and Content Matrix cannot find this link in the central repository, then it will cut off the last portion of the URL and try again. If the remaining portion of the URL doesn't work Content Matrix will try cutting off another element, and will continue to try until all the elements of the link have been cut off. So link correction will step though the link URL in the following steps:
Sales/FactsAndFigures/Output/default.aspx
Sales/FactsAndFigures/Output
Sales/FactsAndFigures
Sales
Stop
Example 2
A link on the source side is pointing to "TargetSales/Figures/Output/default.aspx" and this link is on a page that is being migrated to "Sales/FactsAndFigures/Output/default.aspx," and Content Matrix only has a mapping in the link mapping repository for "TargetSales/Figures" mapped to "Sales/FactsAndFigures." When link correction is run it will look for a mapping for "TargetSales/Figures/Output/default.aspx" to be mapped to "Sales/FactsAndFigures/Output/default.aspx" but will not find any mapping. Content Matrix will then cut off "default.aspx" and look for a mapping to "Sales/FactsAndFigures/Output/." Again, no mapping for this exists, so the next element ("Output") will be cut off and "Sales/FactsAndFigures" will be looked for. This time a mapping will be found, and the link will update with this URL. Because Content Matrix keeps track of the elements that it cuts off, it can then append these to the end. So "Sales/FactsAndFigures" will have the cut elements "/Output/default.aspx" appended to the end, for a final corrected link of "Sales/FactsAndFigures/Output/default.aspx."