Desktop Authority provides the ability to execute programs when Windows shuts down, restarts or logs off. This happens with the help of the Desktop Agent. The Agent is a program that sits idle in the system tray until a shut down, restart or log off event occurs. When one of these events are triggered, the Agent will seamlessly invoke any queued applications, shell scripts, or service pack installations. Custom Scripts may also be executed at this time providing an unlimited array of functionality.
To configure the Desktop Agent, select the Desktop Agent object under Global Options.
The Desktop Agent client is an application used to launch specified programs when the client logs off or shuts down the computer. The client side of the Agent also provides several options to control the workstation. The user may Shut down, Restart, Logoff or Lock the workstation if the agents icon is displayed in the system tray. Simply right-click on the icon for the shortcut menu.
Select About from the shortcut menu to see version and copyright information regarding the Agent.
Select Shut down from the shortcut menu to shut down the workstation.
Select Restart from the shortcut menu to restart the workstation.
Select Logoff from the shortcut menu to log the current user off of the workstation.
Select Lock Workstation from the shortcut menu to lock the workstation. Pressing CTRL-ALT-DEL will allow the user to unlock the workstation.
There are several ways to control the mode in which Desktop Authority executes on the client workstation. This is done with the use of option files that may exist on workstation.
An option file is simply an ASCII file created using any text editor, including Microsoft’s Notepad. The file has no contents and the filename has no extension.
The easiest way to create a special option file is using Windows Explorer. Right-click in the appropriate folder. Choose New and select Text Document from the shortcut menu.
When using Windows Explorer (New / Text Document) to create a Special Option File, make sure you deselect the Hide file extensions for known file types option under Folder Settings. This will allow you to create the file without the ".txt" extension.
To tighten overall security and prevent users/students, etc. from using these special option files to change the behavior of Desktop Authority, you can disable them in the Desktop Authority Manager. This is done in the Global Options Visual, Exceptions and Troubleshooting objects. Clearing the check box disables Desktop Authority from determining if the corresponding option file exists.
The presence of this file, (SLNOGUI., no file extension) specifies the selected visual startup option displayed during the logon process is overridden with a textual version of the logon window. If there are problems with any Desktop Authority client configurations, use this option file to figure out what in the logon process is problematic. The use of this file requires the Allow any client to override this setting and always display the text logon screen option to be set. This is done on the Visual object within Global Options.
To turn the SLNOGUI mode on for all clients without the use of this file, select the Display Text Logon check box on the Visual object within Global Options. Setting this global option provides the text dialog for all workstations.
This feature can be enabled for either a specific user or a specific workstation by using this special option file. To enable this feature for all users logging in from a specific workstation, place this file in the root directory of the workstation’s hard drive. To enable this feature for a specific user regardless of which machine they logon from, place this file in the user’s home directory.
The presence of this file, (SLBYPASS., no file extension) allows you to exclude certain computers from ever executing Desktop Authority regardless of the options selected in the Desktop Authority Manager.
The use of this file requires the Allow any client to selectively bypass Desktop Authority execution option to be set. This is done on the Exceptions object of Global Options. If this file is present on the client, the Desktop Authority Pre-Flight-Check (SLOGIC.BAT), will detect its presence and immediately exit before launching the main script engine and/or applying any configuration changes to the client.
To enable this feature for all users logging in from a specific workstation, place this file in the root directory of the workstation’s hard drive.
The presence of this file, (SLNOCSD., no file extension) allows you to exclude certain computers from automated Service Pack installations, regardless of the Validation Logic applied to the Service Pack configurations by the Desktop Authority Manager.
If this file is present on the client, Desktop Authority will NOT install the Service Pack to the client, regardless of whether or not the user/computer satisfies the criteria specified by the Validation Logic settings for the Service Pack.
To enable this feature for all users logging in from a specific workstation, place this file in the root directory of the workstation’s hard drive.
This option can be used by admins to delay the initial execution of user elements (eg. printers, drive mappings etc). In some cases, this will help to avoid login delays and potentially resolve timing conflicts. However for this option to be utilized, the applicable user object element MUST be set to be executed at Refresh. This option is configured in the Registry profile object.
Configure the Registry element as follows:
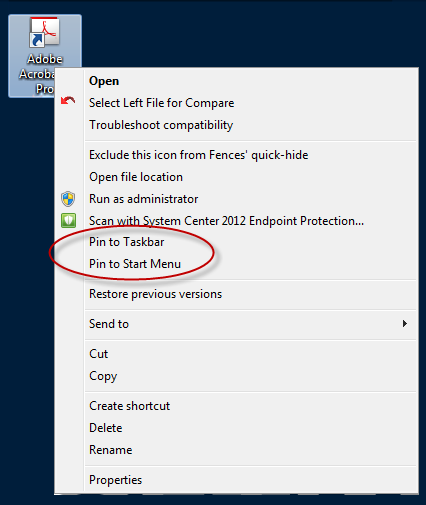
When selecting User Start Menu (Pin) or User Taskbar (Pin) with a non-English language workstation operating system, you must define a variable that defines the non-English verbiage to substitute in place of the English "Pin To..." verbiage. The value of these variables should match the "Pin to Taskbar" or "Pin to Start Menu" text on the popup menu of a program shortcut. The following variables can be defined as User Management Global Variables or as a Profile Definition Variable.
Figure 64: Example of "Pin to" options

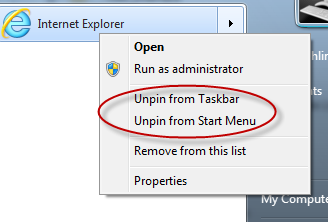
For the Unpin variables, the value should match the "Unpin from Taskbar" or "Unpin from Start Menu" on the popup menu of a shortcut on the Start Menu or Taskbar.
Figure 65: Example of "Unpin from" options

Defines the "Pin to Taskbar" verbiage on non-English client operating systems.
| Example (German language operating system): $PinToTaskbarString = "GermanLanguage" where GermanLanguage will be replaced with the German language equivalent |
Defines the "Unpin from Taskbar" verbiage on non-English client operating systems.
| Example (German language operating system): $UnPinFromTaskbarString = "GermanLanguage" where GermanLanguage will be replaced with the German language equivalent |
Defines the "Pin to Start Menu" verbiage on non-English client operating systems.
| Example (German language operating system): $PinToStartMenuString = "GermanLanguage" where GermanLanguage will be replaced with the German language equivalent |
Defines the "Pin to Start Menu" verbiage on non-English client operating systems.
| Example (German language operating system): $UnPinFromStartMenuString = "GermanLanguage" where GermanLanguage will be replaced with the German language equivalent |
The Web Browser object allows for the configuration of custom Firefox settings. If you wish to configure something in the Firefox browser that is not offered on the Web Browser object, it can be configured in the Global or Profile Definitions.
Use the following syntax for configuration:
This will set the named Firefox preference to the given value. This configuration can be accessed via the browser and changed by the user.
This will set the named Firefox preference to the given value. This configuration will not be able to be changed via the browser about:config dialog by the user.
"Name" is the name of the preference to be set.
Value is the boolean, string, or integer data for the preference.
Preferences and their settings can be seen in Firefox's about:config dialog.
note: Custom Firefox preferences can be researched in this reference to the user preferences in the about:config,
Bool Value: - value can be true or false
AddCustomFirefoxPref('pref("privacy.clearonshutdown.cache", true);')
String Value: - add double quotes around value
AddCustomFirefoxPref('pref("network.automatic-ntlm-auth.trusted-uris", "Http://www.google.com");')
Integer Value: - a numeric value
AddCustomFirefoxPref('pref("network.http.connection-retry-timeout", 500);')
Locked Integer Value: (to prevent a setting from being changed by the user, replace pref with lockpref)
AddCustomFirefoxPref('lockPref("network.http.connection-retry-timeout", 500);')
This setting will enable Validation Logic to validate on any IP address defined for the client, instead of just the first one read. This variable can be defined as a User Management Global Variable or as a Profile Definition Variable.
| Example: $VLCheckAllIPAddresses = 1 |
Sometimes, on large database transactions, the default SQL Command timeout value is not big enough to support the command, allowing the transaction to timeout and fail. Creating this new registry key allows this timeout value to be overridden and increased to alleviate a timeout problem.
| Name | Type | Data |
|---|---|---|
| HKEY_LOCAL_MACHINE\SOFTWARE\ScriptLogic\SqlCommandTimeout | DWORD | specified in seconds |
The following table describes the paths that Desktop Authority uses.
Desktop Authority upgrades from previous versions to 11.3.2 will use the existing installation paths.
|
|
Important: PF stands for %programfiles% in an x86 environment and %programfiles(x86)% in a x64 environment |
|
Location Install paths for upgrades from ver 9.x to 11.3.2 |
Install Path for ver 11.3.2 | ||
|---|---|---|---|
| Group Policies Admx file location | |||
|
| ||
| Remote Mgmt Alternate DesktopAuthority.exe default location (shared as SLDAClient$) | |||
|
| ||
| Default MS SQL 2014 Server Express installation location | |||
|
| ||
| Default MS SQL 2014 Server Express database location | |||
|
| ||
| Website Configuration DA Virtual Directory | |||
|
| ||
| Desktop Authority Manager location (shared as SLogic$) | |||
|
| ||
| DA Manager ProgramData logs | |||
|
| ||
| Website Configuration Web service Virtual Directory | |||
|
| ||
| Default Update Service Download Cache | |||
|
| ||
| Update Service Location | |||
|
| ||
| Update Service Log File | |||
|
| ||
| Update Service Status Reporter Log File | |||
|
| ||
| |||
| OpsMaster ETL Repository | |||
|
| ||
| Signature Files | |||
|
| ||
| Admin Service XML file repository (shared as slETL$) | |||
|
| ||
| Admin Service Log file | |||
|
| ||
| Admin Service StatusGateway log | |||
|
| ||
| |||
| User Management Replication | |||
|
| ||
| Computer Management Replication | |||
|
| ||
| Replication Log | |||
|
| ||
| Prior Paths | New or 11.3.2 Version Paths |
| USB/Port Security devices | |
|
|
| User Detailed Trace File | |
|
|
| Computer verbose debug mode | |
|
|
| Client Files and Agents | |
|
|
| Expert Assist | |
|
|