Conventional scripts typically execute under the security context of the user logging on. Unless users are made administrators of their own machines, the ability to perform administrative tasks through a centralized logon script will be limited to each user's rights on their computer.
The DA Administrative service enables Desktop Authority to perform tasks that require administrative rights without sacrificing user-level security at the workstation. This service helps Desktop Authority perform these specialized tasks by installing a client version of the DA Administrative service to each client machine and a complementary version of the DA Administrative service to one or more Domain Controllers within the domain.
This service requires two unique user accounts. The Server user account is used on each server to remotely install the Desktop Authority Administrative Client Service on each workstation. Therefore, the Server user account (server side service) must have Local Admin rights to all workstations. In most circumstances, this account will be one that is a member of the Domain Admins group.
The Client User account (client side service) is used on each workstation to make registry changes, install software, add printers, synchronize time and perform any other task that may require elevated privileges during the logon, logoff or shutdown events. The Client user account should be a member of the Domain Users group.
Installing this service to all domain controllers is the preferred action for this service and provides the best configuration for load balancing.
To configure the Administrative service in the Server Manager grid, click Properties for the server that the service will be configured for. The service can also be managed by selecting Properties in the service drop list in the DA Administrative Service column.
Figure 26: Configure the Administrative Service

Click Edit properties to edit the Service configuration and credentials.
The status of the DA Administrative service can be managed by clicking the Start, Stop, Restart, Reinstall and Remove buttons. Click Refresh to update the Service status.
The DA Administrative Service requires two unique users accounts. Please provide one user account belonging to the Domain Admins group and one belonging to Domain Users group.
Enter a Domain Admin account that the service will use to log on. This should be entered in the format of Server\UserAccount. Optionally, click Browse to select a user account.
Enter the password associated with the selected log on account.
|
|
Note: The new logon credentials will not take effect until you restart the service. |
Enter the Domain User account that the service will use to log on. This should be entered in the format of Server\UserAccount. Optionally, click Browse to select a user account.
Enter the password associated with the selected user account.
Select from Automatic, Disabled or Manual from the Startup Type list.
Automatic will start the service immediately after it is installed.
Disable will stop the service if it is running and disable the service from being run in the future. To use this service at a later time, the Startup Type must be changed to either Automatic or Manual.
Manual will allow the service to be started at the administrators' discretion. The service will never be started automatically.
Specify a folder to hold intermediate data collected for reporting. Data is collected as users login and out of the network and includes user, hardware and software inventories and much more. During specific timed intervals, data is collected from this folder and parsed into the DAREPORTING database.
The default path is %programfiles%\Quest\Desktop Authority\ETL Cache\. Please refer to the File Paths appendix for the correct path(s) based on the version of Desktop Authority you are using.
The folder specified must be a folder on the server for which the service is being configured for. Click Browse to locate the folder.
Click Save to save the updated service credentials. The service must be restarted by clicking the Restart status button.
Click Save and restart to save the updated service credentials and automatically restart the service.
Click Cancel to reject the credential changes.
The Update Service is used by the USB/Port Security and Software Management objects. This service interfaces with Quest owned and third party websites in order to retrieve licensing information. The Update Service offers an encrypted and secure connection to the web site.
If a proxy is used to access the Internet, each server designated as an Update server must be configured to work with the proxy.
The Update Service is used by the USB/Port Security and Software Management objects. To configure the Update service in the Server Manager grid, first select the server that will be updated. Next click on the Update Service drop menu and then choose the selected action from the menu. The Update Service can also be managed by right-clicking on the server and choosing Update Service.
Figure 27: Configure the Update Service
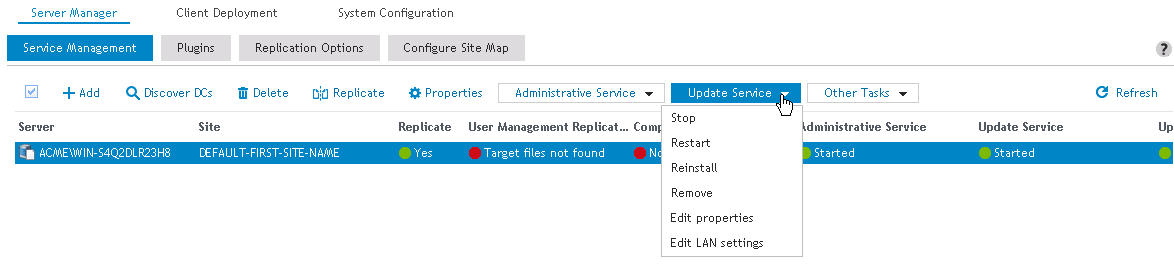
The status of the Update service can be managed by clicking the Start, Stop, Reinstall and Remove buttons. Click Refresh to update the Update service status.
Click Edit properties to edit the Service configuration and credentials.
Click the Edit properties button to edit the Service configuration and credentials.
Click the Edit Properties button to edit the Service configuration and credentials.
The Update Service is used by the USB/Port Security and Software Management objects.
Enter a Domain Admin account that the service will use to log on. This should be entered in the format of Server\UserAccount. Optionally, click the Browse button to select a user account.
Enter the password associated with the selected log on account.
Select from Automatic, Disabled, or Manual from the Startup Type list.
Automatic will start the service immediately after it is installed.
Disable will stop the service if it is running and disable the service from being run in the future. To use this service at a later time, the Startup Type must be changed to either Automatic or Manual.
Manual will allow the service to be started at the administrator’s discretion. The service will never be started automatically.
If this service will be deployed to a server behind a firewall, select this box so an exception can be added in Windows Firewall for this service. This exception can be added manually as well.
|
|
Note: The new logon credentials will not take effect until you restart the service. |
For servers that are not configured to download updates, specify the server where the update files will be located. Select Auto from the list to allow the update files to be located automatically when needed.
Select this check box to enable the Update Service to download selected updates to this server. Downloads will be stored in the specified download directory. Clear the box to prevent the service downloading updates to this server. This option is only available when the Update Service is installed on more than one server.
Specify the directory to which all updates will be downloaded to. This directory specification is only available when one Update Service is installed or on servers which are configured as Download servers. The default download directory is %Program Files%\Quest\Desktop Authority\Update Service\Cache. Please refer to the File Paths appendix for the correct path(s) based on the version of Desktop Authority you are using.
Specify how often the Update Service should look to Quest for updates.
Click Save to save the service properties. Click Save and Restart to save the server properties and restart the service with its new settings.
|
|
Note: Local Area Network settings are only available for the 'Started' service. |
Click Edit LAN Settings to configure the use of proxy server settings. LAN Settings can only be configured when the Update service is installed and started. The settings are enforced on the server where the service is installed to, for the specific service account user.
Check this box to automatically detect the proxy server settings at the time of connection.
Check this box to use a configuration script to configure the proxy settings.
Type an address (URL) or file name that will be used to configure the proxy settings for Internet Explorer.
Check this box to enable the use of a proxy server.
Select this box to enable the use of a single proxy address for all server protocols (HTTP, Secure, FTP, Gopher, Soks)
Desktop Authority supports several protocols including HTTP, Secure, FTP, Gopher and Soks. If the server is using a proxy, these protocols can be configured to work with different proxy addresses if needed. Enter the specific proxy address (TCP/IP address or host name of the proxy server and port (TCP/IP port number) for each protocol. If a only one proxy address will be used, be sure to select the Use the same proxy for all protocols.
Select this check box to ignore the proxy server for local addresses. Clear this check box to use the proxy server for all Internet addresses.
Enter any local addresses for which the proxy should not be bypassed.
Enter the user name needed to access the proxy.
Enter the password needed to access the proxy.
Enter the password again to confirm its spelling.
Click Save to save the LAN Settings. Click Cancel to exit LAN Settings without changes.

