Using this option lost items can be restored to a mailbox different from the original one. However, when only shortcut is restored (i.e. not the original message) to a different mailbox, the mailbox user is not the owner of such item. It means that the user will not be able to delete or modify the archived item using that shortcut. The user will be able to restore the shortcut and perform the changes but cannot control the archived counterpart. On the Archive tab such item is displayed with a yellow icon 
To restore lost item(s) to a folder or a mailbox different from the original one:
1.Click View on the Enterprise Manager menu bar. Select Archive. Then switch to the Archive tab.
2.In the left pane find the user whose lost item(s) you want to restore. You can use the Look for combo box where you do not must enter an exact name of the user.
3.To restore ONE LOST ITEM, open the folder in which the shortcut to this item was originally residing. A list of all items of the folder will be displayed in the right pane. Right-click the lost item (blue icon). In the context menu select Restore lost item to.
To restore ALL LOST ITEMS OF A FOLDER right-click that folder in the left pane. In the context menu select Restore lost folder items to option.
To restore ALL LOST ITEMS OF A MAILBOX right-click that mailbox in the left pane. In the context menu select Restore lost mailbox items to option.
|
|
NOTE: If you want to display lost items only, right-click in the right pane and, in the context menu, click Show only lost items. |
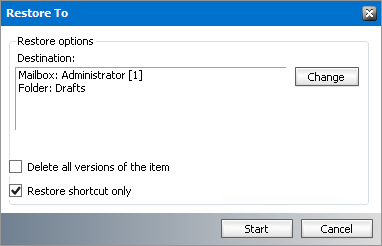
4.In the pop-up Restore To window choose between two Restore options:
a.Delete all versions of the document checkbox all versions of the respective lost item(s) will be marked for deletion in the archive, and the latest one will be displayed in the users mailbox as non-archived.
b.Restore shortcut only checkbox shortcut of the respective item(s) will be displayed in the users mailbox and all versions will be accessible.
|
|
NOTE: If none of the options is checked, email is returned to the users mailbox as non-archived and its versions, if any, are displayed as lost in the Enterprise Manager. |
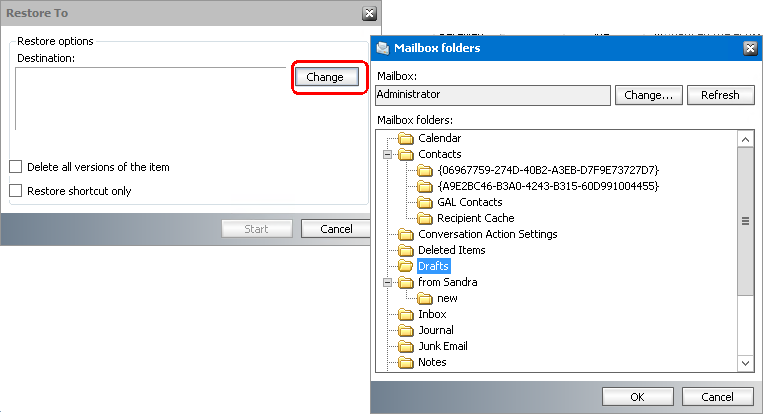
5.Then click the Change button to specify the destination where the item(s) will be restored.
6.In the Mailbox folders pop-up window define a mailbox (using the Change button) and a folder of that mailbox where the lost item(s) must be restored. If the folders are not displayed, click Refresh. Click OK.
7.In the Restore To window the selected folder is displayed in the Destination field. Click Start. Then OK.
When mailbox folders or sub-folders with archived items are deleted, the information about the folder structure is available to Archive Manager. The entire folder structure can be restored. Deleted folder names appear in blue color.
To restore the folder structure:
1.Select the root node of the deleted folder structure.
2.Right click and select Create folder structure from the context menu. The folder structure will be restored along with any archived items in those folders and the folder names will be displayed in normal black color.
You can archive and restore items in a Public Folders manually. Manual archiving and restoring of the items in public folders requires additional permissions.
Granting permissions to the super-user
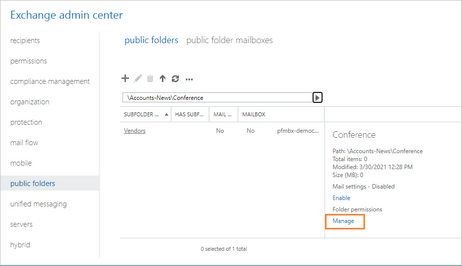
1.Open Microsoft Exchange Administrator Center.
2.Click public folders and then click the public folders tab.
3.Select a public folder from the list (click through sub folders to reach a descendant sub-folder). Then click Manage under Folder Permissions on the right.
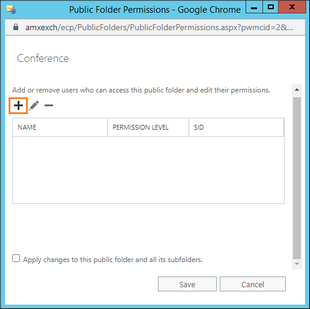
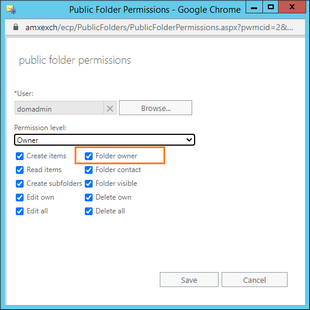
4.In the pop-up window click Add (plus sign). Then click Browse to select the super-user that you have configured in Archive Manager.
5.Set Permission level to Owner. Then select the Folder owner option.
6.Click Close in the confirmation dialog and then click Save to exit.
7.To verify the permissions, open your Outlook client and follow the steps below:
a.Copy any archived email into that public folder: select an archived email and press CTRL while dragging that email into that public folder. Then try to restore it. Only for this mail item (an mail items that were previously archived with this process), you will get a warning message saying "Failed to restore 1 item".
b.For all other items subsequently archived to the public folder, archiving (as well as restoring) will work properly.
After completing this process you can archive and restore items with the MS Outlook using Archive Manager Outlook AddIn, the Public Folders tab using toolbar icons or the context menu as described in the following topic.
Administrators can archive several public folders at once and apply archiving filters for message types.
1.In the Archive view click on the Public Folders tab.
2.Right-click a public folder and select Archive wizard from the context menu. The Archive messages wizard starts and the Selected mailboxes window opens.
3.The selected public folders from the selected group are already listed.
4.Click the Add to open the Select mailbox list. Move selected root public folder mailboxes to the Selected Objects list (you will see more roots public folders if you are managing more than one exchange servers from the AMAC). Then click OK. You can click Remove or Remove all to manage the selected mailboxes to archive.
5.Click Next. The Select archive options window opens. You can choose to archive all message items or set filters for messages and folders:
Select the options as described below:
a.Archive all messages - To archive all messages
b.Filter messages - To archive messages based on message classes.
|
|
NOTE: The selected message classes must be set as supported message classes in View > Manager > Settings > Message classes. If they are not supported or excluded, they will not be archived. |
Click Filter to open the Message filter window. Select the options as described below:
·All supported message classes - messages classes as defined
·Selected message classes - select the message classes that you want to archive.
6.Click Next. The Retention category window opens. Select a retention category from the dropdown list.
7.Click Next. The Summary window opens.
8.Click Start. When the process completes, click Close.