
-
Title
How to Set Up and Perform Continuous Virtual Standby Using Rapid Recovery -
Description
From the Rapid Recovery Core, you can export a recovery point from a repository to a virtual machine. This process—sometimes called virtual export—is a physical-to-virtual (P2V) process that creates a virtual machine from a recovery point. The VM is a bootable clone of a protected machine.
You can perform a virtual export from the Virtual Standby page in the Core Console, or by selecting VM Export
from the Restore drop-down menu on the button bar.
When you perform a virtual export from Rapid Recovery Core, you have two choices. This article will discuss the second option, continuous virtual standby.
-
Cause
When you export to a virtual machine, the following information is exported:
- All of the backup data from a recovery point
- The operating system and settings from the original protected machine
You can perform virtual export of recovery points for your protected Windows or Linux machines to VMware, ESXi, Hyper-V, and VirtualBox. If you have replication set up between two Cores (source and target), you can only export data from the target Core after the initial replication is complete.
With virtual standby, the VM snapshot that you create from the selected recovery point is continually updated by the Core after every scheduled or forced snapshot captured from the source machine. This creates a high-availability resource for data recovery. If the protected machine fails, you can boot up the virtual machine to quickly replace it temporarily, allowing you time to recover the original protected machine without substantial downtime.
NOTES:
- For ESXi, VMware Workstation, or Hyper-V, the virtual machine version must be a licensed version of these virtual machines, not the trial or free versions
- Rapid Recovery supports Hyper-V export to Window 8, Window 8.1, Windows Server 2012 and 2012 R2.
- VirtualBox Version 4.2.18 or higher is supported. VirtualBox export of a Windows 10 protected machine is not currently supported
-
Resolution
For more information on this topic, please see:
- Rapid Recovery Basic Administration Course - Web Based Training (WBT)
- Rapid Recovery Advanced Administration Course - Web Based Training (WBT)
- Rapid Recovery Administration: Module 7 – Volume and Machine-level Recovery
Performing a continual (Virtual Standby) ESXi exportComplete the steps in this procedure to perform a continual export to an ESXi virtual machine (VM) using Rapid Recovery.
- In the Rapid Recovery Core Console, in the button bar, click the Restore drop-down menu, and then click VM Export.
- In the Virtual Machine Export Wizard, select One-time Export.
- Click Next.
- In the Machines page, select the protected machine that you want to export.
- Click Next.
- On the Recovery Points page, select the recovery point that you want to use for the export.
- Click Next.
- On the Destination page in the Export Wizard, in the Recover to Virtual machine drop-down menu, select ESX(i).
- Enter the parameters for accessing the virtual machine as described in the following table, and then click Next.
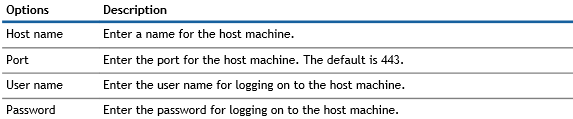
- On the Virtual Machine Options page, enter the information described in the following table:
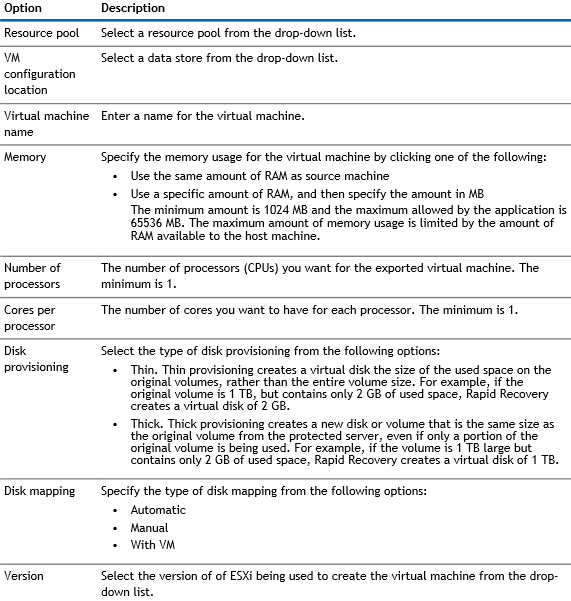
- Select Perform initial one-time export to perform the virtual export immediately instead of after the next scheduled snapshot
- Click Next.
- On the Volumes page, select the volumes you want to export, and then click Next.
- On the Summary page, click Finish to complete the wizard and start the export.
Performing a continual (Virtual Standby) VMware Workstation export
Complete the steps in this procedure to perform a continual export to a VMware Workstation virtual machine (VM) using Rapid Recovery.
- In the Rapid Recovery Core Console, in the button bar, click the Restore drop-down menu, click VM Export.
- In the Virtual Machine Export Wizard, select One-time Export.
- Click Next.
- On the Machines page, select the protected machine that you want to export.
- Click Next.
- On the Recovery Points page, select the recovery point that you want to use for the export.
- Click Next.
- On the Destination page in the Export Wizard, in the Recover to Virtual machine drop-down menu, select VMware Workstation, and then click Next.
- On the Virtual Machine Options page, enter the parameters for accessing the virtual machine as described in the following table.

- Select Perform initial one-time export to perform the virtual export immediately instead of after the next scheduled snapshot
- Click Next.
- On the Volumes page, select the volumes to export, for example, C:\ and D:\, and then click Next.
- On the Summary page, click Finish to complete the wizard and start the export
Exporting data to a Hyper-V virtual machine
Rapid Recovery supports first-generation Hyper-V export to the following hosts:
- Windows 8
- Windows 8.1
- Windows Server 2008
- Windows Server 2008 R2
- Windows Server 2012
- Windows Server 2012 R2
Rapid Recovery supports second-generation Hyper-V export to the following hosts:
- Windows 8.1
- Windows Server 2012 R2
NOTE: Not all protected machines can be exported to Hyper-V second generation hosts.
Only protected machines with the following Unified Extensible Firmware Interface (UEFI) operating systems support virtual export to Hyper-V second generation hosts:
- Windows 8 (UEFI)
- Windows 8.1 (UEFI)
- Windows Server 2012 (UEFI)
- Windows Server 2012 R2 (UEFI)
NOTE: Hyper-V export to second-generation VM can fail if the Hyper-V host does not have enough RAM allocated to perform the export.
Performing a continual (Virtual Standby) Hyper-V export
Complete the steps in this procedure to perform a continual export to a Hyper-V virtual machine (VM) using Rapid Recovery.
- In the Rapid Recovery Core Console, in the button bar, click the Restore drop-down menu, click VM Export.
- In the Virtual Machine Export Wizard, select One-time Export.
- Click Next.
- On the Machines page, select the protected machine that you want to export.
- Click Next.
- On the Recovery Points page, select the recovery point that you want to use for the export.
- Click Next.
- On the Destination page, in the Export to Virtual machine drop-down menu, select Hyper-V.
- To export to a local machine with the Hyper-V role assigned, click Use local machine.
- To indicate that the Hyper-V server is located on a remote machine, click Remote host, and then enter the information for the remote host as described in the following table.
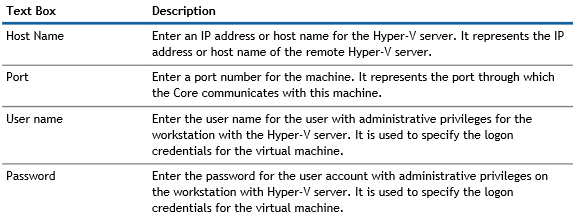
- Click Next.
- On the Virtual Machines Options page, in the VM Machine Location text box, enter the path for the virtual machine; for example, D:\export. This is used to identify the location of the virtual machine.
NOTE: You need to specify the virtual machine location for both local and remote Hyper-V servers. The path should be a valid local path for the Hyper-V server. Non-existent directories are automatically created. You should not attempt to create them manually. Export to shared folders (for example, to \\data\share) is not permitted.
- In the Virtual Machine Name text box, enter the name for the virtual machine . The name you enter appears in the list of virtual machines in the Hyper-V Manager console.
- To specify memory usage, click one of the following:
- Use the same amount of RAM as the source machine. Select this option to identify that the RAM use is identical between the virtual and source machines.
- Use a specific amount of RAM. Select this option if you want to specify the amount of RAM in MB. The minimum amount is 1024 MB, and the maximum allowed by the application is 65536 MB. The maximum amount of memory usage is limited by the amount of RAM available to the host machine.
- To specify the disk format, next to Disk Format, click one of the following:
- VHDX
- VHD
NOTE: Hyper-V Export supports VHDX disk formats if the target machine is running Windows 8 (Windows Server 2012) or higher. If the VHDX is not supported for your environment, the option is disabled.
If exporting to Hyper-V generation 2, only VHDX disk format is supported.
- To specify generation of Hyper-V to use for export, click one of the following:
- Generation 1
- Generation 2
NOTE: Only generation 2 supports the secure boot option.
- Specify the appropriate network adapter for the exported VM.
- On the Volumes page, select the volume(s) to export; for example, C:\.
NOTE: If the selected volumes are larger than the appropriate maximum allocations supported by the application as indicated below, or exceed the amount of space available, you will receive an error.
- For VHDX disk format, your selected volumes should be no larger than 64 TB.
- For VHD disk format, your selected volumes should be no larger than 2040 GB.
- Select Perform initial one-time export to perform the virtual export immediately instead of after the next scheduled snapshot
- On the Volumes page, click Finish to complete the wizard and to start the export
Performing a continual (Virtual Standby) VirtualBox export
Prerequisites
To perform this step, VirtualBox must be installed on the Core machine.
Complete the steps in this procedure to perform a continuous export to a VirtualBox virtual machine (VM) using Rapid Recovery.
- In the Rapid Recovery Core Console, in the button bar, click the Restore drop-down menu, click VM Export.
- In the Virtual Machine Export Wizard, select One-time Export.
- Click Next.
- On the Machines page, select the protected machine that you want to export.
- Click Next.
- On the Recovery Points page, select the recovery point that you want to use for the export.
- Click Next.
- On the Destination page in the Export Wizard, in the Recover to Virtual machine drop-down menu, select VirtualBox, and then click Next.
- On the Virtual Machine Options page, select Use Windows machine.
- Enter the parameters for accessing the virtual machine as described in the following table.
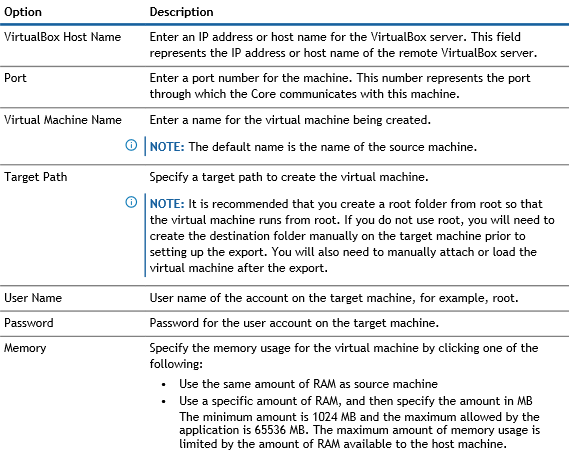
- To specify a user account for the virtual machine, select Specify the user account for the exported virtual machine, and then enter the following information. This refers to a specific user account for which the virtual machine will be registered in the event there are multiple user accounts on the virtual machine. When this user account is logged on, only this user will see this Virtual Machine in VirtualBox manager. If an account is not specified, then the Virtual Machine will be registered for all existing users on the Windows machine with VirtualBox.
- User name - Enter the user name for which the virtual machine is registered.
- Password - Enter the password for this user account.
- Select Perform initial one-time export to perform the virtual export immediately instead of after the next scheduled snapshot
- Click Next.
- On the Volumes page, select the volumes to export, for example, C:\ and D:\, and then click Next.
- On the Summary page, click Finish to complete the wizard and to start the export.