サポートと今すぐチャット
サポートとのチャット

Migrator for Notes to Exchange 4.15.2 - Scenarios Guide

About the Migrator for Notes to Exchange documentation Scenarios overview Migration to a proprietary Exchange
Migration to a proprietary Exchange target Pre-migration preparations Batch migration process Post-migration activities
Migration to Microsoft's Office 365
Pre-migration preparations Batch migration process Post-migration activities
SSDM (per-desktop) migration

Migration to a proprietary Exchange target

For our purposes, a proprietary Exchange environment is one whose hardware and software are wholly under the control of the migrating organization. A proprietary Exchange server typically is on the same premises as the Notes source, but could reside elsewhere.

Migration to a proprietary Exchange environment includes a few scenarios depending on whether the organization already has its Active Directory configured and, if so, whether any objects it may already contain are mail-enabled, or mailbox-enabled, or neither.

NOTE: A mail-enabled Active Directory object is one with a mail-address attribute for an address outside the Exchange domain, so AD can forward the object’s mail to its external address. A mailbox-enabled object is one that has an Exchange mailbox. An AD object that is mail-enabled cannot receive mail in Exchange unless it is also mailbox-enabled; a mail-enabled AD object without a mailbox can only forward mail to an object’s external forwarding address.

An organization may have an existing Active Directory already in place, for login and security purposes. When user accounts already exist in an established AD, Migrator for Notes to Exchange can use these objects to preserve the same credentials and security currently in use within the environment, but the objects must also be mail-enabled and mailbox-enabled before data for these users can be migrated.

Your coexistence strategy also figures into this category of scenarios. Most organizations’ migration plans include some form of coexistence, which requires extra steps to configure and use.

This chapter provides process instructions and application notes for this group of traditional scenarios.

In these scenarios, Migrator for Notes to Exchange tools are run by admin accounts that are configured with the necessary permissions for access to directories and user data in both the source and target environments.

Pre-migration preparations

Any migration scenario requires preparation of the source and target environments, configuration of admin accounts, and preparation of the required software. Most also require configuration of a coexistence strategy. These pre-migration procedures can be time consuming because they include activities spanning multiple environments, configuring applications that will run concurrently to facilitate the migration, and other considerations.

These pre-migration preparations are typically performed only once, before the first users are migrated, and need not be repeated thereafter.

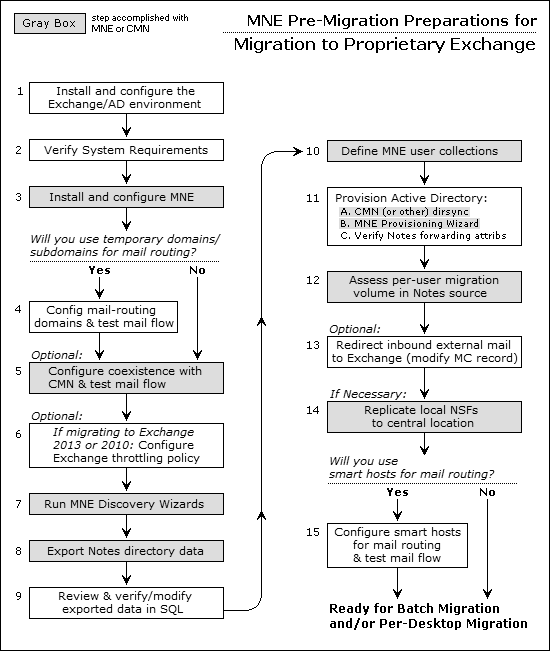
The flow chart below illustrates these necessary pre-migration preparations when migrating to a proprietary Exchange target.

Conditional Step: Steps that apply only in particular circumstances are clearly marked with this "If" branching-arrows icon and a note explaining when the step applies.

Note that the step numbers in the flow chart correspond to the step numbers in the process instructions below.

NOTE: This process does not create users’ Exchange mailboxes until just prior to their migration (per user collection, in the Batch migration process), due to the Exchange free/busy limitation (explained in chapter 1, see the Important note under Provisioning and mailbox creation for Office 365. If you will not configure free/busy coexistence, you could create Exchange mailboxes earlier in the process, in these Pre-Migration Preparations, as long as you also set Exchange-to-Notes mail forwarding for not-yet-migrated Notes users.

Step 1: Install and configure your target Exchange environment

If you have not yet installed and configured your destination Exchange environment, do so now. Just install and configure the Exchange server and Active Directory at this time. Provisioning of Active Directory (if not already provisioned) will occur in a later step.

Step 2: Verify all system requirements are satisfied

All system requirements must be satisfied before you install Migrator for Notes to Exchange in the next step below. System Requirements are documented in the most recent RTM Release Notes. The admin accounts that will be used to run the Quest applications and access data and features in the Notes/Domino and Exchange/AD environments also will require particular permissions, as specified in Migrator for Notes to Exchange’s Pre-Migration Planning Guide (see the topic Configuration requirements and account permissions). If these accounts do not already exist, create and configure them now.

関連ドキュメント

The document was helpful.

評価を選択

I easily found the information I needed.

評価を選択