
How to migrate from disconnected NSFs or PSTs to Exchange
|
1 |
On the Exchange Server Configuration screen: Make sure the Always use these values checkbox is not checked. |
|
2 |
Under Discover Notes Information: |
|
• |
On the Find NABs screen: Load and Enable the offline copy of the Notes Address Book. You will have to locate and load the offline copy manually (by the Add NAB button). (The Find NABs button will not work for this, since the Notes server is offline.) |
|
• |
|
• |
On the Export Notes Directory screen: Click Export Directory, to launch Migrator for Notes to Exchange’s Directory Export Wizard, and then: |
|
• |
Click the Edit button (to edit Task Parameters). In the configuration file, add the parameter offline=1 to the bottom of the [Notes] section. Then save and close the file, and click Next. |
|
• |
On the Specify Notes Login Information screen, for Domino Server enter the name of the original Domino server from which the NAB files were copied. Then specify the offline migration ID file and password for the User ID file and Password fields. |
|
3 |
Back in Notes Migration Manager, under User Collections, on the Locate Notes Data Stores screen: Click Locate data stores to launch the Notes Data Locator Wizard for the designated User collection, and then: |
|
• |
In the Notes Data Locator Wizard, on the Select Notes Data Store Type(s) to Locate screen: Select Find new data stores and gather statistics, and set the Add/Replace mode to Replace data previously found.... Then select the data types you want to locate and click Next. |
|
• |
|
• |
On the following pages, for each data type, browse to the directory where the items you want are located, and add them to the scan lists. Note: Make sure you specify the root folder, one folder above where the actual mail files are located. Also: The mail files must reside in a directory whose name matches the one from which the mail files came. |
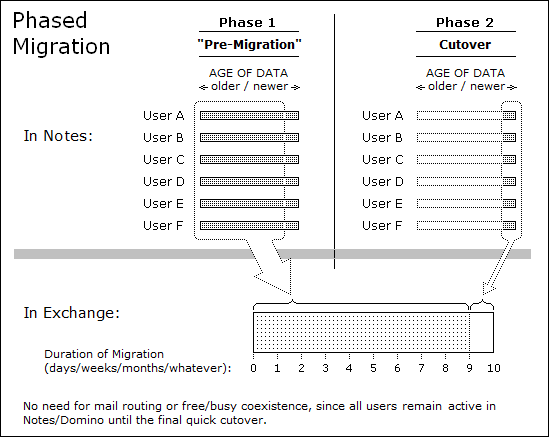
Phased (staged) migration
The term phased migration or staged migration refers to the process of pre-migrating or pre-populating data to target Exchange mailboxes prior to a final "cutover" migration. The staged migration may occur across the bandwidth or, in many cases, may be implemented in conjunction with the offline method described in the preceding section.
With this approach, a majority of the data can be pre-populated to the target mailboxes, which reduces the volume of data that must be transferred in the final cutover. Users remain active in Notes throughout the transition period, receiving and sending mail and managing their calendars in Notes while their older data is migrated to Exchange. After the older data has been migrated, the much smaller volume of data remaining can be migrated comparatively quickly, so that larger numbers of users (or all of them) can be migrated together within a shorter window. Since Migrator for Notes to Exchange migrates copies of Notes data (does not delete the originals), the older data is still available to users in Notes throughout the transition period.
|
• |
Replica method: The agreements created to replicate NSFs can be configured to limit the data included in the replica NSF. With this approach, the data replicated can be limited to the subset of information you want to include in the pre-cutover phase. |
|
• |
Date filter method: The Data Migration Wizard has integrated filtering options to specify date limits and ranges for messages to be migrated—to migrate only messages on or after (or before) a certain date, or within a particular range of dates. |
Note that Migrator for Notes to Exchange also contains Smart Remigration technology, so that previously migrated items are detected and not duplicated if they are inadvertently migrated again.
|
• |
First Pass: mailbox-enable user accounts on Exchange, set mail-forwarding rules on Exchange (to forward mail back to Notes until the users migrate), and migrate users' older data to the new server; and then ... |
|
• |
Second Pass: reverse the mail routing (to forward mail from Notes to Exchange) and migrate the remaining data. |
|
NOTE: A phased migration requires the creation of Exchange mailboxes at the outset (for all Notes users, as part of your Pre-Migration Preparations), but this strategy also eliminates the need for free/busy coexistence, since all users (and their free-busy data) will remain in Notes throughout that period. Also, since all users will migrate together in the final cutover, a phased migration removes the need for Exchange-to-Notes mail forwarding in most cases. |
Silent mode options in per-desktop migrations
When Silent Mode is configured, the migration team configures the application in advance within the notesdtapp.ini file to determine what will migrate, the target for each migrated data type, and the filters and other configuration elements for the migration.
The SSDM Silent Mode options are fully described in chapter 4 of this Scenarios Guide.