Mail-In Database Replicas can be created and managed if Replication is enabled. Note that Replication must be enabled and configured in the Replica Settings tab of Settings. Replication views do not appear if Replication is disabled.
To manage replication:
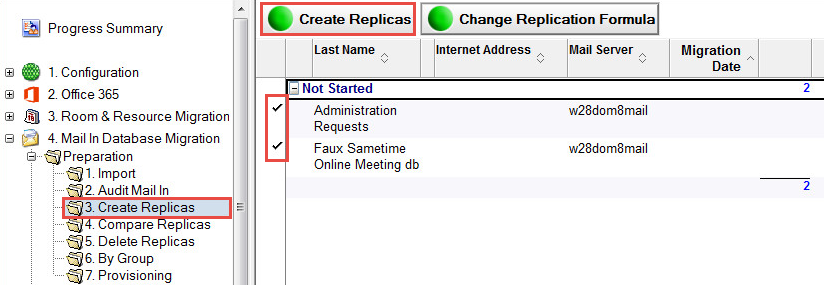
Expand the Mail In Database Migration | Preparation | Create Replicas view
To create replicas, select one or more entries and click the Create Replicas button; the Change Replication Formula option is also available in this view:
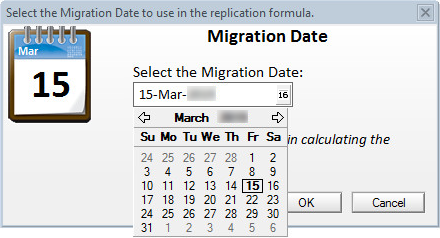
Select the date when you want the migration to start; click OK:
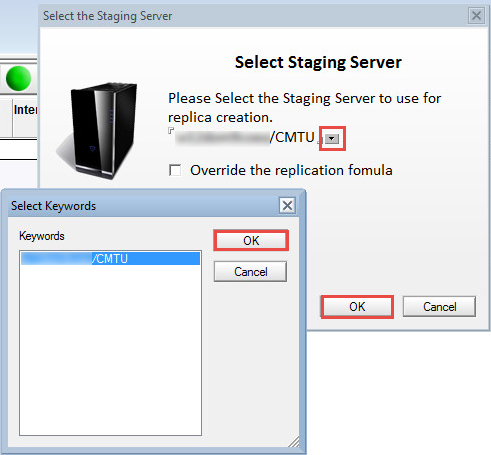
In the Select the Staging Server that appears, select the Staging Server that should be used for replica creation; click OK:
The Proceed with Replica Creation? window will appear; click Yes
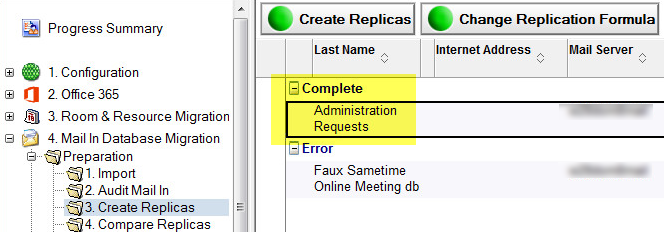
The Results window will appear showing the operation has completed; click Ok; the completed replicas will show in the Data Pane:
Click Compare Replicas; the replica comparison will allow you to compare the original mail-in database and the staging replica
Select a mail-in database from the Data Pane and click the Verify Actions button; select an option from the drop-down menu; a Quick Push Replication option is also available; click the Help button for more information about the replica comparison view:
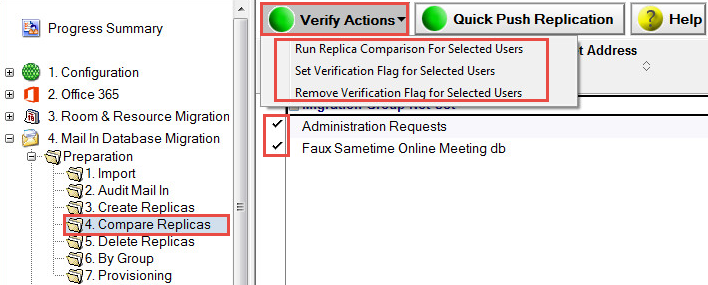
The following table describes the function of each menu option:
|
Option |
Description |
|
Run Replica Comparison For Selected Users |
Allows you to select entries and compare replicas |
|
Set Verification Flag for Selected Users |
Allows you to select entries and set a verification flag for them |
|
Remove Verification Flag for Selected Users |
Allows you to select entries and remove the verification flag for them |
You may delete selected mail-in databases from the Delete Replicas view:

Click By Group.
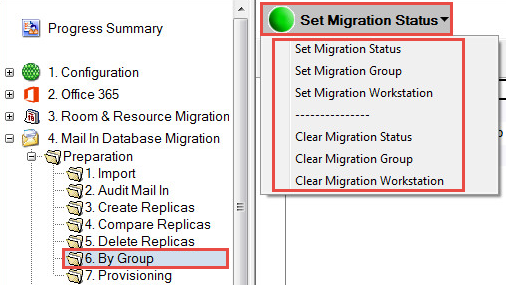
This view gives you the ability set migration status, migration group, migration workstation.
7.3 Provisioning Mail-in Databases
Perform the following steps to set up Office 365 mailboxes:
Select the appropriate resource.
Select one or more entries and then click the Set Country Code button to select a country code.
Select one or more entries and then click the Set Full Access button and select Set Full Access.
Select one or more entries and then click the Enable O365 Mailbox button to enable a Mailbox.
To match the selected Mail-In databases:
Expand Preparation | Provisioning
Select mail-in databases in the Data Pane and then click the Match selected button
The drop-down menu displays four menu options:

The following table describes each menu option:
|
Option |
Description |
|
Match selected entries using LDAP |
Matches selected Mail-in databases with their corresponding entries in AD using LDAP. |
|
Match Selected users on CAS server |
Matches selected Mail-in databases with their corresponding entries in AD on the Exchange CAS server. |
|
Match Selected entries using PowerShell |
Matches selected Mail-in databases using PowerShell. |
|
Match all entries using PowerShell |
Matches all Mail-in databases using PowerShell. |
|
|
|
|
|
|
Match Selected Entries using LDAP
Select the Match selected entries using LDAP menu option
The selected Mail-in databases are matched in AD
Click OK to close the message box
Match Selected users on CAS Server
Use this option if the destination mailbox server and the CAS servers are not the same server
Select the Match Selected users on CAS server menu option
The selected Mail-in databases are matched on the Exchange CAS server; click OK to close the message box
Match Selected entries using Powershell
Select the Match Selected entries using PowerShell menu option
The selected Mail-in databases are matched using PowerShell; cllick OK to close the message box
Match all entries using Powershell
Select the Match all entries using PowerShell menu option
All Mail-in databases are matched using PowerShell. Click OK to close the message box
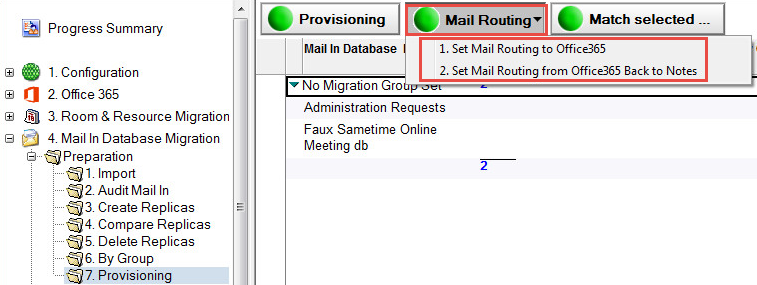
Once the migration is completed, you can update mail routing.
Click the Mail Routing button to set mail routing to Exchange; the Set Mail Routing Back to Notes option is for rolling back if needed
Mail-In Database Replicas can be created and managed if Replication is enabled. Note that Replication must be enabled and configured in the Replica Settings tab of Settings. Replication views do not appear if Replication is disabled.
To manage replication:
Expand the Mail In Database Migration | Preparation | Create Replicas view
To create replicas, select one or more entries and click the Create Replicas button; the Change Replication Formula option is also available in this view:

Select the date when you want the migration to start; click OK:

In the Select the Staging Server that appears, select the Staging Server that should be used for replica creation; click OK:

The Proceed with Replica Creation? window will appear; click Yes
The Results window will appear showing the operation has completed; click Ok; the completed replicas will show in the Data Pane:

Click Compare Replicas; the replica comparison will allow you to compare the original mail-in database and the staging replica
Select a mail-in database from the Data Pane and click the Verify Actions button; select an option from the drop-down menu; a Quick Push Replication option is also available; click the Help button for more information about the replica comparison view:

The following table describes the function of each menu option:
|
Option |
Description |
|
Run Replica Comparison For Selected Users |
Allows you to select entries and compare replicas |
|
Set Verification Flag for Selected Users |
Allows you to select entries and set a verification flag for them |
|
Remove Verification Flag for Selected Users |
Allows you to select entries and remove the verification flag for them |
You may delete selected mail-in databases from the Delete Replicas view:

Click By Group.

This view gives you the ability set migration status, migration group, migration workstation.
7.3 Provisioning Mail-in Databases
Perform the following steps to set up Office 365 mailboxes:
Select the appropriate resource.
Select one or more entries and then click the Set Country Code button to select a country code.
Select one or more entries and then click the Set Full Access button and select Set Full Access.
Select one or more entries and then click the Enable O365 Mailbox button to enable a Mailbox.
To match the selected Mail-In databases:
Expand Preparation | Provisioning
Select mail-in databases in the Data Pane and then click the Match selected button
The drop-down menu displays four menu options:

The following table describes each menu option:
|
Option |
Description |
|
Match selected entries using LDAP |
Matches selected Mail-in databases with their corresponding entries in AD using LDAP. |
|
Match Selected users on CAS server |
Matches selected Mail-in databases with their corresponding entries in AD on the Exchange CAS server. |
|
Match Selected entries using PowerShell |
Matches selected Mail-in databases using PowerShell. |
|
Match all entries using PowerShell |
Matches all Mail-in databases using PowerShell. |
|
|
|
|
|
|
Match Selected Entries using LDAP
Select the Match selected entries using LDAP menu option
The selected Mail-in databases are matched in AD
Click OK to close the message box
Match Selected users on CAS Server
Use this option if the destination mailbox server and the CAS servers are not the same server
Select the Match Selected users on CAS server menu option
The selected Mail-in databases are matched on the Exchange CAS server; click OK to close the message box
Match Selected entries using Powershell
Select the Match Selected entries using PowerShell menu option
The selected Mail-in databases are matched using PowerShell; cllick OK to close the message box
Match all entries using Powershell
Select the Match all entries using PowerShell menu option
All Mail-in databases are matched using PowerShell. Click OK to close the message box
Once the migration is completed, you can update mail routing.
Click the Mail Routing button to set mail routing to Exchange; the Set Mail Routing Back to Notes option is for rolling back if needed

Mail-In Database Replicas can be created and managed if Replication is enabled. Note that Replication must be enabled and configured in the Replica Settings tab of Settings. Replication views do not appear if Replication is disabled.
To manage replication:
Expand the Mail In Database Migration | Preparation | Create Replicas view
To create replicas, select one or more entries and click the Create Replicas button; the Change Replication Formula option is also available in this view:

Select the date when you want the migration to start; click OK:

In the Select the Staging Server that appears, select the Staging Server that should be used for replica creation; click OK:

The Proceed with Replica Creation? window will appear; click Yes
The Results window will appear showing the operation has completed; click Ok; the completed replicas will show in the Data Pane:

Click Compare Replicas; the replica comparison will allow you to compare the original mail-in database and the staging replica
Select a mail-in database from the Data Pane and click the Verify Actions button; select an option from the drop-down menu; a Quick Push Replication option is also available; click the Help button for more information about the replica comparison view:

The following table describes the function of each menu option:
|
Option |
Description |
|
Run Replica Comparison For Selected Users |
Allows you to select entries and compare replicas |
|
Set Verification Flag for Selected Users |
Allows you to select entries and set a verification flag for them |
|
Remove Verification Flag for Selected Users |
Allows you to select entries and remove the verification flag for them |
You may delete selected mail-in databases from the Delete Replicas view:

Click By Group.

This view gives you the ability set migration status, migration group, migration workstation.
7.3 Provisioning Mail-in Databases
Perform the following steps to set up Office 365 mailboxes:
Select the appropriate resource.
Select one or more entries and then click the Set Country Code button to select a country code.
Select one or more entries and then click the Set Full Access button and select Set Full Access.
Select one or more entries and then click the Enable O365 Mailbox button to enable a Mailbox.
To match the selected Mail-In databases:
Expand Preparation | Provisioning
Select mail-in databases in the Data Pane and then click the Match selected button
The drop-down menu displays four menu options:

The following table describes each menu option:
|
Option |
Description |
|
Match selected entries using LDAP |
Matches selected Mail-in databases with their corresponding entries in AD using LDAP. |
|
Match Selected users on CAS server |
Matches selected Mail-in databases with their corresponding entries in AD on the Exchange CAS server. |
|
Match Selected entries using PowerShell |
Matches selected Mail-in databases using PowerShell. |
|
Match all entries using PowerShell |
Matches all Mail-in databases using PowerShell. |
|
|
|
|
|
|
Match Selected Entries using LDAP
Select the Match selected entries using LDAP menu option
The selected Mail-in databases are matched in AD
Click OK to close the message box
Match Selected users on CAS Server
Use this option if the destination mailbox server and the CAS servers are not the same server
Select the Match Selected users on CAS server menu option
The selected Mail-in databases are matched on the Exchange CAS server; click OK to close the message box
Match Selected entries using Powershell
Select the Match Selected entries using PowerShell menu option
The selected Mail-in databases are matched using PowerShell; cllick OK to close the message box
Match all entries using Powershell
Select the Match all entries using PowerShell menu option
All Mail-in databases are matched using PowerShell. Click OK to close the message box
Once the migration is completed, you can update mail routing.
Click the Mail Routing button to set mail routing to Exchange; the Set Mail Routing Back to Notes option is for rolling back if needed

Mail-In Database Replicas can be created and managed if Replication is enabled. Note that Replication must be enabled and configured in the Replica Settings tab of Settings. Replication views do not appear if Replication is disabled.
To manage replication:
Expand the Mail In Database Migration | Preparation | Create Replicas view
To create replicas, select one or more entries and click the Create Replicas button; the Change Replication Formula option is also available in this view:

Select the date when you want the migration to start; click OK:

In the Select the Staging Server that appears, select the Staging Server that should be used for replica creation; click OK:

The Proceed with Replica Creation? window will appear; click Yes
The Results window will appear showing the operation has completed; click Ok; the completed replicas will show in the Data Pane:

Click Compare Replicas; the replica comparison will allow you to compare the original mail-in database and the staging replica
Select a mail-in database from the Data Pane and click the Verify Actions button; select an option from the drop-down menu; a Quick Push Replication option is also available; click the Help button for more information about the replica comparison view:

The following table describes the function of each menu option:
|
Option |
Description |
|
Run Replica Comparison For Selected Users |
Allows you to select entries and compare replicas |
|
Set Verification Flag for Selected Users |
Allows you to select entries and set a verification flag for them |
|
Remove Verification Flag for Selected Users |
Allows you to select entries and remove the verification flag for them |
You may delete selected mail-in databases from the Delete Replicas view:

Click By Group.

This view gives you the ability set migration status, migration group, migration workstation.
7.3 Provisioning Mail-in Databases
Perform the following steps to set up Office 365 mailboxes:
Select the appropriate resource.
Select one or more entries and then click the Set Country Code button to select a country code.
Select one or more entries and then click the Set Full Access button and select Set Full Access.
Select one or more entries and then click the Enable O365 Mailbox button to enable a Mailbox.
To match the selected Mail-In databases:
Expand Preparation | Provisioning
Select mail-in databases in the Data Pane and then click the Match selected button
The drop-down menu displays four menu options:

The following table describes each menu option:
|
Option |
Description |
|
Match selected entries using LDAP |
Matches selected Mail-in databases with their corresponding entries in AD using LDAP. |
|
Match Selected users on CAS server |
Matches selected Mail-in databases with their corresponding entries in AD on the Exchange CAS server. |
|
Match Selected entries using PowerShell |
Matches selected Mail-in databases using PowerShell. |
|
Match all entries using PowerShell |
Matches all Mail-in databases using PowerShell. |
|
|
|
|
|
|
Match Selected Entries using LDAP
Select the Match selected entries using LDAP menu option
The selected Mail-in databases are matched in AD
Click OK to close the message box
Match Selected users on CAS Server
Use this option if the destination mailbox server and the CAS servers are not the same server
Select the Match Selected users on CAS server menu option
The selected Mail-in databases are matched on the Exchange CAS server; click OK to close the message box
Match Selected entries using Powershell
Select the Match Selected entries using PowerShell menu option
The selected Mail-in databases are matched using PowerShell; cllick OK to close the message box
Match all entries using Powershell
Select the Match all entries using PowerShell menu option
All Mail-in databases are matched using PowerShell. Click OK to close the message box
Once the migration is completed, you can update mail routing.
Click the Mail Routing button to set mail routing to Exchange; the Set Mail Routing Back to Notes option is for rolling back if needed
