Chatta subito con l'assistenza
Chat con il supporto

On Demand Migration Current - User Guide

About On Demand Migration Working with On Demand Migration Account Migration Mailbox Migration OneDrive Migration Microsoft Teams Migration Microsoft 365 Groups Migration SharePoint Migration Public Folders Migration Power BI Migration Troubleshooting Finalizing the Migration Appendix A: Using PowerShell Appendix B: How Queuing Works

Migrating Group Membership

You can migrate group members with the Group Membership Migration Task for Distribution Groups, Security Groups, and Mail-Enabled Security Groups. Teams and M365 groups are not supported by Group Membership Migration Task.

  • Membership is migrated for all group members that have been matched.
  • Unmatched members will be skipped.
  • Matched accounts in the target tenant are appended to the target group.
  • Existing group members in the target tenant are not removed.

Starting the Group Membership Migration Task

  1. Log in to Quest On Demand and choose an organization if you have multiple organizations.
  2. From the navigation pane, click Migration to open the My Projects list.
  3. Create a new project or open an existing project.
  4. Click the Accounts tile, or click Open from the Accounts tile to open the Accounts and User Data migration workspace.
  5. Select the Accounts tab and select List View if not already selected.
  6. Select Distribution Groups, Security Groups, and Mail-Enabled Security Groups from the list.
  7. From the actions toolbar, click More > Migrate Group Membership. The New Migrate Group Membership Task wizard starts. Each step is described below:
  8. Description
    1. Read the description to understand the implications of group membership migration.
    2. Click Next.
  9. Notification
    1. Send notification email once the task is completed - select this option to send a notification email when a discovery task completes.
      • Only in a case of failure - select this option to send the email if the discovery task fails to complete successfully.
    2. Recipients - enter the email address of the recipients of this email. You can specify multiple recipient email addresses separated by semicolon.
  10. Schedule
    1. Choose from one of three options to schedule the task. The scheduler will be activated only after you complete the task wizard.
      • Run now - task runs immediately.
      • Run later - task must be started manually.
      • Schedule - task will be started at a future date and time entered in the corresponding calendar field.
    2. Click Next.
  11. Summary
    1. Verify the task specifications as described below:
      1. Name - name of the task. You can specify a custom name. Default name is Group Membership Migration Task.
      2. Source tenant - name of the source tenant in this project.
      3. Target tenant - name of the target tenant in this project.
      4. Scheduled start - date and time when the task will start. Now indicates that the task will start immediately.
    2. Click Back to revise or review a previous step or click Finish to complete the task wizard and start the task as scheduled.

Reviewing the Group Membership Migration Task

You can track a task's progress from the Tasks tab, view the summary on the Dashboard or monitor alerts and notifications in Events.

You can track the migration state from the Account State column in the Accounts list view. The column values during and after a task is run are as follows:

Column value Description
Migrating

Migration of this object has started.

  • For each source member object (user or group), the matched target account is added to the matched target group
  • If the matched target account is already a member in the group, the member will not ne processed.
Migrated Migration is complete and successful. Matches were found for all source group members and the target members were added to the target group.
Migrated with Issues

Migration has completed with errors. At least one member was migrated, but not all. Possible reasons:

  • Source member did not matched a target account. Runthe Account Matching Task or Account Mapping Task for this member, or ignore if the member is not in scope.
  • Source member was matched to a target account, but an error occurred when trying to add the member to the target group. The member that failed is listed in the task event. Review error details.
Migration failed

Migration of members did not succeed. Possible reasons:

  • Source group did not match a target group. Run the Account Matching Task or Account Mapping Task, or perform a standard Account migration.
  • Selected object was a User, Team, or M365 Group. Group Membership migration is not supported for these objects.
  • An error occurred that prevented migrating any members to the matched target group. Review error details.
Migration stopped Migration canceled by the user.

Domain Coexistence

Mergers and acquisitions are often accompanied by the unification of brands and corporate identities, including the consolidation of email addresses. However, the transition from source to target tenant might take considerable time. On Demand Migration offers domain coexistence services to close this gap, allowing your employees to send mail from new addresses and access cross-tenant data before the migration is finished. The following services are currently available on the account migration dashboard:

  • Address Rewrite Service seamlessly changes the source users' email flow as if they're already fully migrated to the target tenant. Outgoing email addresses are replaced with the recipient's email address in the target tenant, while all incoming mail is automatically redirected to the source mailbox. Address rewriting can be started once the account is matched or migrated, giving you time to prepare and migrate mailboxes. The Address Rewrite Service requires additional licensing.
  • Calendar Sharing allows users from the source and target tenants to see each other's free or busy information.

Address Rewrite Service

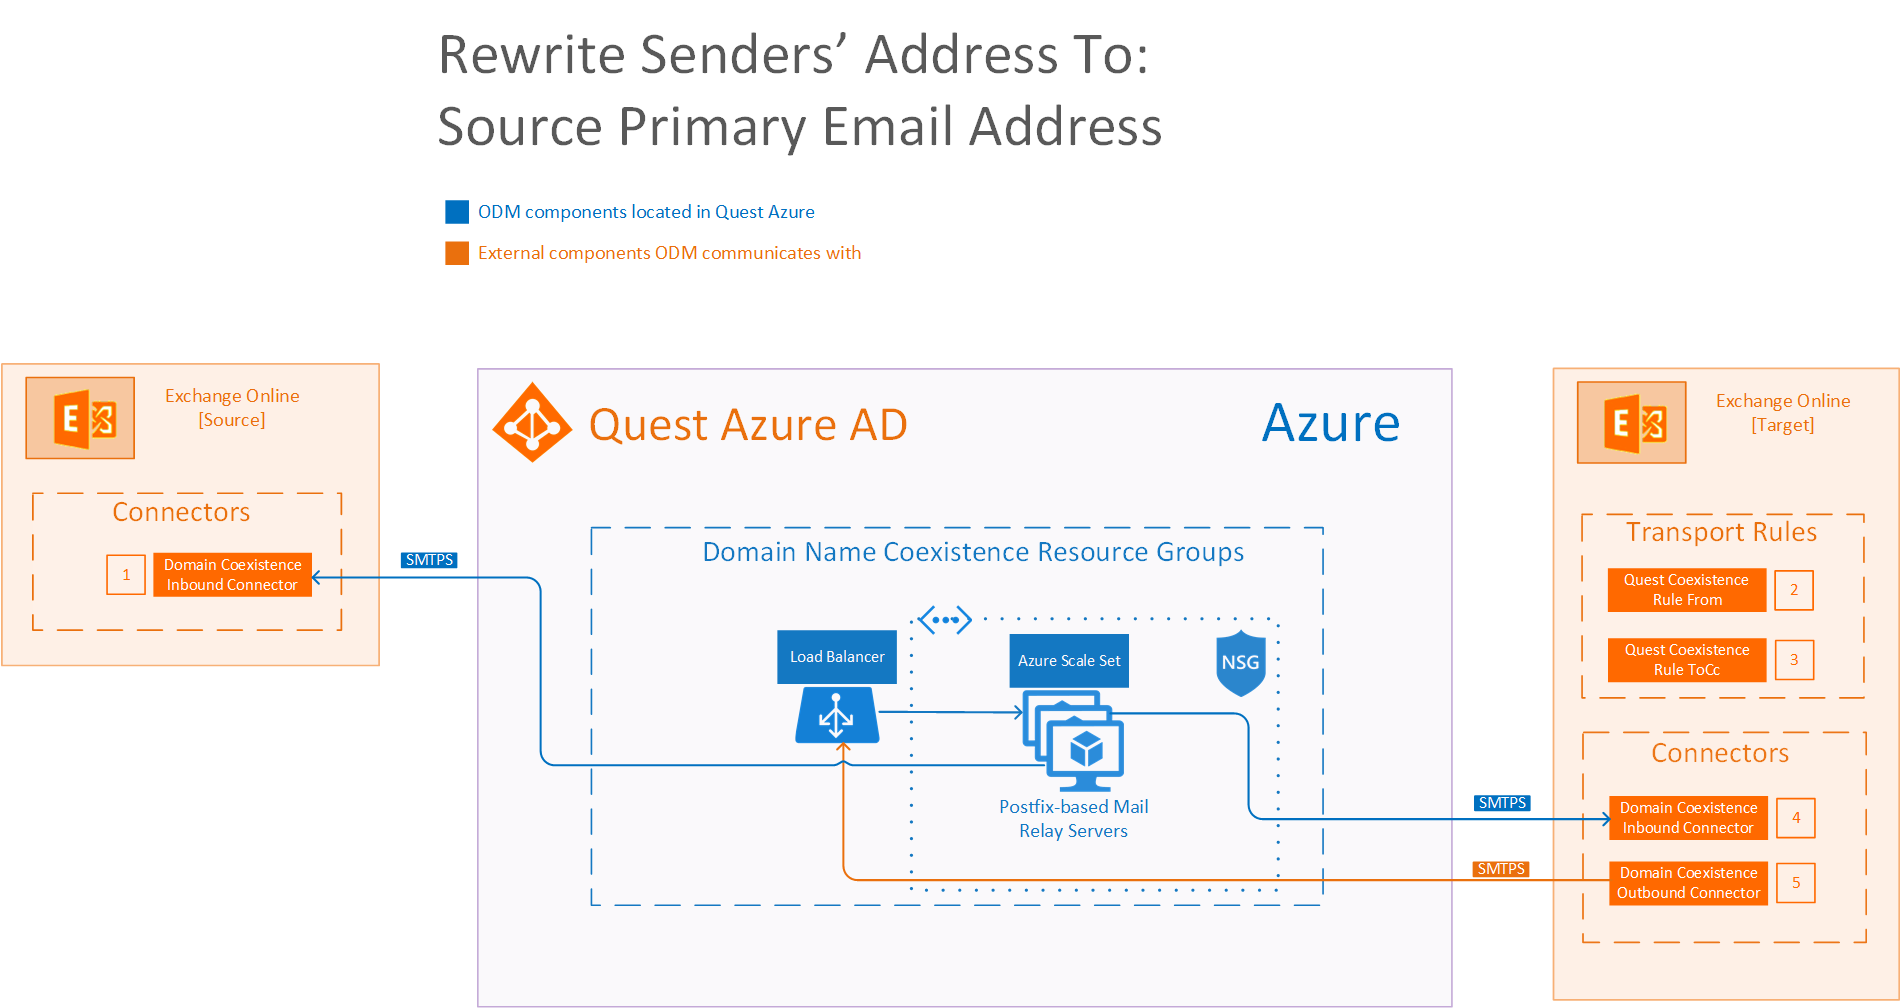
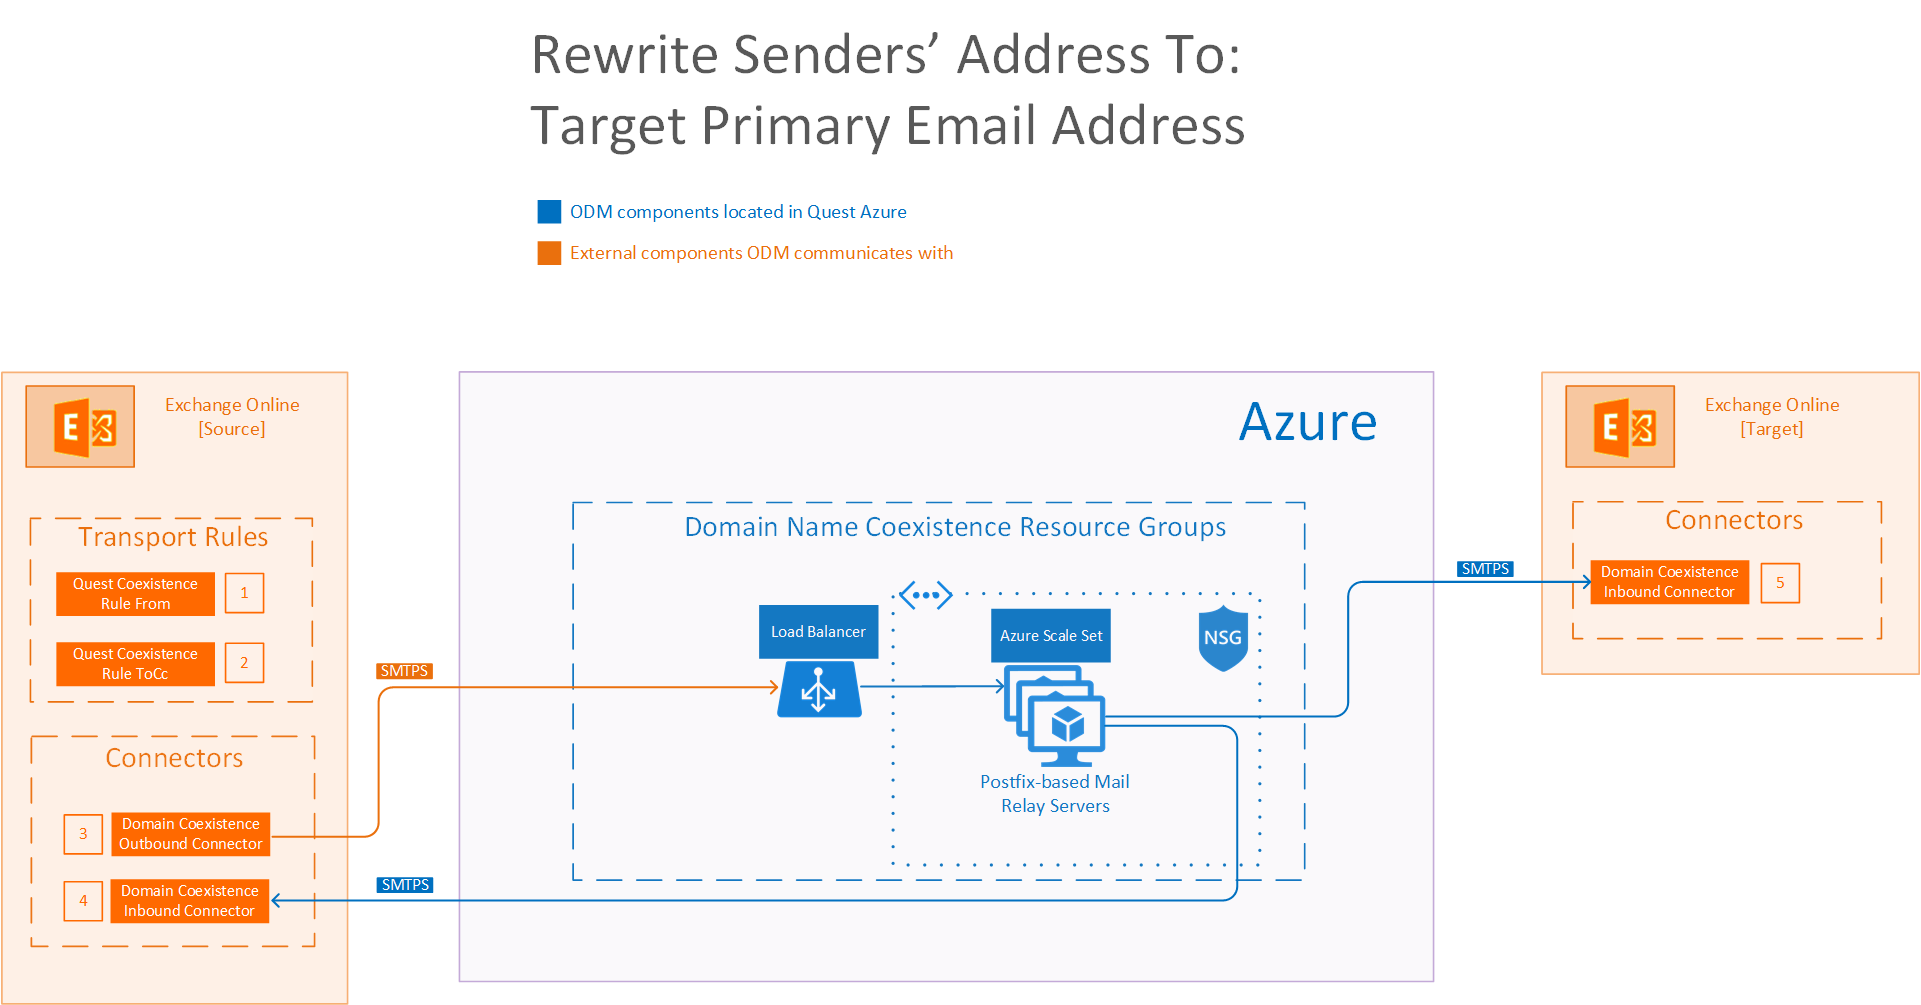
The Address Rewrite Service substitutes the From, To, and Cc addresses in the outgoing emails with the addresses from the target or source tenant depending on the selected address rewriting scenario. Emails are automatically redirected to the source or target mailbox. You can specify the users processed by the service. For example, you can turn on the service for only Sales and Marketing team members.

IMPORTANT: Address Rewrite Service requires additional licensing. The service only works with accounts that have been matched in the target tenant. See matching accounts for more information. Mailbox provisioning is not required.

Address Rewrite Service Message Flow

Address Rewrite Service is intended for creating a coexistence space for domains in which all the email messages coming from the source or target mail domain will look like they were sent from the unified mail domain according to the selected settings. The Address Rewrite Service will take all the necessary steps to create this coexistence space in the Exchange online environment, including creating and managing all the required connectors, mail flow rules, mail-enabled users, and groups in source and target environments. The administrator should add or remove source mail users to this coexistence space and activate or deactivate the Address Rewrite Service.

The mail message flow in a unified domain with an activated Address Rewrite Service is as described below:

Unified mail domain in the source tenant

  1. When a user sends an email as user@target.domain mail user, it is redirected to the Address Rewrite Service server if it is addressed to external recipients.
  2. When the Address Rewrite Service receives an email from user@target.domain, it checks user eligibility to for the address rewriting service and then processes the email by rewriting @target.domain to @source.domain for every user address that is found in the coexistence space. The addresses in "From", "To" and "Cc" fields of the email message are rewritten for all external recipients. Then Address Rewrite Service passes the processed email message to the source Exchange Online. Internal recipients that reside in the source receive this email message with unchanged addresses.
  3. Exchange Online at the source sends a message to external recipients as if it was sent by a user from @source.domain, and all addresses of users added to coexistence scope in From, To and Cc are rewritten for external recipients.
  4. The External recipient is not aware about @target.domain and replies (or create a new email) to the user@source.domain
  5. When the reply or a new mail arrives to the source mail domain it will be forwarded to the target. Target recipient gets the message as if it was forwarded from the Exchange online at the source from user@source.domain
If the message...

Is sent outside the organization from a member of the coexistence group

Do the following...

Route the message using the connector Quest Coexistence Connector Outbound.

Except if...

Sender IP address belongs to one of Mail Relay IP addresses.

If the message...

Is sent outside the organization and is received by a member of the coexistence group specified in the To or CC field

Do the following...

Route the message using the connector Quest Coexistence Connector Outbound.

Except if...

Sender IP address belongs to one of Mail Relay IP addresses.

Mail flow scenario

From: Mail Relay Servers

To: Microsoft 365

How to identify email sent from Mail Relay Servers

Identify incoming messages from Mail Relay Servers by verifying that the sending server's IP address is within Mail Relay IP address ranges and the sender's email address is an accepted domain in your organization.

Mail flow scenario

From: Microsoft 365

To: Mail Relay Servers

When to use the connector

Use only when there is a transport rule (Quest Coexistence Rule From and Quest Coexistence Rule ToCc) is set up that redirects messages to this connector. Routing method Route email messages through Mail Relay Servers.

Mail flow scenario

From: Mail Relay Servers

To: Microsoft 365

How to identify email sent from Mail Relay Servers

Identify incoming messages from Mail Relay Servers by verifying that the sending server's IP address is within Mail Relay IP address ranges and the sender's email address is an accepted domain in your organization.

Unified mail domain in the target tenant

  1. When a user sends an email as user@source.domain it is redirected to Address Rewrite Service server if it is addressed to external recipients.
  2. When the Address Rewrite Service receives email from user@source.domain, its checks user eligibility for the address rewriting service and then processes it by rewriting @source.domain to @target.domain for every user found in the coexistence space. The addresses in "From", "To" and "Cc" of the email message are rewritten for all external recipients. Then Address Rewrite Service passes the processed email message to the target Exchange Online. Internal recipients that reside in the source receive this email message with unchanged addresses.
  3. Exchange Online at the target sends the message to external recipients as if it was sent by user@target.domain, and all addresses of the users added to the coexistence scope in "From", "To" and "Cc" are rewritten for external recipients.
  4. External recipient is not aware about @sourcedomain and replies (or create a new email) to user@target.domain.
  5. When the reply or a new mail arrives to the target mail domain it will be forwarded to the source. Source recipient gets the message as if it was forwarded from the target Exchange online from user@target.domain
If the message...

Is sent outside the organization from a member of the coexistence group

Do the following...

Route the message using the connector Quest Coexistence Connector Outbound.

Except if...

Sender IP address belongs to one of Mail Relay IP addresses.

If the message...

Is sent outside the organization and is received by a member of the coexistence group specified in the To or CC field

Do the following...

Route the message using the connector Quest Coexistence Connector Outbound.

Except if...

Sender IP address belongs to one of Mail Relay IP addresses.

Mail flow scenario

From: Microsoft 365

To: Mail Relay Servers

When to use the connector

Use only when there is a transport rule (Quest Coexistence Rule From and Quest Coexistence Rule ToCc) is set up that redirects messages to this connector. Routing method Route email messages through Mail Relay Servers.

Mail flow scenario

From: Mail Relay Servers

To: Microsoft 365

How to identify email sent from Mail Relay Servers

Identify incoming messages from Mail Relay Servers by verifying that the sending server's IP address is within Mail Relay IP address ranges and the sender's email address is an accepted domain in your organization.

TIP: If Exchange Server Integration fails, click Try to fix and Quest will try to help you resolve the issue.

Using the Address Rewrite Service requires following steps:

# Step
1 Select Scenario for Address Rewriting
2 Provision Address Rewrite Service
3 Add mailboxes to address rewriting
4 Optional: Add Address Rewrite Service's IP address to the target DNS SPF record
5 Activate address rewriting. You can deactivate address rewriting at any time or turn off address rewriting for individual mailboxes

Address Rewrite Service Considerations

Each customer has a dedicated environment and inbound IP address for Address Rewrite Service.

Caution: Do not edit or remove the groups, connectors and rules related to Address Rewrite Service otherwise the service may fail. These rules can be removed manually only if address rewriting no longer needed.

The following groups, connectors and rules appear in Exchange Admin Centers after Exchange Server Integration is configured depending on which rewrite direction is chosen:

Rewrite Senders’ Address to Target

On source tenant:

  • Quest On Demand Coexistence group contains accounts (recipients) joined to Address Rewriting
  • Inbound Quest Coexistence Connector helps control mail flow for Address Rewrite Service from Microsoft 365 to the organization
  • Outbound Quest Coexistence Connector helps control mail flow for Address Rewrite Service from the organization to Microsoft 365
  • Quest Coexistence Rules implement Address Rewriting messaging policy for accounts joined to Address Rewriting

On target tenant:

  • Quest Coexistence Connector helps control flow of email messages for Address Rewrite Service from the organization to Microsoft 365
Rewrite Senders’ Address to Source

On source tenant:

  • Quest Coexistence Connector helps control flow of email messages for Address Rewrite Service from the organization to Microsoft 365

On target tenant:

  • Quest On Demand Coexistence group contains accounts (recipients) joined to Address Rewriting
  • Inbound Quest Coexistence Connector helps control mail flow for Address Rewrite Service from Microsoft 365 to the organization
  • Outbound Quest Coexistence Connector helps control mail flow for Address Rewrite Service from the organization to Microsoft 365
  • Quest Coexistence Rules implement Address Rewriting messaging policy for accounts joined to Address Rewriting

NOTE:

The service only works with accounts that have pairs in the target tenant. You should match or migrate an account before adding it to address rewriting.

In case an email is sent to a group of people, including a migrated user, that email is automatically forwarded to the migrated user, and then if the migrated user clicks Reply all, he / she gets a copy of his / her reply message. This is default behavior.

Related Documents

The document was helpful.

Seleziona valutazione

I easily found the information I needed.

Seleziona valutazione