
Introduction
Getting started
About deploying NetVault Backup
About NetVault Backup components
Starting or stopping the NetVault Backup Service
Enabling Web Service over HTTP or HTTPS
Overview of NetVault Backup WebUI
Navigation pane
Quitting NetVault Backup
Using the configuration wizard
Monitoring the NetVault Backup Server
Sorting records in NetVault Backup WebUI
Customizing tables in NetVault Backup WebUI
Configuring clients
About NetVault Backup Clients
Installing software from WebUI (push installation)
Managing catalog search
About push installation
Prerequisites
Managing package stores
Performing push installations
Monitoring deployment tasks
Managing deployment tasks
Adding clients
Adding a client to the NetVault Backup Server
Adding multiple clients
Firewall settings
Locating a client
Checking communication through a firewall
Adding a server as a client
Removing a client from the list of available clients
Managing clients
Viewing client details
Setting client description
Installing plug-ins
Checking for upgrades
Installing product license keys
Checking client access
Removing plug-ins
Removing a client from the server
Managing client groups
About catalog search
Configuring catalog search
Relocating the catalog search database directory
Configuring storage devices
Changing the NetVault Catalog Database directory on a Windows-based machine
Migrating NetVault Catalog Server to different Windows-based client machine
Changing the NetVault Catalog Database directory on a Linux-based machine
Modifying catalog search
Disabling catalog search
Removing catalog search
Displaying Status of Catalog Search
About storage devices
SAN considerations
Quest DR Series systems
Quest QoreStor
NetVault SmartDisk
Backing up data
About NetVault SmartDisk
Adding a NetVault SmartDisk
Migrating savesets and backup jobs from NetVault SmartDisk to QoreStor
EMC Data Domain Systems
About EMC Data Domain Systems
Data Domain System prerequisites
Adding a Data Domain System
DD Boost commands
Snapshot Array Manager
Virtual Tape Libraries
About Virtual Tape Library
Virtual Tape Library considerations
Creating and adding a Virtual Tape Library
Re-adding a previously created VTL
Virtual standalone drives
Shared Virtual Tape Libraries
About Shared Virtual Tape Libraries
SVTL considerations
SVTL prerequisites
Creating and adding an SVTL
Re-adding a previously created SVTL
Physical tape devices
About backing up data
Secondary Copy
Snapshot-based backups
Backup retirement
About NetVault Backup Sets
Backup and recovery strategy
Creating backup jobs
Creating Schedule Sets
Managing policies
Scheduling methods and options for non-repeating jobs
Scheduling methods and options for repeating jobs
Creating Target Sets
Creating Source Sets for backup jobs
Creating Backup Advanced Options Sets
Setting backup retirement options
Specifying additional options
Creating a Secondary Copy
Configuring pre- and post script options for backup jobs
Configuring user-defined events for backup jobs
Managing sets
About policies
Creating a policy
Viewing existing backup policies
Viewing job status of policy jobs
Modifying a backup policy
Restoring data
Modifying jobs in a backup policy
Modifying clients in a backup policy
Modifying events in a backup policy
Quiescing a backup policy
Deleting a backup policy
About restoring data
Creating restore jobs
Restoring data using an existing Restore Selection Set
Searching for files in savesets
Viewing media list
Creating Source Sets for restore jobs
Creating Restore Advanced Options Sets
Managing NetVault Backup dashboard
Setting restore type
Specifying additional options
Configuring pre- and post -scripts for restore jobs
Configuring user-defined events for restore jobs
Managing online backup indexes
About managing online indexes
Manually deleting online indexes
Loading offline indexes
Manually compressing online indexes
Uncompressing online indexes
Managing Snapshots
About NetVault Backup dashboard
Viewing NetVault Backup dashboard
Managing a widget on NetVault Backup dashboard
Managing jobs
Viewing job activity
Viewing job calendar
Managing jobs
Monitoring logs
Running a job immediately
Aborting a job
Stopping a job
Restarting a job
Placing a job on hold
Resuming a job
Determining the reason for "waiting for media" status
Viewing log messages for a job
Viewing and managing a job
Monitoring job progress
Clearing job errors and warnings
Removing a job schedule
Managing job definitions
Viewing job definitions
Editing job definitions
Deleting job definitions
Adding a non-policy job to a policy
Viewing job history
About NetVault Backup logs
Viewing log messages
Downloading logs
Exporting logs
Manually purging the log messages
Setting up a user-defined log event
Removing a user-defined log event
Searching the knowledge base
Managing storage devices
Monitoring device activity
Managing disk-based storage devices in list view
Managing storage media
Viewing disk device details
Managing a Quest DR Series system, QoreStor, or Data Domain system
Managing disk-based storage devices in tree view
Viewing device details
Viewing cleaner statistics
Starting or stopping cleaner
Managing device users
Managing a container
Managing storage groups
Removing Quest DR Series system
Removing QoreStor
Checking the status of a disk-based storage device
Changing the status of a disk-based storage device
Scanning a disk-based storage device
Removing all savesets from a disk-based storage device
Removing a disk-based storage device
Viewing disk device details
Checking the status of a disk-based storage device
Changing the status of a disk-based storage device
Setting storage properties for a disk-based storage device
Scanning a disk-based storage device
Removing a disk-based storage device
Managing the Snapshot Array Manager
Modifying the Snapshot Array Manager settings
Changing the user credentials for Snapshot Array Manager
Changing the status of Snapshot Array Manager
Removing the Snapshot Array Manager
Managing tape libraries in list view
Viewing tape library details
Opening and closing library door
Opening and closing entry/exit ports
Unloading or importing tapes from entry/exit ports
Exporting tapes to entry/exit ports
Restarting ACSLS or NDMP Libraries
Importing shadow tapes (NetApp VTL)
Removing a tape library
Managing tape libraries in tree view
Viewing tape library details
Modifying a library
Changing the device view type
Opening and closing library door
Opening and closing entry/exit ports
Unloading or importing tapes from entry/exit ports
Exporting tapes to entry/exit ports
Restarting ACSLS or NDMP libraries
Importing shadow tapes (NetApp VTL)
Removing a tape library
Managing tape drives in list view
Viewing tape drive details
Configuring performance options for a tape drive
Checking the status of a tape drive
Changing the status of a tape drive
Configuring cleaning slots
Configuring the cleaning lives option
Configuring automatic cleaning options for a tape drive
Manually submitting a drive cleaning request
Unloading a tape
Loading a tape
Removing a tape drive
Managing tape drives in tree view
Viewing tape drive details
Configuring physical tape drives
Checking the status of a tape drive
Changing the status of a tape drive
Configuring cleaning slots
Configuring the cleaning lives option
Configuring automatic cleaning options for a tape drive
Manually submitting a drive cleaning request
Unloading a tape
Loading a tape
Marking media for re-use
Removing a tape drive
Adding shared devices
Viewing storage summary
Viewing disk storage details
Viewing tape storage details
Managing tape storage media
Managing user and group accounts
Labeling tape media
Blanking tape media
Scanning tape media
Marking a tape as unusable
Marking a tape as read-only
Marking a tape for reuse
Removing an offline tape
Managing savesets
About user accounts
About user and group privileges and presets
Creating a user account
Monitoring events and configuring notifications
Setting user password
Configuring user details
Configuring client and media group memberships for a user group
Granting privileges and quota to a user account
Setting up user notification profile
Modifying a user account
Deleting a user account
Setting a user policy
Using Secure Mode
Using Presets
User privileges
Predefined Presets
Integrating Active Directory with NetVault Backup
Using Azure Active Directory as an identity provider
About NetVault Backup events
About notification methods
Event classes
Events types
Viewing event logs
Using global notification methods
Using custom notification methods
Reporting in NetVault Backup
About custom notification methods
Creating a custom notification method
Setting up a custom notification method
Removing a user-defined job event
Removing a user-defined report event
Reporting system overview
Working with client clusters
Working with reports
Generating reports
Setting a favorite report
Setting filters for report
Editing report job definitions
Using notification methods to send reports by email or print reports
Customizing table views for reports
Adding charts to reports
Exporting reports to PDF files
Available reports
About client cluster support
Device configuration in cluster environment
Installing and upgrading cluster-aware plug-ins
Configuring a cluster-aware plug-in
Configuring default settings for NetVault Backup
Configuring preferred network address for cluster nodes
Configuring default settings for a cluster-aware plug-in
Managing virtual clients
Modifying a virtual client
Checking access to a virtual client
Determining the current real client
Removing a virtual client
Backups using cluster-aware plug-ins
Restores using cluster-aware plug-ins
About configuring default settings
Configuring encryption settings
Configuring plug-in options
Configuring default settings for post-scripts
Configuring default settings for Verify Plug-in
Configuring Deployment Manager Settings
Configuring Job Manager settings
Configuring Logging Daemon settings
Diagnostic tracing
About Logging Daemon
Configuring disk space alert thresholds
Modifying the purge policy for log messages
Configuring additional settings for Logging Daemon
Configuring Media Manager settings
About Media Manager
Configuring general settings for Media Manager
Configuring retirement rules for dependent backups
Configuring Media Manager settings for tape devices
Configuring Media Manager settings for backup indexes
Configuring Media Manager settings for RAS devices
Configuring transfer update settings for foreign RAS devices
Configuring data transfer stall timeout period for NetVault SmartDisk
Configuring media request weightings
Configuring default interval for backup retirement scans
Configuring an alternate index read block size for Quest DR Series systems
Configuring Network Manager settings
About Network Manager
Configuring timeout settings for Network Manager
Enabling or disabling availability broadcasts
Configuring network addresses for multihomed machines
Reducing startup delay
Configuring default port for Network Manager
Configuring default port for Communications Manager
Configuring Process Manager settings
Configuring RAS device settings
Configuring Schedule Manager settings
About Schedule Manager
Configuring default settings for Schedule Manager
Configuring default job priority settings
Configuring Web Service settings
Configuring Web Service to disable ciphers
Configuring Web Service to disable protocols
Enabling Web Service auditing
Configuring timeout period for client operations
Configuring timeout period for saveset removal request
Configuring Auditor Daemon settings
About Auditor Daemon
Configuring Auditor to log only failed requests
Modifying the purge policy for audit logs
Configuring firewall settings
Configuring general settings
Relocating default directories
Relocating the NetVault Database directory
Configuring TCP/IP buffer sizes
Changing language and locale settings
Disabling pre-installation package compatibility check
Configuring license expiration warning period
Configuring security settings
Synchronizing NetVault Time
Configuring default settings for global notification methods
Configuring email server settings for notifications
Configuring SysOp email ID for notifications
Configuring a default printer for notifications
Configuring network manager host settings for notifications
Configuring the reporting utility
About reporting utility
Customizing HTML report templates
Customizing plain text report templates
Customizing CSV report templates
Configuring timeout setting for report generation
Configuring default mail format type for report
Configuring default settings for Statistics Manager
Creating a global purge policy for the Reports Database
Creating table-specific purge policy
Configuring NetVault Backup WebUI default settings
Configuring NetVault Backup to use a specific VSS provider
Configuring default settings using Txtconfig
About diagnostic tracing
Managing trace filters
Enabling tracing
Downloading trace files
Changing the trace directory location
Enabling tracing using Txtconfig
Disabling tracing
Deleting trace session directories
Managing diagnostic data
Using the deviceconfig utility
About deviceconfig
Configuring default settings for tape libraries
Configuring default settings for tape drives
NetVault Backup processes
Environment variables
Network ports used by NetVault Backup
Troubleshooting
Common errors
NetVault Backup Service fails to start on Windows
NetVault Backup Service fails to start after the machine is restarted
NetVault Backup Service starts, but stops immediately on Linux
Login fails after any change in the server IP address
Unexpected behavior of NetVault Backup WebUI
WebUI does not run in Compatibility View in Internet Explorer
NetVault Backup installer fails during push installation
VSS-based backup fails
Modifying TCP/IP socket buffer size on Windows
Restores using Data Copy savesets fail on clients running NetVault Backup 10.0.1
Restore fails on Itanium platforms if the index is larger than 2GB
After upgrade, Data Copy and Consolidated backup job on Linux fails
After upgrade, console error is displayed on WebUI pages
Deployment task hangs on target Linux machine during push installation.
Unable to add package store with hostname.
Deployment task fails due to network configuration issues.
Domain user is unable to login NetVault Backup Server if the workstation attribute is set.
Domain user is unable to login NetVault Backup Server on Debian 9.
Adding the target machine as a client fails, after successful push installation.
Unable to install, uninstall or navigate catalog search page after manually uninstalling NetVault Backup Client Host.
Unable to install, uninstall catalog search on client after NetVault Backup Server migration with the same or different server name
External Azure AD user cannot add an external Azure AD user to NetVault Backup Server
Failed to verify target Windows machine from a Linux-based NetVault Backup server
Safe Mode in NetVault Backup
Virtual Tape Library considerations
Before creating and adding a VTL, review the following information:
On normal file systems you can use the disk space check feature to avoid errors during VTL creation. When creating a VTL on a third-party deduplication appliance or compressed file system, you should disable this feature. For more information, see Configuring default settings for Disk Devices Plug‑in.
Here <x> is the additional disk space considered for the following requirements:
By default, the additional space requirement is set to 20MB. To change this setting, see Configuring default settings for Disk Devices Plug‑in.
Creating and adding a Virtual Tape Library
|
1 |
In the Navigation pane, click Guided Configuration, and then on the NetVault Configuration Wizard page, click Add Storage Devices. |
|
2 |
On the Add Storage Devices page, select the Virtual tape library/media changer option, and click Next. |
|
4 |
On the Add Virtual Tape Library page, provide the following details. |
Figure 10. Add Virtual Tape Library page
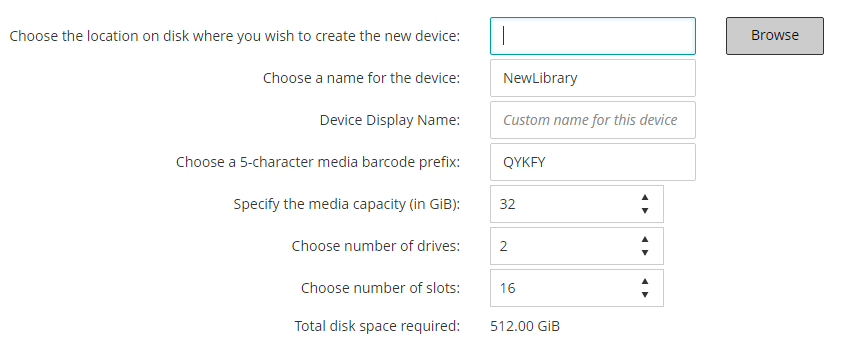
Table 31. Add Virtual Tape Library
|
Choose the location on disk where you wish to create the new device |
Enter the location where you want to create the VTL, or use the Browse button to select a location. To create a path, click Browse, select a parent folder, and then click Add new folder, After you click OK, the new folder is added to the parent folder and can be used as the location for the new device. |
|
5 |
Click Next to create and add the device. |
Re-adding a previously created VTL
|
2 |
On the Add Storage Devices page, select the Virtual tape library/media changer option and the Re-add previously generated virtual device check box. |
|
3 |
In the list of NetVault Backup machines, select the machine on which the device was created. Click Next to scan the selected client and display the discovered VTLs. |
|
4 |