
Adding Smart Labels for devices
Adding Smart Labels for devices
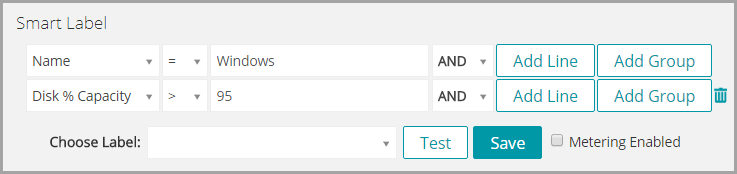
Add a Smart Label for desktops
You can create a Smart Label to identify devices that require desktop patches.
|
1. |
|
a. |
Log in to the appliance Administrator Console, https://appliance_hostname/admin. Or, if the Show organization menu in admin header option is enabled in the appliance General Settings, select an organization in the drop-down list in the top-right corner of the page next to the login information. |
|
b. |
|
2. |
|
b. |
Other useful criteria for identifying desktops include:
|
▪ |
System Models, such as all systems with XPS in the model name. |
|
▪ |
IP addresses, or partial IP addresses using the contains criteria. |
|
▪ |
BIOS Serial Numbers, or use the Includes partial serial number criteria. This is useful if you have purchased desktops with sequential numbers. For more information, contact your vendor. |
|
4. |
|
5. |
|
◦ |
Select an existing label to associate with the Smart Label. Type in the Choose label field to search for existing labels. |
|
◦ |
|
NOTE: Press Enter or Return after you enter a new Smart Label name to move the text from the search field to the label field. |
|
6. |
|
7. |
Optional: To confirm that the new label appears on the Labels list, select Home > Labels > Smart Labels or Label Management. |
|
a. |
|
c. |
Force Inventory is available only if the agent messaging protocol connection to an Agent-managed device is active, or for Agentless devices, if the device is reachable.
Add a Smart Label for servers
You can create a Smart Label to identify devices that require server patches.
|
1. |
|
a. |
Log in to the appliance Administrator Console, https://appliance_hostname/admin. Or, if the Show organization menu in admin header option is enabled in the appliance General Settings, select an organization in the drop-down list in the top-right corner of the page next to the login information. |
|
b. |
|
2. |
|
b. |
Other useful criteria for identifying servers include:
|
▪ |
IP addresses, or partial IP addresses using the contains criteria. |
|
▪ |
BIOS Serial Numbers, or use the Includes partial serial number criteria. This is useful if you have purchased servers with sequential numbers. For more information, contact your vendor. |
|
4. |
|
5. |
|
◦ |
Select an existing label to associate with the Smart Label. Type in the Choose label field to search for existing labels. |
|
◦ |
|
NOTE: Press Enter or Return after you enter a new Smart Label name to move the text from the search field to the label field. |
|
6. |
|
7. |
|
a. |
|
c. |
Force Inventory is available only if the agent messaging protocol connection to an Agent-managed device is active, or for Agentless devices, if the device is reachable.
Add a Smart Label for laptops
You can create a Smart Label to identify devices that require laptop patches.
|
1. |
|
a. |
Log in to the appliance Administrator Console, https://appliance_hostname/admin. Or, if the Show organization menu in admin header option is enabled in the appliance General Settings, select an organization in the drop-down list in the top-right corner of the page next to the login information. |
|
b. |
|
2. |
|
b. |
Other useful criteria for identifying laptops include:
|
▪ |
IP addresses, or partial IP addresses using the contains criteria. |
|
▪ |
BIOS Serial Numbers, or use the Includes partial serial number criteria. This is useful if you have purchased laptops with sequential numbers. For more information, contact your vendor. |
|
4. |
|
5. |
|
◦ |
Select an existing label to associate with the Smart Label. Type in the Choose label field to search for existing labels. |
|
◦ |
|
NOTE: Press Enter or Return after you enter a new Smart Label name to move the text from the search field to the label field. |
|
6. |
|
7. |
Optional: To confirm that the new label appears on the Labels list, select Home > Labels > Smart Labels or Label Management. |
|
a. |
|
c. |
Force Inventory is available only if the agent messaging protocol connection to an Agent-managed device is active, or for Agentless devices, if the device is reachable.
Add a Smart Label for desktops
Adding Smart Labels for devices
Add a Smart Label for desktops
You can create a Smart Label to identify devices that require desktop patches.
|
1. |
|
a. |
Log in to the appliance Administrator Console, https://appliance_hostname/admin. Or, if the Show organization menu in admin header option is enabled in the appliance General Settings, select an organization in the drop-down list in the top-right corner of the page next to the login information. |
|
b. |
|
2. |
|
b. |
Other useful criteria for identifying desktops include:
|
▪ |
System Models, such as all systems with XPS in the model name. |
|
▪ |
IP addresses, or partial IP addresses using the contains criteria. |
|
▪ |
BIOS Serial Numbers, or use the Includes partial serial number criteria. This is useful if you have purchased desktops with sequential numbers. For more information, contact your vendor. |
|
4. |
|
5. |
|
◦ |
Select an existing label to associate with the Smart Label. Type in the Choose label field to search for existing labels. |
|
◦ |
|
NOTE: Press Enter or Return after you enter a new Smart Label name to move the text from the search field to the label field. |
|
6. |
|
7. |
Optional: To confirm that the new label appears on the Labels list, select Home > Labels > Smart Labels or Label Management. |
|
a. |
|
c. |
Force Inventory is available only if the agent messaging protocol connection to an Agent-managed device is active, or for Agentless devices, if the device is reachable.
Add a Smart Label for servers
You can create a Smart Label to identify devices that require server patches.
|
1. |
|
a. |
Log in to the appliance Administrator Console, https://appliance_hostname/admin. Or, if the Show organization menu in admin header option is enabled in the appliance General Settings, select an organization in the drop-down list in the top-right corner of the page next to the login information. |
|
b. |
|
2. |
|
b. |
Other useful criteria for identifying servers include:
|
▪ |
IP addresses, or partial IP addresses using the contains criteria. |
|
▪ |
BIOS Serial Numbers, or use the Includes partial serial number criteria. This is useful if you have purchased servers with sequential numbers. For more information, contact your vendor. |
|
4. |
|
5. |
|
◦ |
Select an existing label to associate with the Smart Label. Type in the Choose label field to search for existing labels. |
|
◦ |
|
NOTE: Press Enter or Return after you enter a new Smart Label name to move the text from the search field to the label field. |
|
6. |
|
7. |
|
a. |
|
c. |
Force Inventory is available only if the agent messaging protocol connection to an Agent-managed device is active, or for Agentless devices, if the device is reachable.
Add a Smart Label for laptops
You can create a Smart Label to identify devices that require laptop patches.
|
1. |
|
a. |
Log in to the appliance Administrator Console, https://appliance_hostname/admin. Or, if the Show organization menu in admin header option is enabled in the appliance General Settings, select an organization in the drop-down list in the top-right corner of the page next to the login information. |
|
b. |
|
2. |
|
b. |
Other useful criteria for identifying laptops include:
|
▪ |
IP addresses, or partial IP addresses using the contains criteria. |
|
▪ |
BIOS Serial Numbers, or use the Includes partial serial number criteria. This is useful if you have purchased laptops with sequential numbers. For more information, contact your vendor. |
|
4. |
|
5. |
|
◦ |
Select an existing label to associate with the Smart Label. Type in the Choose label field to search for existing labels. |
|
◦ |
|
NOTE: Press Enter or Return after you enter a new Smart Label name to move the text from the search field to the label field. |
|
6. |
|
7. |
Optional: To confirm that the new label appears on the Labels list, select Home > Labels > Smart Labels or Label Management. |
|
a. |
|
c. |
Force Inventory is available only if the agent messaging protocol connection to an Agent-managed device is active, or for Agentless devices, if the device is reachable.
Add a Smart Label for servers
Adding Smart Labels for devices
Add a Smart Label for desktops
You can create a Smart Label to identify devices that require desktop patches.
|
1. |
|
a. |
Log in to the appliance Administrator Console, https://appliance_hostname/admin. Or, if the Show organization menu in admin header option is enabled in the appliance General Settings, select an organization in the drop-down list in the top-right corner of the page next to the login information. |
|
b. |
|
2. |
|
b. |
Other useful criteria for identifying desktops include:
|
▪ |
System Models, such as all systems with XPS in the model name. |
|
▪ |
IP addresses, or partial IP addresses using the contains criteria. |
|
▪ |
BIOS Serial Numbers, or use the Includes partial serial number criteria. This is useful if you have purchased desktops with sequential numbers. For more information, contact your vendor. |
|
4. |
|
5. |
|
◦ |
Select an existing label to associate with the Smart Label. Type in the Choose label field to search for existing labels. |
|
◦ |
|
NOTE: Press Enter or Return after you enter a new Smart Label name to move the text from the search field to the label field. |
|
6. |
|
7. |
Optional: To confirm that the new label appears on the Labels list, select Home > Labels > Smart Labels or Label Management. |
|
a. |
|
c. |
Force Inventory is available only if the agent messaging protocol connection to an Agent-managed device is active, or for Agentless devices, if the device is reachable.
Add a Smart Label for servers
You can create a Smart Label to identify devices that require server patches.
|
1. |
|
a. |
Log in to the appliance Administrator Console, https://appliance_hostname/admin. Or, if the Show organization menu in admin header option is enabled in the appliance General Settings, select an organization in the drop-down list in the top-right corner of the page next to the login information. |
|
b. |
|
2. |
|
b. |
Other useful criteria for identifying servers include:
|
▪ |
IP addresses, or partial IP addresses using the contains criteria. |
|
▪ |
BIOS Serial Numbers, or use the Includes partial serial number criteria. This is useful if you have purchased servers with sequential numbers. For more information, contact your vendor. |
|
4. |
|
5. |
|
◦ |
Select an existing label to associate with the Smart Label. Type in the Choose label field to search for existing labels. |
|
◦ |
|
NOTE: Press Enter or Return after you enter a new Smart Label name to move the text from the search field to the label field. |
|
6. |
|
7. |
|
a. |
|
c. |
Force Inventory is available only if the agent messaging protocol connection to an Agent-managed device is active, or for Agentless devices, if the device is reachable.
Add a Smart Label for laptops
You can create a Smart Label to identify devices that require laptop patches.
|
1. |
|
a. |
Log in to the appliance Administrator Console, https://appliance_hostname/admin. Or, if the Show organization menu in admin header option is enabled in the appliance General Settings, select an organization in the drop-down list in the top-right corner of the page next to the login information. |
|
b. |
|
2. |
|
b. |
Other useful criteria for identifying laptops include:
|
▪ |
IP addresses, or partial IP addresses using the contains criteria. |
|
▪ |
BIOS Serial Numbers, or use the Includes partial serial number criteria. This is useful if you have purchased laptops with sequential numbers. For more information, contact your vendor. |
|
4. |
|
5. |
|
◦ |
Select an existing label to associate with the Smart Label. Type in the Choose label field to search for existing labels. |
|
◦ |
|
NOTE: Press Enter or Return after you enter a new Smart Label name to move the text from the search field to the label field. |
|
6. |
|
7. |
Optional: To confirm that the new label appears on the Labels list, select Home > Labels > Smart Labels or Label Management. |
|
a. |
|
c. |
Force Inventory is available only if the agent messaging protocol connection to an Agent-managed device is active, or for Agentless devices, if the device is reachable.
Add a Smart Label for laptops
Adding Smart Labels for devices
Add a Smart Label for desktops
You can create a Smart Label to identify devices that require desktop patches.
|
1. |
|
a. |
Log in to the appliance Administrator Console, https://appliance_hostname/admin. Or, if the Show organization menu in admin header option is enabled in the appliance General Settings, select an organization in the drop-down list in the top-right corner of the page next to the login information. |
|
b. |
|
2. |
|
b. |
Other useful criteria for identifying desktops include:
|
▪ |
System Models, such as all systems with XPS in the model name. |
|
▪ |
IP addresses, or partial IP addresses using the contains criteria. |
|
▪ |
BIOS Serial Numbers, or use the Includes partial serial number criteria. This is useful if you have purchased desktops with sequential numbers. For more information, contact your vendor. |
|
4. |
|
5. |
|
◦ |
Select an existing label to associate with the Smart Label. Type in the Choose label field to search for existing labels. |
|
◦ |
|
NOTE: Press Enter or Return after you enter a new Smart Label name to move the text from the search field to the label field. |
|
6. |
|
7. |
Optional: To confirm that the new label appears on the Labels list, select Home > Labels > Smart Labels or Label Management. |
|
a. |
|
c. |
Force Inventory is available only if the agent messaging protocol connection to an Agent-managed device is active, or for Agentless devices, if the device is reachable.
Add a Smart Label for servers
You can create a Smart Label to identify devices that require server patches.
|
1. |
|
a. |
Log in to the appliance Administrator Console, https://appliance_hostname/admin. Or, if the Show organization menu in admin header option is enabled in the appliance General Settings, select an organization in the drop-down list in the top-right corner of the page next to the login information. |
|
b. |
|
2. |
|
b. |
Other useful criteria for identifying servers include:
|
▪ |
IP addresses, or partial IP addresses using the contains criteria. |
|
▪ |
BIOS Serial Numbers, or use the Includes partial serial number criteria. This is useful if you have purchased servers with sequential numbers. For more information, contact your vendor. |
|
4. |
|
5. |
|
◦ |
Select an existing label to associate with the Smart Label. Type in the Choose label field to search for existing labels. |
|
◦ |
|
NOTE: Press Enter or Return after you enter a new Smart Label name to move the text from the search field to the label field. |
|
6. |
|
7. |
|
a. |
|
c. |
Force Inventory is available only if the agent messaging protocol connection to an Agent-managed device is active, or for Agentless devices, if the device is reachable.
Add a Smart Label for laptops
You can create a Smart Label to identify devices that require laptop patches.
|
1. |
|
a. |
Log in to the appliance Administrator Console, https://appliance_hostname/admin. Or, if the Show organization menu in admin header option is enabled in the appliance General Settings, select an organization in the drop-down list in the top-right corner of the page next to the login information. |
|
b. |
|
2. |
|
b. |
Other useful criteria for identifying laptops include:
|
▪ |
IP addresses, or partial IP addresses using the contains criteria. |
|
▪ |
BIOS Serial Numbers, or use the Includes partial serial number criteria. This is useful if you have purchased laptops with sequential numbers. For more information, contact your vendor. |
|
4. |
|
5. |
|
◦ |
Select an existing label to associate with the Smart Label. Type in the Choose label field to search for existing labels. |
|
◦ |
|
NOTE: Press Enter or Return after you enter a new Smart Label name to move the text from the search field to the label field. |
|
6. |
|
7. |
Optional: To confirm that the new label appears on the Labels list, select Home > Labels > Smart Labels or Label Management. |
|
a. |
|
c. |
Force Inventory is available only if the agent messaging protocol connection to an Agent-managed device is active, or for Agentless devices, if the device is reachable.