
Choosing the devices and applications to meter
Enabling and configuring metering for devices and applications
Choosing the devices and applications to meter
Enabling metering on devices
To apply a metering-enabled label to devices, do one of the following:
|
• |
Apply the built-in label, MeteredDevices, to your devices. This label has the metering option enabled. See Setting up and using labels to manage groups of items. |
|
• |
|
• |
Enable metering on devices using manual labels
|
1. |
|
a. |
Log in to the appliance Administrator Console, https://appliance_hostname/admin. Or, if the Show organization menu in admin header option is enabled in the appliance General Settings, select an organization in the drop-down list in the top-right corner of the page next to the login information. |
|
b. |
|
c. |
|
2. |
|
| |||
|
If you specify an alternate download location, specify the path to the location. | |||
|
If you specify an alternate download location, specify the username and password for the location. | |||
|
The type of label. To create a label that enables metering, select the Device Inventory check box. You can select additional label types as needed, but Metering can be enabled only if the Devices label type is selected. | |||
|
(Optional) The label group to which the label is assigned. To assign the label to a label group, click Edit next to the Label Group field, then select a label group. This is useful if you have a large number of labels and you want to organize them into sub-labels. For example, you could include the labels of your licensed applications in a group label named Licenses. In addition, labels inherit any restrictions of the groups to which they belong. |
|
4. |
|
a. |
|
c. |
|
|
Metering is enabled on the device, and the KACE Agent is scheduled to report metering information for Software Catalog applications that also have metering enabled. See Enabling and configuring metering for devices and applications. It might take as long as 24 hours for the appliance to display metering information in the Administrator Console, depending on the metering interval. To change the metering interval, see Enable metering for Software Catalog applications. |
|
|
Enable metering on devices using Smart Labels
You can enable metering using Smart Labels provided that the Smart Label is a device label.
|
1. |
|
a. |
Log in to the appliance Administrator Console, https://appliance_hostname/admin. Or, if the Show organization menu in admin header option is enabled in the appliance General Settings, select an organization in the drop-down list in the top-right corner of the page next to the login information. |
|
b. |
|
c. |
|
2. |
|
◦ |
To add a row, click Add line. |
|
◦ |
To add a subset of rules, select AND or OR from the operator drop-down list at the right of the Smart Label criteria, then click Add Group. 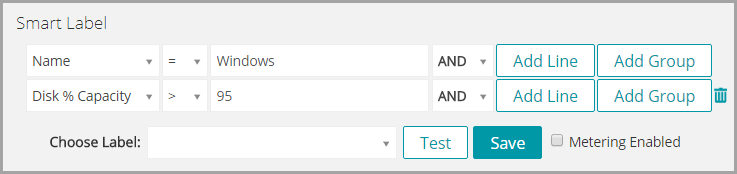 |
|
4. |
|
6. |
|
7. |
|
◦ |
Select an existing label to associate with the Smart Label. Type in the Choose label field to search for existing labels. |
|
◦ |
|
NOTE: Press Enter or Return after you enter a new Smart Label name to move the text from the search field to the label field. |
|
8. |
|
|
Metering is enabled on the device, and the KACE Agent is scheduled to report metering information for Software Catalog applications that also have metering enabled. See Enabling and configuring metering for devices and applications. It might take as long as 24 hours for the appliance to display metering information in the Administrator Console, depending on the metering interval. To change the metering interval, see Enable metering for Software Catalog applications. |
|
|
Enable metering for Software Catalog applications
When metering is enabled for an application, and for devices on which the application is installed, metering information is displayed on the Software Catalog Detail page for the application. Metering information is also displayed on the detail page of managed devices that have the application installed. See Viewing Software Catalog metering information.
|
1. |
|
a. |
Log in to the appliance Administrator Console, https://appliance_hostname/admin. Or, if the Show organization menu in admin header option is enabled in the appliance General Settings, select an organization in the drop-down list in the top-right corner of the page next to the login information. |
|
b. |
|
3. |
A metering icon appears in the metering column next to the selected applications: . Provided that metering is enabled for devices with the application installed, metering information is reported according to the metering schedule. See:
Configure options for metering Software Catalog applications
|
◦ |
If the Organization component is enabled on your appliance, log in to the appliance System Administration Console, https://appliance_hostname/system, or select System in the drop-down list in the top-right corner of the page next to the login information. Then click Organizations. To display the organization’s information, click the organization’s name. |
On the Organization Detail page that appears, locate the Communication and Agent Settings section.
|
◦ |
If the Organization component is not enabled on your appliance, log in to the appliance Administrator Console, https://appliance_hostname/admin. Then select Settings > Provisioning., and click Communication Settings on the Provisioning panel. |
The Communication Settings page appears.
|
2. |
|
Whether the appliance stores scripting results provided by Agents installed on managed devices. Agent logs can consume as much as 1GB of disk space in the database. If disk space is not an issue, enable Agent Logging to keep all log information for Agent-managed devices. These logs can be useful during troubleshooting. To save disk space, and enable faster Agent communication, disable Agent Logging. | ||
|
The frequency at which Agents on managed devices report inventory. This information is displayed in the Inventory section. | ||
|
The frequency at which Agentless devices report inventory. This information is displayed in the Inventory section. | ||
|
The frequency at which managed devices report inventory to the Software Catalog page. | ||
|
3. |
|
4. |
|
a. |
Log in to the appliance Administrator Console, https://appliance_hostname/admin. Or, if the Show organization menu in admin header option is enabled in the appliance General Settings, select an organization in the drop-down list in the top-right corner of the page next to the login information. |
|
b. |
|
5. |
|
6. |
At the bottom of the page, click Save or Save and Restart Services, depending on whether the Organization component is enabled on your appliance. |
Enabling metering on devices
Enabling and configuring metering for devices and applications
Choosing the devices and applications to meter
Enabling metering on devices
To apply a metering-enabled label to devices, do one of the following:
|
• |
Apply the built-in label, MeteredDevices, to your devices. This label has the metering option enabled. See Setting up and using labels to manage groups of items. |
|
• |
|
• |
Enable metering on devices using manual labels
|
1. |
|
a. |
Log in to the appliance Administrator Console, https://appliance_hostname/admin. Or, if the Show organization menu in admin header option is enabled in the appliance General Settings, select an organization in the drop-down list in the top-right corner of the page next to the login information. |
|
b. |
|
c. |
|
2. |
|
| |||
|
If you specify an alternate download location, specify the path to the location. | |||
|
If you specify an alternate download location, specify the username and password for the location. | |||
|
The type of label. To create a label that enables metering, select the Device Inventory check box. You can select additional label types as needed, but Metering can be enabled only if the Devices label type is selected. | |||
|
(Optional) The label group to which the label is assigned. To assign the label to a label group, click Edit next to the Label Group field, then select a label group. This is useful if you have a large number of labels and you want to organize them into sub-labels. For example, you could include the labels of your licensed applications in a group label named Licenses. In addition, labels inherit any restrictions of the groups to which they belong. |
|
4. |
|
a. |
|
c. |
|
|
Metering is enabled on the device, and the KACE Agent is scheduled to report metering information for Software Catalog applications that also have metering enabled. See Enabling and configuring metering for devices and applications. It might take as long as 24 hours for the appliance to display metering information in the Administrator Console, depending on the metering interval. To change the metering interval, see Enable metering for Software Catalog applications. |
|
|
Enable metering on devices using Smart Labels
You can enable metering using Smart Labels provided that the Smart Label is a device label.
|
1. |
|
a. |
Log in to the appliance Administrator Console, https://appliance_hostname/admin. Or, if the Show organization menu in admin header option is enabled in the appliance General Settings, select an organization in the drop-down list in the top-right corner of the page next to the login information. |
|
b. |
|
c. |
|
2. |
|
◦ |
To add a row, click Add line. |
|
◦ |
To add a subset of rules, select AND or OR from the operator drop-down list at the right of the Smart Label criteria, then click Add Group. |
|
4. |
|
6. |
|
7. |
|
◦ |
Select an existing label to associate with the Smart Label. Type in the Choose label field to search for existing labels. |
|
◦ |
|
NOTE: Press Enter or Return after you enter a new Smart Label name to move the text from the search field to the label field. |
|
8. |
|
|
Metering is enabled on the device, and the KACE Agent is scheduled to report metering information for Software Catalog applications that also have metering enabled. See Enabling and configuring metering for devices and applications. It might take as long as 24 hours for the appliance to display metering information in the Administrator Console, depending on the metering interval. To change the metering interval, see Enable metering for Software Catalog applications. |
|
|
Enable metering for Software Catalog applications
When metering is enabled for an application, and for devices on which the application is installed, metering information is displayed on the Software Catalog Detail page for the application. Metering information is also displayed on the detail page of managed devices that have the application installed. See Viewing Software Catalog metering information.
|
1. |
|
a. |
Log in to the appliance Administrator Console, https://appliance_hostname/admin. Or, if the Show organization menu in admin header option is enabled in the appliance General Settings, select an organization in the drop-down list in the top-right corner of the page next to the login information. |
|
b. |
|
3. |
A metering icon appears in the metering column next to the selected applications: . Provided that metering is enabled for devices with the application installed, metering information is reported according to the metering schedule. See:
Configure options for metering Software Catalog applications
|
◦ |
If the Organization component is enabled on your appliance, log in to the appliance System Administration Console, https://appliance_hostname/system, or select System in the drop-down list in the top-right corner of the page next to the login information. Then click Organizations. To display the organization’s information, click the organization’s name. |
On the Organization Detail page that appears, locate the Communication and Agent Settings section.
|
◦ |
If the Organization component is not enabled on your appliance, log in to the appliance Administrator Console, https://appliance_hostname/admin. Then select Settings > Provisioning., and click Communication Settings on the Provisioning panel. |
The Communication Settings page appears.
|
2. |
|
Whether the appliance stores scripting results provided by Agents installed on managed devices. Agent logs can consume as much as 1GB of disk space in the database. If disk space is not an issue, enable Agent Logging to keep all log information for Agent-managed devices. These logs can be useful during troubleshooting. To save disk space, and enable faster Agent communication, disable Agent Logging. | ||
|
The frequency at which Agents on managed devices report inventory. This information is displayed in the Inventory section. | ||
|
The frequency at which Agentless devices report inventory. This information is displayed in the Inventory section. | ||
|
The frequency at which managed devices report inventory to the Software Catalog page. | ||
|
3. |
|
4. |
|
a. |
Log in to the appliance Administrator Console, https://appliance_hostname/admin. Or, if the Show organization menu in admin header option is enabled in the appliance General Settings, select an organization in the drop-down list in the top-right corner of the page next to the login information. |
|
b. |
|
5. |
|
6. |
At the bottom of the page, click Save or Save and Restart Services, depending on whether the Organization component is enabled on your appliance. |
Enable metering on devices using manual labels
Enabling and configuring metering for devices and applications
Choosing the devices and applications to meter
Enabling metering on devices
To apply a metering-enabled label to devices, do one of the following:
|
• |
Apply the built-in label, MeteredDevices, to your devices. This label has the metering option enabled. See Setting up and using labels to manage groups of items. |
|
• |
|
• |
Enable metering on devices using manual labels
|
1. |
|
a. |
Log in to the appliance Administrator Console, https://appliance_hostname/admin. Or, if the Show organization menu in admin header option is enabled in the appliance General Settings, select an organization in the drop-down list in the top-right corner of the page next to the login information. |
|
b. |
|
c. |
|
2. |
|
| |||
|
If you specify an alternate download location, specify the path to the location. | |||
|
If you specify an alternate download location, specify the username and password for the location. | |||
|
The type of label. To create a label that enables metering, select the Device Inventory check box. You can select additional label types as needed, but Metering can be enabled only if the Devices label type is selected. | |||
|
(Optional) The label group to which the label is assigned. To assign the label to a label group, click Edit next to the Label Group field, then select a label group. This is useful if you have a large number of labels and you want to organize them into sub-labels. For example, you could include the labels of your licensed applications in a group label named Licenses. In addition, labels inherit any restrictions of the groups to which they belong. |
|
4. |
|
a. |
|
c. |
|
|
Metering is enabled on the device, and the KACE Agent is scheduled to report metering information for Software Catalog applications that also have metering enabled. See Enabling and configuring metering for devices and applications. It might take as long as 24 hours for the appliance to display metering information in the Administrator Console, depending on the metering interval. To change the metering interval, see Enable metering for Software Catalog applications. |
|
|
Enable metering on devices using Smart Labels
You can enable metering using Smart Labels provided that the Smart Label is a device label.
|
1. |
|
a. |
Log in to the appliance Administrator Console, https://appliance_hostname/admin. Or, if the Show organization menu in admin header option is enabled in the appliance General Settings, select an organization in the drop-down list in the top-right corner of the page next to the login information. |
|
b. |
|
c. |
|
2. |
|
◦ |
To add a row, click Add line. |
|
◦ |
To add a subset of rules, select AND or OR from the operator drop-down list at the right of the Smart Label criteria, then click Add Group. |
|
4. |
|
6. |
|
7. |
|
◦ |
Select an existing label to associate with the Smart Label. Type in the Choose label field to search for existing labels. |
|
◦ |
|
NOTE: Press Enter or Return after you enter a new Smart Label name to move the text from the search field to the label field. |
|
8. |
|
|
Metering is enabled on the device, and the KACE Agent is scheduled to report metering information for Software Catalog applications that also have metering enabled. See Enabling and configuring metering for devices and applications. It might take as long as 24 hours for the appliance to display metering information in the Administrator Console, depending on the metering interval. To change the metering interval, see Enable metering for Software Catalog applications. |
|
|
Enable metering for Software Catalog applications
When metering is enabled for an application, and for devices on which the application is installed, metering information is displayed on the Software Catalog Detail page for the application. Metering information is also displayed on the detail page of managed devices that have the application installed. See Viewing Software Catalog metering information.
|
1. |
|
a. |
Log in to the appliance Administrator Console, https://appliance_hostname/admin. Or, if the Show organization menu in admin header option is enabled in the appliance General Settings, select an organization in the drop-down list in the top-right corner of the page next to the login information. |
|
b. |
|
3. |
A metering icon appears in the metering column next to the selected applications: . Provided that metering is enabled for devices with the application installed, metering information is reported according to the metering schedule. See:
Configure options for metering Software Catalog applications
|
◦ |
If the Organization component is enabled on your appliance, log in to the appliance System Administration Console, https://appliance_hostname/system, or select System in the drop-down list in the top-right corner of the page next to the login information. Then click Organizations. To display the organization’s information, click the organization’s name. |
On the Organization Detail page that appears, locate the Communication and Agent Settings section.
|
◦ |
If the Organization component is not enabled on your appliance, log in to the appliance Administrator Console, https://appliance_hostname/admin. Then select Settings > Provisioning., and click Communication Settings on the Provisioning panel. |
The Communication Settings page appears.
|
2. |
|
Whether the appliance stores scripting results provided by Agents installed on managed devices. Agent logs can consume as much as 1GB of disk space in the database. If disk space is not an issue, enable Agent Logging to keep all log information for Agent-managed devices. These logs can be useful during troubleshooting. To save disk space, and enable faster Agent communication, disable Agent Logging. | ||
|
The frequency at which Agents on managed devices report inventory. This information is displayed in the Inventory section. | ||
|
The frequency at which Agentless devices report inventory. This information is displayed in the Inventory section. | ||
|
The frequency at which managed devices report inventory to the Software Catalog page. | ||
|
3. |
|
4. |
|
a. |
Log in to the appliance Administrator Console, https://appliance_hostname/admin. Or, if the Show organization menu in admin header option is enabled in the appliance General Settings, select an organization in the drop-down list in the top-right corner of the page next to the login information. |
|
b. |
|
5. |
|
6. |
At the bottom of the page, click Save or Save and Restart Services, depending on whether the Organization component is enabled on your appliance. |
Enable metering on devices using Smart Labels
Enabling and configuring metering for devices and applications
Choosing the devices and applications to meter
Enabling metering on devices
To apply a metering-enabled label to devices, do one of the following:
|
• |
Apply the built-in label, MeteredDevices, to your devices. This label has the metering option enabled. See Setting up and using labels to manage groups of items. |
|
• |
|
• |
Enable metering on devices using manual labels
|
1. |
|
a. |
Log in to the appliance Administrator Console, https://appliance_hostname/admin. Or, if the Show organization menu in admin header option is enabled in the appliance General Settings, select an organization in the drop-down list in the top-right corner of the page next to the login information. |
|
b. |
|
c. |
|
2. |
|
| |||
|
If you specify an alternate download location, specify the path to the location. | |||
|
If you specify an alternate download location, specify the username and password for the location. | |||
|
The type of label. To create a label that enables metering, select the Device Inventory check box. You can select additional label types as needed, but Metering can be enabled only if the Devices label type is selected. | |||
|
(Optional) The label group to which the label is assigned. To assign the label to a label group, click Edit next to the Label Group field, then select a label group. This is useful if you have a large number of labels and you want to organize them into sub-labels. For example, you could include the labels of your licensed applications in a group label named Licenses. In addition, labels inherit any restrictions of the groups to which they belong. |
|
4. |
|
a. |
|
c. |
|
|
Metering is enabled on the device, and the KACE Agent is scheduled to report metering information for Software Catalog applications that also have metering enabled. See Enabling and configuring metering for devices and applications. It might take as long as 24 hours for the appliance to display metering information in the Administrator Console, depending on the metering interval. To change the metering interval, see Enable metering for Software Catalog applications. |
|
|
Enable metering on devices using Smart Labels
You can enable metering using Smart Labels provided that the Smart Label is a device label.
|
1. |
|
a. |
Log in to the appliance Administrator Console, https://appliance_hostname/admin. Or, if the Show organization menu in admin header option is enabled in the appliance General Settings, select an organization in the drop-down list in the top-right corner of the page next to the login information. |
|
b. |
|
c. |
|
2. |
|
◦ |
To add a row, click Add line. |
|
◦ |
To add a subset of rules, select AND or OR from the operator drop-down list at the right of the Smart Label criteria, then click Add Group. |
|
4. |
|
6. |
|
7. |
|
◦ |
Select an existing label to associate with the Smart Label. Type in the Choose label field to search for existing labels. |
|
◦ |
|
NOTE: Press Enter or Return after you enter a new Smart Label name to move the text from the search field to the label field. |
|
8. |
|
|
Metering is enabled on the device, and the KACE Agent is scheduled to report metering information for Software Catalog applications that also have metering enabled. See Enabling and configuring metering for devices and applications. It might take as long as 24 hours for the appliance to display metering information in the Administrator Console, depending on the metering interval. To change the metering interval, see Enable metering for Software Catalog applications. |
|
|
Enable metering for Software Catalog applications
When metering is enabled for an application, and for devices on which the application is installed, metering information is displayed on the Software Catalog Detail page for the application. Metering information is also displayed on the detail page of managed devices that have the application installed. See Viewing Software Catalog metering information.
|
1. |
|
a. |
Log in to the appliance Administrator Console, https://appliance_hostname/admin. Or, if the Show organization menu in admin header option is enabled in the appliance General Settings, select an organization in the drop-down list in the top-right corner of the page next to the login information. |
|
b. |
|
3. |
A metering icon appears in the metering column next to the selected applications: . Provided that metering is enabled for devices with the application installed, metering information is reported according to the metering schedule. See:
Configure options for metering Software Catalog applications
|
◦ |
If the Organization component is enabled on your appliance, log in to the appliance System Administration Console, https://appliance_hostname/system, or select System in the drop-down list in the top-right corner of the page next to the login information. Then click Organizations. To display the organization’s information, click the organization’s name. |
On the Organization Detail page that appears, locate the Communication and Agent Settings section.
|
◦ |
If the Organization component is not enabled on your appliance, log in to the appliance Administrator Console, https://appliance_hostname/admin. Then select Settings > Provisioning., and click Communication Settings on the Provisioning panel. |
The Communication Settings page appears.
|
2. |
|
Whether the appliance stores scripting results provided by Agents installed on managed devices. Agent logs can consume as much as 1GB of disk space in the database. If disk space is not an issue, enable Agent Logging to keep all log information for Agent-managed devices. These logs can be useful during troubleshooting. To save disk space, and enable faster Agent communication, disable Agent Logging. | ||
|
The frequency at which Agents on managed devices report inventory. This information is displayed in the Inventory section. | ||
|
The frequency at which Agentless devices report inventory. This information is displayed in the Inventory section. | ||
|
The frequency at which managed devices report inventory to the Software Catalog page. | ||
|
3. |
|
4. |
|
a. |
Log in to the appliance Administrator Console, https://appliance_hostname/admin. Or, if the Show organization menu in admin header option is enabled in the appliance General Settings, select an organization in the drop-down list in the top-right corner of the page next to the login information. |
|
b. |
|
5. |
|
6. |
At the bottom of the page, click Save or Save and Restart Services, depending on whether the Organization component is enabled on your appliance. |