
Creating and Activating a JMX Discovery Agent
Before attempting this procedure, ensure that you have successfully completed Deploying the JMX Discovery Agent Package.
|
1 |
On the Agent Status dashboard, click Create Agent. |
|
2 |
In the HostSelector box, select the host to which you have deployed the JMXDiscoveryAgent. gar package, and then click Next. |
|
3 |
|
4 |
To allow Foglight to automatically generate a name for the agent, select the Generic Name check box. |
|
5 |
Click Next. |
|
6 |
|
7 |
Locate the new agent in the Agents table and select it. |
|
8 |
Click Activate. |
Creating a JMX Agent Using Local Process Discovery
Before attempting this procedure, ensure that you have successfully completed Deploying the JMX Discovery Agent Package and Creating and Activating a JMX Discovery Agent.
|
1 |
On the navigation panel, under Dashboards, click Application Servers > Administration. |
|
2 |
|
3 |
Select JMX (Discovery). |
|
4 |
On the Discovery Hosts page of the JMX - Setup Agents using Discovery wizard, select one or more monitored hosts on which you want to discover processes. |
|
5 |
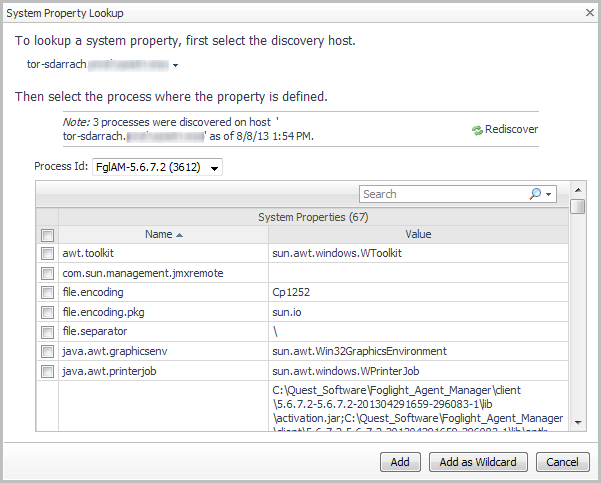
On the Identifying Properties page, define the set of identifying system properties that must be matched to enable process monitoring. |
|
• |
Click Add Property to manually add a property. |
|
a |
Select the host from the Discovery Host list. |
|
b |
|
c |
Select the process from the Process ID list. |
|
e |
|
b |
Optional — To edit the agent naming scheme, click the edit icon at the bottom of the dialog box. The Edit Agent Naming Scheme dialog box opens, allowing you to change the naming scheme that is automatically assigned to agents whenever you use this configuration to create agents. |
|
c |
Click Next. |
|
• |
After creating an agent, you can manage it from the Application Servers Administration dashboard. For more information, see Managing JMX Agents. |
|
• |
|
• |
Use the JMX > Explorer dashboard to view the MBean data. For more information, see Monitoring and Investigating JMX Data.. |
|
• |
View data collected by the agent in the Application Servers > Monitor dashboard. See the Monitoring Application Servers User and Reference Guide or help for more information. |
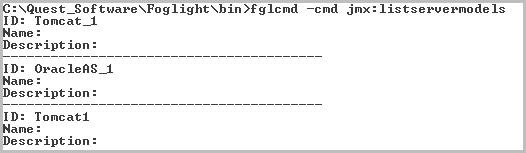
Creating JMX Agents and Server Models from the Command-Line
As an alternative to creating and managing JMX agents and server models through the Foglight browser interface, you can use the fglcmd command-line scripts that are available on the Foglight Management Server. This allows you to automate the creation of a large number of agents or server models.
You can also access help for the scripts from the command-line by typing: fglcmd /h.
The following JMX-specific commands are available:
|
Creates an agent called <NAME> on <HOST> (or <remoteClientId>) using server model ID <ID> with the given configuration settings. Either <HOST> or <remoteClientId> must be specified, but not both.
| |||||||
|
Deletes the agent specified by <NAME>. | |||||||
|
Updates the agent specified by <NAME> with the given configuration settings. | |||||||
|
Creates a new server model with id <ID>, optionally setting its name to <NAME>, description to <DESC> and copying the configuration from server model <ID2>. jmx:createservermodel ‑id <ID> [‑name <NAME>] [‑desc <DESC>] [‑copy <ID2>] | |||||||
|
Updates the name and/or description of a specified server model. jmx:updateservermodel ‑id <ID> [‑name <NAME>] [‑desc <DESC>] | |||||||
|
Exports the configuration for a server model as an XML file. | |||||||
|
Imports the server model configuration that was previously exported as an XML file. jmx:importservermodel -file <file path> [-newName <new name>] [- replace <boolean> ] |
|
2 |
Navigate to the <foglight_home>/bin directory. By default, the path is: C:\Quest_Software\Foglight\bin. |
|
4 |