
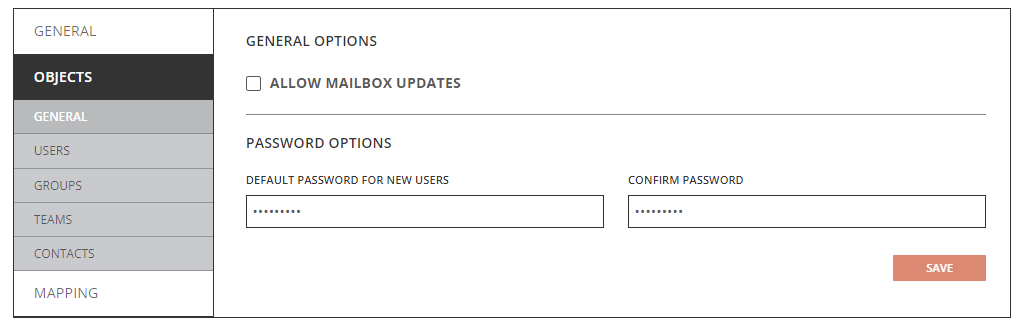
General Option
Objects General Tab – Local Environment
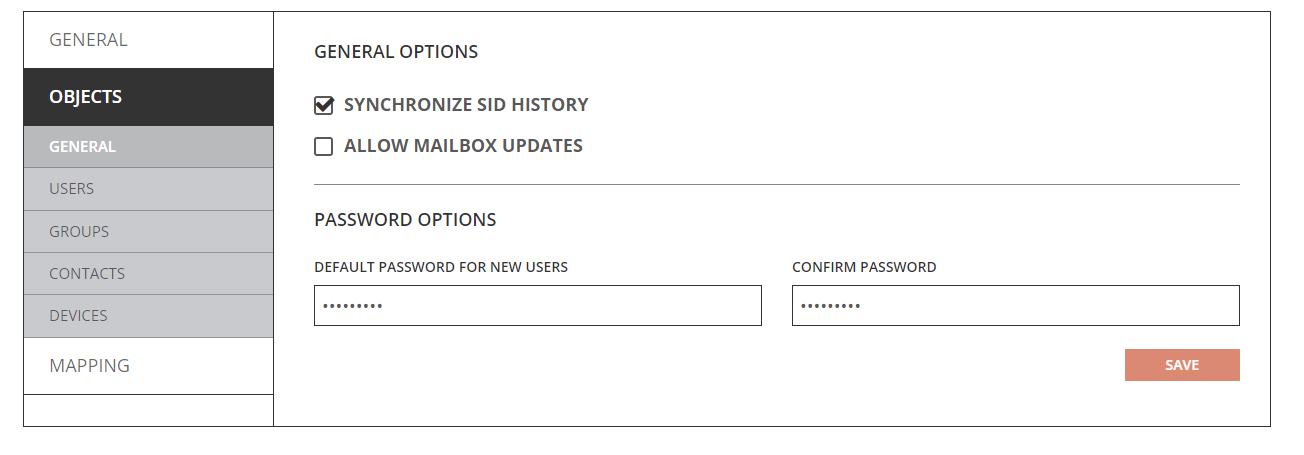
- Synchronize SID History – Directory Sync will migrate SID-History when this option is enabled. Refer to the SID History Synchronization Quick Start Guide for additional information on how to migrate SID-History.
- Allow Mailbox Update - You can configure Directory Sync to update mailbox-enabled target objects via Templates under the Objects and General tab. You should also review the mapping configuration to ensure mail attributes mappings are configured correctly per your project's need to avoid unwanted mail disruption.
- Default Password for New Users – Define the default password for new users. The default password defined should meet the password complexity policy for your target environment.
Objects Users Option – Local Environment
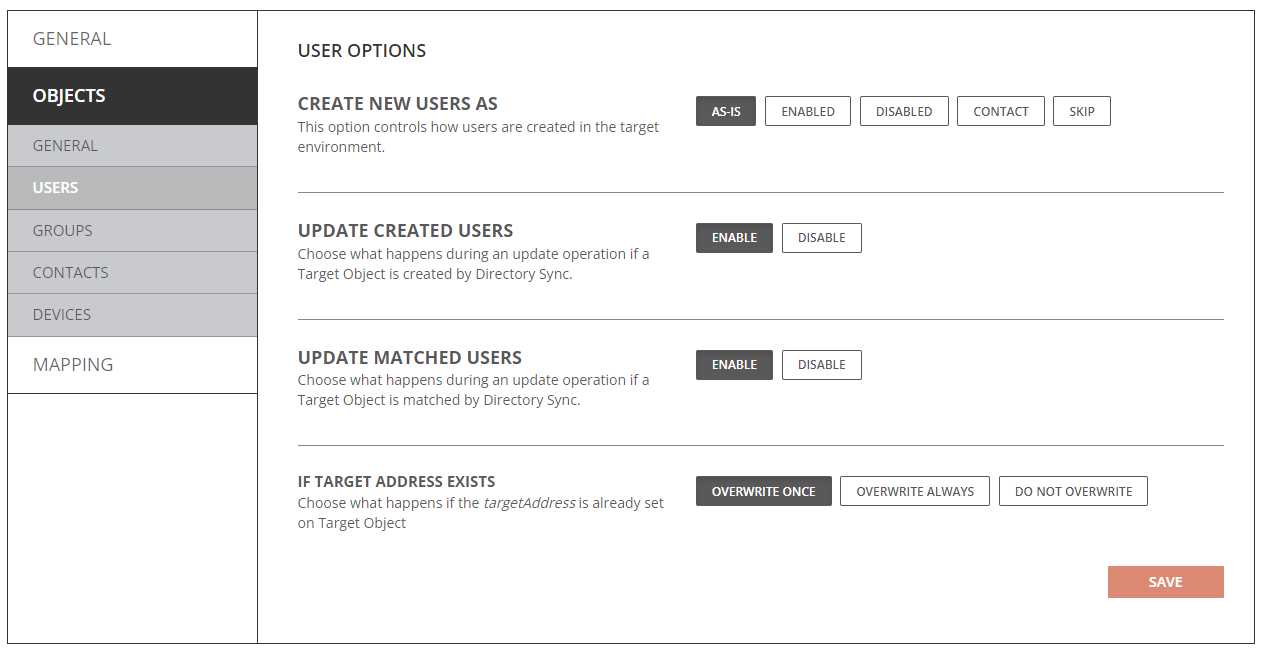
- Create New Users As
- As-Is: Objects will be created just as they currently exist in the source. If the account was disabled in Active Directory in the source, it will be disabled in Active Directory when created in the target. If the account was enabled in Active Directory in the source, it will be created as enabled in Active Directory in the target.
- Enabled: Objects will be created as enabled in the target Active Directory.
- Disabled: Objects will be created as disabled in the target Active Directory.
- Contact: Objects will be created as contact in the target Active Directory.
- Skip: Objects will not be created in the target Active Directory.
NOTE: Source User’s UserAccountControl(UAC) setting can be synchronized to target as-is via attribute mapping in the template.
- Update Created Users
- Enabled: Object changes will be synchronized to the target during delta sync after the users were created by Directory Sync.
- Disabled: Object changes will not be synchronized to the target during delta sync after the users were created by Directory Sync.
- Update Matched Users
- Enabled: Object changes will be synchronized to the target during delta sync after the users were matched by Directory Sync.
- Disabled: Object changes will not be synchronized to the target during delta sync after the users were matched by Directory Sync.
- If Target Address Exists
- Overwrite Once: TargetAddress attribute will only synchronized once during the initial sync.
- Overwrite Always: TargetAddress attribute will always synchronized during initial and delta sync.
- Do Not Overwrite: TargetAddress attribute will not be synchronized.

Objects Groups Option – Local Environment
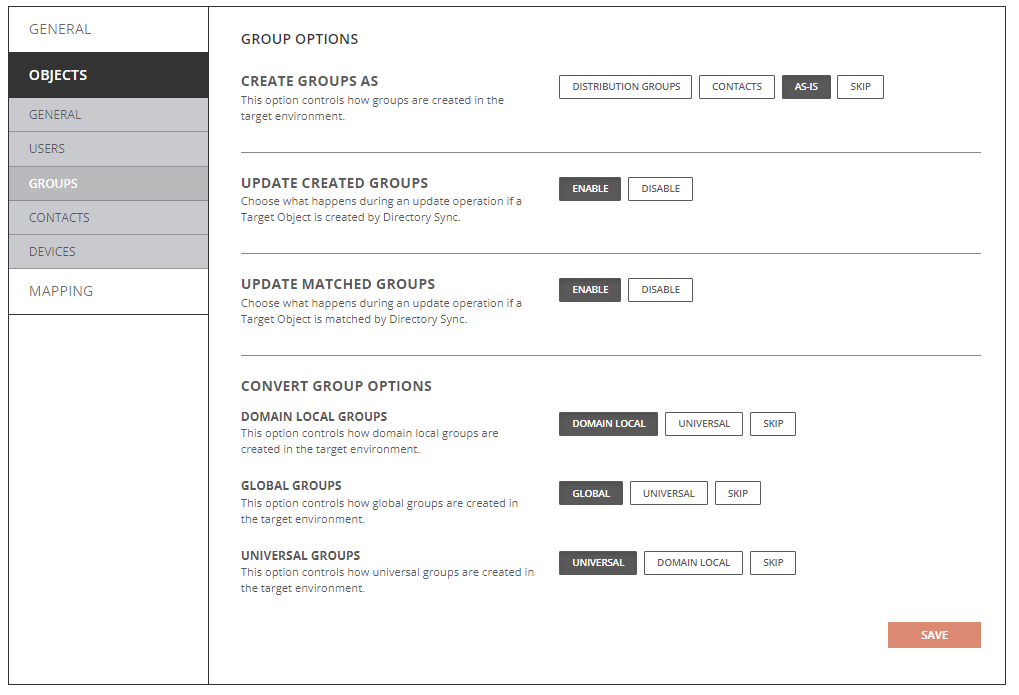
- Create Groups As
- Distribution Groups: Objects will be created just as Distribution Group in the target Active Directory.
- Contacts: Objects will be created just as Contacts in the target Active Directory.
- As-Is: Objects will be created just as they currently exist in the source.
- Update Created Groups
- Enabled: Object changes will be synchronized to the target during delta sync after the groups were created by Directory Sync.
- Disabled: Object changes will not be synchronized to the target during delta sync after the groups were created by Directory Sync.
- Update Matched Groups
- Enabled: Object changes will be synchronized to the target during delta sync after the groups were matched by Directory Sync.
- Disabled: Object changes will not be synchronized to the target during delta sync after the groups were matched by Directory Sync.
- Convert Group Options
- Domain Local Groups
- Domain Local: Source Domain Local Groups will be created as Domain Local Groups in the target.
- Universal: Source Domain Local Groups will be created as Universal Groups in the target.
- Skip: Source Domain Local Groups will not be created.
- Global Groups
- Global: Source Global Groups will be created as Global Groups in the target.
- Universal: Source Global Groups will be created as Universal Groups in the target.
- Skip: Source Global Groups will not be created.
- Global Groups
- Global: Source Global Groups will be created as Global Groups in the target.
- Universal: Source Global Groups will be created as Universal Groups in the target.
- Skip: Source Global Groups will not be created.
- Universal Groups
- Universal: Source Universal Groups will be created as Universal Groups in the target.
- Domain Local: Source Universal Groups will be created as Domain Local Groups in the target.
- Skip: Source Universal Groups will not be created.
- Domain Local Groups
Objects Contacts Option – Local Environment
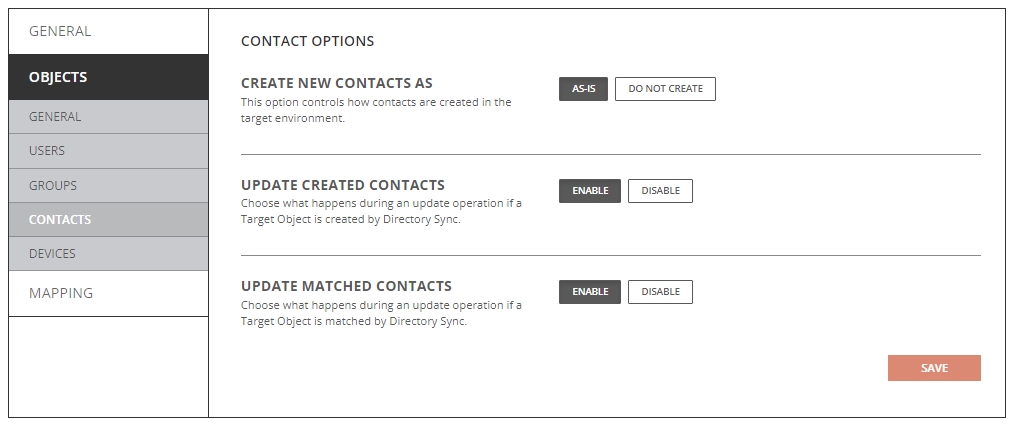
- Create New Contacts As
- As-Is: Source contacts will be created just as they currently exist in the source.
- Do Not Create: Source contacts will not be created in the target.
- Update Created Contacts
- Enabled: Object changes will be synchronized to the target during delta sync after the contacts were created by Directory Sync.
- Disabled: Object changes will not be synchronized to the target during delta sync after the contacts were created by Directory Sync.
- Update Matched Contacts
- Enabled: Object changes will be synchronized to the target during delta sync after the contacts were created by Directory Sync.
- Disabled: Object changes will not be synchronized to the target during delta sync after the contacts were created by Directory Sync.
Objects Devices Option – Local Environment
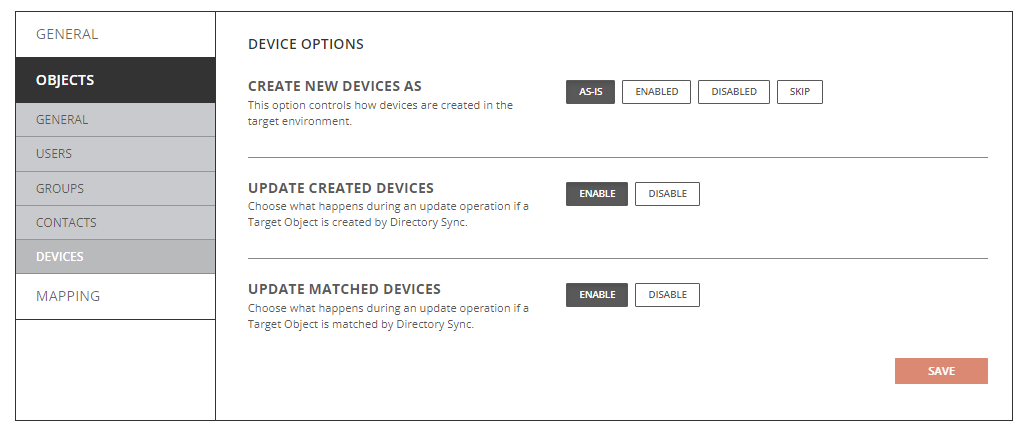
- Create New Devices As
- As-Is: Source devices will be created just as they currently exist in the source.
- Enabled: Source devices will be created as enabled in the source.
- Disabled: Source devices will be created as disabled in the source.
- Do Not Create: Source devices will not be created in the target.
- Update Created Devices
- Enabled: Object changes will be synchronized to the target during delta sync after the devices were created by Directory Sync.
- Disabled: Object changes will not be synchronized to the target during delta sync after the devices were created by Directory Sync.
- Update Matched Devices
- Enabled: Object changes will be synchronized to the target during delta sync after the devices were created by Directory Sync.
- Disabled: Object changes will not be synchronized to the target during delta sync after the devices were created by Directory Sync.
Cloud Environment Template Options
General Option
Objects General Tab – Cloud Environment
- Allow Mailbox Update - You can configure Directory Sync to update mailbox enabled target objects via Templates under Objects and General tab. You should also review the mapping configuration to ensure mail attributes mappings are configured correctly per your project's need to avoid unwanted mail disruption.
- Default Password for New Users – Define the default password for new users.
|
|
NOTE: The default password defined should meet the password complexity policy for your target environment. |
Objects Users Tab – Cloud Environment
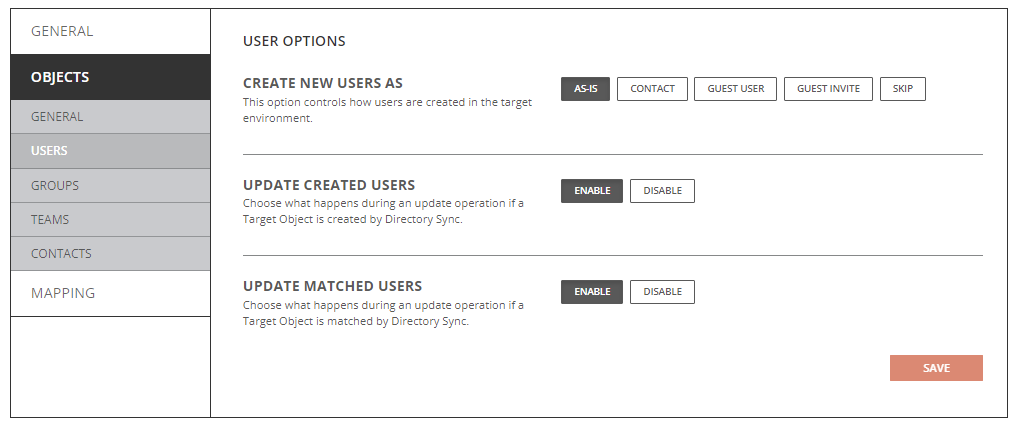
- Create New Users As
- As-Is: Objects will be created just as they currently exist in the source.
- Contact: Objects will be created as contact.
- Guest User: Objects will be created as a guest user.
- Guest Invite: Objects will be created as a guest user with invite.
- Skip: Objects will not be created in the target.
|
|
NOTE: For additional information related to Guest Objects synchronization, see the Guest User How To topic. |
- Update Created Users
- Enabled: Object changes will be synchronized to the target during delta sync after the users were created by Directory Sync.
- Disabled: Object changes will not be synchronized to the target during delta sync after the users were created by Directory Sync.
- Update Matched Users
- Enabled: Object changes will be synchronized to the target during delta sync after the users were matched by Directory Sync.
- Disabled: Object changes will not be synchronized to the target during delta sync after the users were matched by Directory Sync.
Objects Groups Tab – Cloud Environment
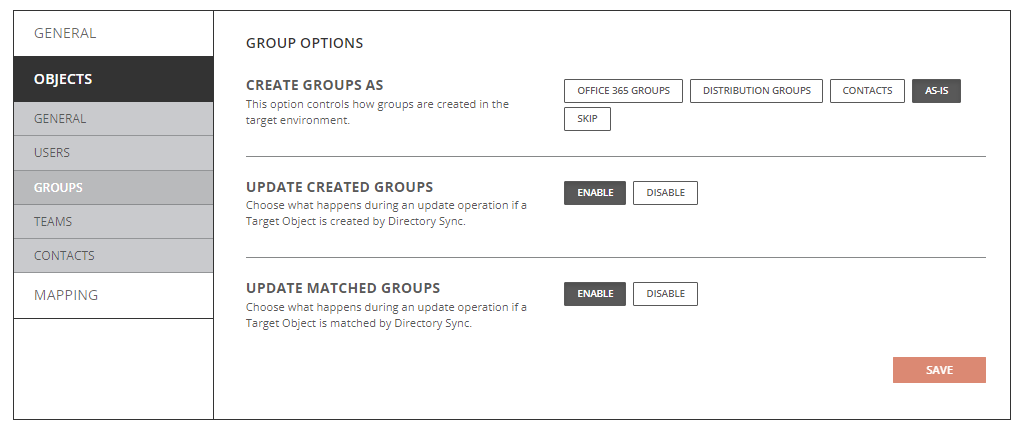
- Create New Users As
- Office 365 Groups: Objects will be created as Office 365 Groups(Unified Groups) in the target.
- Distribution Groups: Objects will be created as Distribution Groups.
- Contacts: Objects will be created as contacts.
- As-Is: Objects will be created just as they currently exist in the source.
- Skip: Objects will not be created in the target.
NOTE: If the source group is a security group, it will be created as security group when As-Is option selected.
- Update Created Groups
- Enabled: Object changes will be synchronized to the target during delta sync after the groups were created by Directory Sync.
- Disabled: Object changes will not be synchronized to the target during delta sync after the groups were created by Directory Sync.
- Update Matched Groups
- Enabled: Object changes will be synchronized to the target during delta sync after the groups were matched by Directory Sync.
- Disabled: Object changes will not be synchronized to the target during delta sync after the groups were matched by Directory Sync.
Objects Teams Tab – Cloud Environment
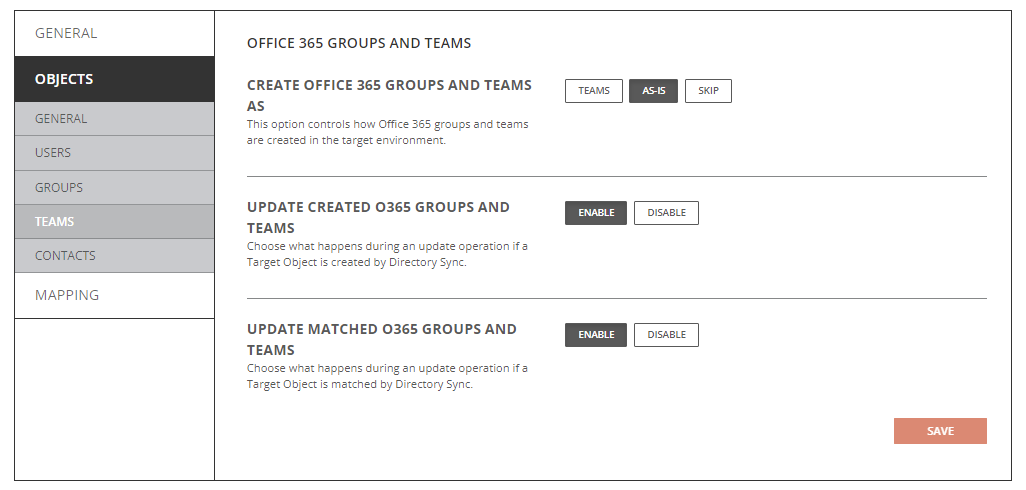
- Create Office 365 Groups and Teams As
- Teams: Objects will be created Teams in the target.
- As-Is: Objects will be created just as they currently exist in the source.
- Skip: Objects will not be created in the target.
- Update Created Office 365 Groups and Teams
- Enabled: Object changes will be synchronized to the target during delta sync after they were created by Directory Sync.
- Disabled: Object changes will not be synchronized to the target during delta sync after they were created by Directory Sync.
- Update Matched Office 365 Groups and Teams
- Enabled: Object changes will be synchronized to the target during delta sync after they were matched by Directory Sync.
- Disabled: Object changes will not be synchronized to the target during delta sync after they were matched by Directory Sync.
Objects Contacts Tab – Cloud Environment
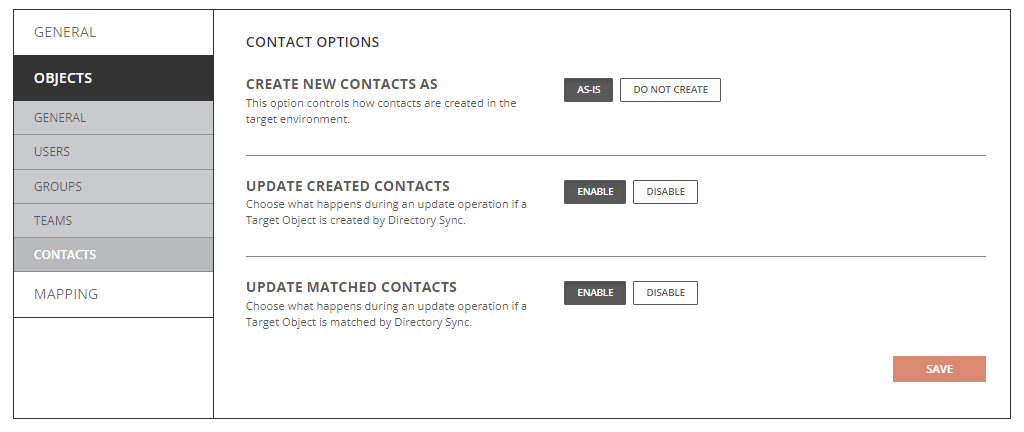
- Create New Contacts As
- As-Is: Source contacts will be created just as they currently exist in the source.
- Do Not Create: Source contacts will not be created in the target.
- Update Created Contacts
- Enabled: Object changes will be synchronized to the target during delta sync after the contacts were created by Directory Sync.
- Disabled: Object changes will not be synchronized to the target during delta sync after the contacts were created by Directory Sync.
- Update Matched Contacts
- Enabled: Object changes will be synchronized to the target during delta sync after the contacts were created by Directory Sync.
- Disabled: Object changes will not be synchronized to the target during delta sync after the contacts were created by Directory Sync.
