Normally, right after a Device is Cutover to a new domain VPN users can’t log in to their workstation because Windows must be able to contact the target domain to authenticate against a domain controller for that very first login. Typically, a remote user not on the VPN would need to log in to their machine first and then establish a VPN connection.
Active Directory answers this problem by building on Microsoft’s Offline Domain Join (ODJ) process to allow a workstation to join a domain without contacting a Domain Controller. This solution is achieved by first creating an ODJ file for each workstation and then taking advantage of Windows’ ability to cache credentials. If users have logged in to the target domain previously, Windows can log them in again even if they can no longer reach a domain controller by using cached credentials.
Active Directory’s ODJ process has users pre-login to the new domain before the computer needs to be Cutover so the target credentials can be cached and used for the first post-Cutover login without the need to contact a domain controller first. Then when the administrator is ready to Cutover workstations using the ODJ Action, Active Directory allows the workstation to join the new domain without having the user connect to the corporate VPN and manually join their workstation to the new domain.
The computers that the ODJ process is being run on must have network connectivity to BOTH the source and target environments at the same time sometime pre-cutover in order to have the Cache Credentials function work properly.
Additionally, computers will be unable to save the cached credentials unless the source environment trusts the target environment. The AD Offline Domain Join Credential Cache Quick Start Guide provides guidance on configuring an AD trust to enable Offline Domain Join functionality.
1. Creating ODF Files For Each Workstation
The first step in the ODJ process is for an administrator to use Microsoft’s DJOIN utility to create a provisioning file. Only the provisioning part of the DJOIN process is needed. Complete information on DJOIN can be found here.
The Provision, Domain, Machine, and Savefile parameters are required at a minimum. There is the option to control where the target machine will be created using the MachineOU parameter as in the sample shown here.
DJOIN.EXE /Provision /Domain BTADLAB.com /Machine Sales220 /Savefile “\\server\odj-share\Sales220.txt” /MACHINEOU OU=SalesComputers,OU=Sales,DC=BTADLAB,DC=COM
The file must be saved in the ODJ folder in the Repositories path that was configured in the UI.
Generating these files can be completed for all in scope workstations early in the migration process.
|
|
NOTE: Name each text file with the exact matching machine name. |

2. Configuring the Credential Cache Profile
The next step is to configure the existing Default Credential Cache profile with the IP address of a Target domain controller, or to create a new profile for this setting.
From the Profiles page select Credential Cache Profiles. Click on Add to create a new profile, or Edit to modify an existing profile. If you choose to use the Default profile, you must edit it to include a Target DC IP address.
- The Target Domain Controller Ping Interval setting determines how long the script will sleep before pinging the DC again.
- The Timeout Before Job Failure setting determines the Credential Cache app timeout value that will be used for the job once downloaded to the agent managed machine.
- The Timeout For User Credential setting determines how long the user is presented with a dialog box to enter their target domain credentials.
3. Cache Credentials Jobs
Now that a profile has been configured with a target DC IP address, we can assign a Cache Credentials job to each in scope workstation.
In the Devices list, select one or more Computers. Select Cache Credentials from the Actions dropdown menu and click the Apply Action button. The Credential Cache Options box appears.
Select a Credential Cache Profile.
A date and time for the Cache Credentials job can be chosen to run the job at a later time. This date/time combination represents the earliest time that this job could run.
If a date/time is not chosen, this job will run on the workstation the next time the agent checks for jobs.
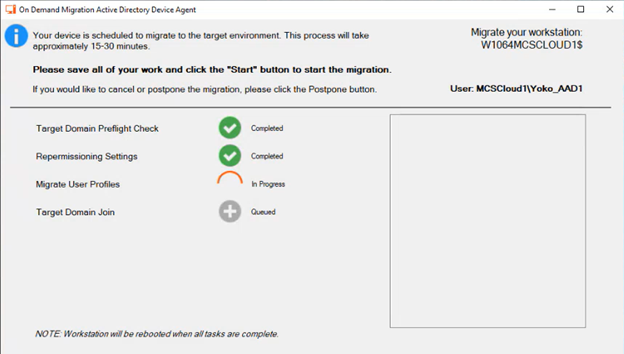
The Devices list will reflect a status of "Queued". When the job is collected by the agent the status will change to "In Progress", and then finally it will transition to a status of "Completed" or "Failed".
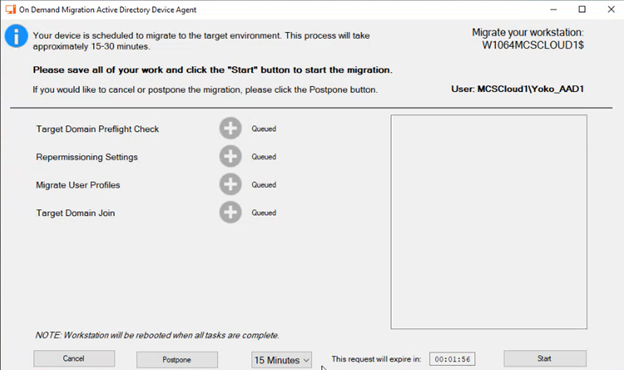
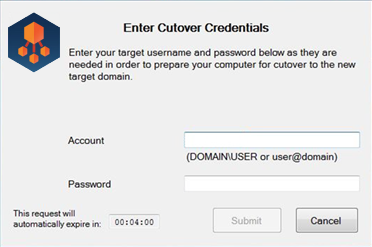
On the workstation side, when the Cache Credentials Job is received, the user will be prompted to enter their target credentials. Below is an example of what the user will see when the Cache Credential job runs:
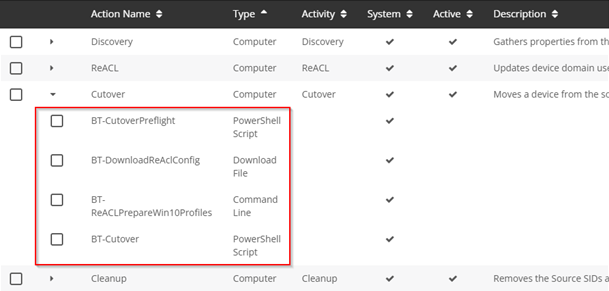
4. ReACL
Following Cache Credentials the next recommended step is the ReACL process. The ReACL process can be run repeatedly as needed before ODJ, but it is suggested to be run at least once right after the Cache Credentials process is run.
In the Devices list, select one or more Computers. Select ReACL from the Actions dropdown menu and click the Apply Action button.
The Job Options box appears. A specific date/time combination can be chosen for when to run the job, or just click Apply Action to have this job received by the workstations during their next check for jobs.
5. Offline Domain Join Job
The final step is the actual Offline Domain Join job itself. This is similar to the Cutover process used for machines that are directly connected to the network.
|
|
NOTE: Do not perform the Cutover process on Offline Domain Join workstations. The Offline Domain Join process takes the place of Cutover for workstations connecting via VPN. |
In the Devices list, select one or more Computers. Select Offline Domain Join from the Actions dropdown menu and click the Apply Action button.
The Job Options box appears. A specific date/time combination can be chosen for when to run the job, or just click Apply Action to have this job received by the workstations during their next check for jobs.
|
|
NOTE: The Offline Domain Join (Job Scheduling Options dialog box) start date and time must be set AFTER the Cache Credentials job (Cache Credential Options dialog box) start date and time. |
The Offline Domain Join process does not support rollback.