Tchater maintenant avec le support
Tchattez avec un ingénieur du support

Rapid Recovery 6.3 - Command Line and Scripting Reference Guide

Rapid Recovery overview and system requirements Command Line Management Utility PowerShell Module
Prerequisites for using PowerShell Working with commands and cmdlets Rapid Recovery PowerShell module cmdlets
Add-CredentialsVaultAccount AddEncryptionKeytoProtectedMachine Add-EsxAutoProtectObjects Add-EsxVirtualMachines Add-HyperVClusterSharedVirtualDisks Add-HyperVClusterVirtualMachines Add-HyperVVirtualMachines Disable-HyperVAutoProtection Edit-ActiveBlockMapping Edit-AzureVirtualStandby Edit-EsxiVirtualStandby Edit-EsxServerProtectionRules Edit-ExcludedFilesAndFolders Edit-HyperVClusterProtectionRules Edit-HyperVServerProtectionRules Edit-HyperVVirtualStandby Edit-OracleDBVerifyNightlyJob Edit-OracleLogTruncationNightlyJob Edit-Replication Edit-ScheduledArchive Edit-VBVirtualStandby Edit-VMVirtualStandby Enable-HyperVAutoProtection Enable-OracleArchiveLogMode Get-ActiveJobs Get-CloudAccounts Get-Clusters Get-CompletedJobs Get-CredentialsVaultAccounts Get-ExchangeMailStores Get-Failed Get-FailedJobs Get-HyperVClusterSharedVirtualDisks Get-ListAzureVMSizes Get-Mounts Get-OracleInstanceMetadata Get-OracleInstances Get-Passed Get-ProtectedServers Get-ProtectionGroups Get-ProtectionRules Get-QueuedJobs Get-RecoveryPoints Get-ReplicatedServers Get-Repositories Get-ScheduledArchives Get-SqlDatabases Get-TransferQueueEntries Get-UnprotectedVolumes Get-Version Get-VirtualizedServers Get-Volumes Join-CredentialsVaultAccount New-AzureVirtualStandby New-Base New-BootCD New-CloudAccount New-EncryptionKey New-EsxiVirtualStandby New-FileSearch New-HyperVVirtualStandby New-Mount New-Replication New-Repository New-ScheduledArchive New-Snapshot New-VBVirtualStandby New-VMVirtualStandby Open-DvmRepository Push-Replication Push-Rollup Remove-Agent Remove-CredentialsVaultAccount Remove-EncryptionKey Remove-EsxAutoProtectObjects Remove-EsxVirtualMachines Remove-HyperVClusterSharedVirtualDisks Remove-HyperVClusterVirtualMachines Remove-HyperVVirtualMachines Remove-Mount Remove-Mounts Remove-RecoveryPoints Remove-Replication Remove-Repository Remove-ScheduledArchive Remove-VirtualStandby Restart-CoreService Resume-Replication Resume-ScheduledArchive Resume-Scheduler Resume-Snapshot Resume-VirtualStandby Set-AgentMetadataCredentials Set-CredentialsVaultAccount Set-DedupCacheConfiguration Set-License Set-OracleMetadataCredentials Set-ReplicationResponse Start-Archive Start-AttachabilityCheck Start-AzureDeploy Start-AzureExport Start-BackupSettings Start-ChecksumCheck Start-ConfigureAgentMigration Start-ConsumeSeedDrive Start-CopySeedDrive Start-EsxiExport Start-HypervExport Start-LogTruncation Start-MountabilityCheck Start-OptimizationJob Start-OracleDBVerifyJob Start-OracleLogTruncationJob Start-Protect Start-ProtectCluster Start-ProtectEsxServer Start-ProtectHyperVCluster Start-ProtectHyperVServer Start-RepositoryCheck Start-RestoreAgent Start-RestoreArchive Start-RestoreSettings Start-RestoreUrc Start-ScheduledArchive Start-VBExport Start-VirtualStandby Start-VMExport Stop-ActiveJobs Stop-CoreService Suspend-Replication Suspend-ScheduledArchive Suspend-Scheduler Suspend-Snapshot Suspend-VirtualStandby Update-Repository
Localization Qualifiers
Scripting

What's new

The Quest® Rapid Recovery team works diligently to respond to customer feedback and make continual improvements to the product. With that goal in mind, the following changes have been implemented for release 6.3 related to Command Line Management utility (cmdutil.exe), Rapid Recovery PowerShell module, and sample scripts.

New in this release

The following Rapid Recovery Command Line Management utility (cmdutil) commands have been added to this release:

  • /AddEncryptionKeytoProtectedMachine
  • /BackupSettings
  • /CredentialsVaultAccount
  • /EditActiveBlockMapping
  • /EditExcludedFilesAndFolders
  • /ExportRmanBackup
  • /RemoveEncryptionKey
  • /RestoreSettings

The following Rapid Recovery PowerShell module cmdlets have been added to this release:

  • Add-CredentialsVaultAccount
  • Add-EncryptionKeyToProtectedMachine
  • Edit-ActiveBlockMapping
  • Edit-EsxServerProtectionRules
  • Edit-ExcludedFilesAndFolders
  • Edit-HyperVClusterProtectionRules
  • Edit-HyperVServerProtectionRules
  • Get-CredentialsVaultAccounts
  • Get-OracleInstanceData
  • Get-ProtectionRules
  • Join-CredentialsVaultAccount
  • Open-DvmRepository
  • Remove-CredentialsVaultAccount
  • Remove-EncryptionKey
  • Resume-Scheduler
  • Set-CredentialsVaultAccount
  • Start-BackupSettings
  • Start-ConfigureAgentMigration
  • Start-RestoreSettings


Updated in this release

The following changes have been made to this document:

  • The following Command Line Management Utility commands, previously marked "deprecated" within the command help and in this document, should no longer be considered deprecated. These commands continue to be supported. The commands include /CheckRepository, /CreateRepository, /DeleteRepository, and /UpdateRepository,
  • Similarly, the related PowerShell cmdlets, CreateRepository and DeleteRepository, included notes in print versions indicating that these cmdlets are deprecated. This is not the case; these commands continue to be supported. This version of documentation is updated accordingly.

Deprecated in this release

The following information is deprecated.

  • The PowerShell cmdlet Set-ApplianceLicenseNumber is deprecated. Once Quest appliances have reached end of life, this command will be removed from the Rapid Recovery code base.

No longer included in this release

  • Rapid Recovery no longer supports tiering of recovery points to a Quest DR appliance. As a result:
    • The /CheckTieredRepository, /CreateTieredRepository, /DeleteTieredRepository, and /OpenTieredRepositorycommands have been removed from the Command Line Management Utility (cmdutil) module and are no longer available.
    • The cmdlets Get-TieredRepositories, New-TieredRepository, Remove-TieredRepository, and Start-TieredRepositoryCheck have been removed from the Rapid Recovery PowerShell module and are no longer available.
  • Rapid Recovery now supports Azure Resource Manager deployments only. Management certificates, which were required for Rapid Recovery to support Azure Service Management deployments, are no longer supported by Azure. Accordingly:
    • The /ManagementCertificates command has been removed from the cmdutil module.
    • Correspondingly, cmdlets Add-ManagementCertificates, Get-ManagementCertificates, and Remove-ManagementCertificates have been removed from the Rapid Recovery PowerShell module.
  • The cmdlet Suspend-RepositoryActivity was an internal testing tools that has been removed from this release.
  • The cmdlet :Suspend-VMExport was discontinued has been removed from this release.

Command Line Management Utility

Rapid Recovery consists of several software components. Key components relevant to this topic include the following:

  • The Rapid Recovery Core manages authentication for protected machines, schedules for transferring data for backup and replication, export to virtual machines, reporting, and bare metal restore (BMR) to similar or dissimilar hardware.
  • The Rapid Recovery Agent is responsible for volume snapshots and fast transfer of the data to the repository managed by the Core.
  • The Rapid Recovery Command Line Management utility, cmdutil.exe, provides third-party access to manage system functionality. This tool permits scripting of the Rapid Recovery Core management functions.

Figure 1: Rapid Recovery Command Line Management provides command line functions

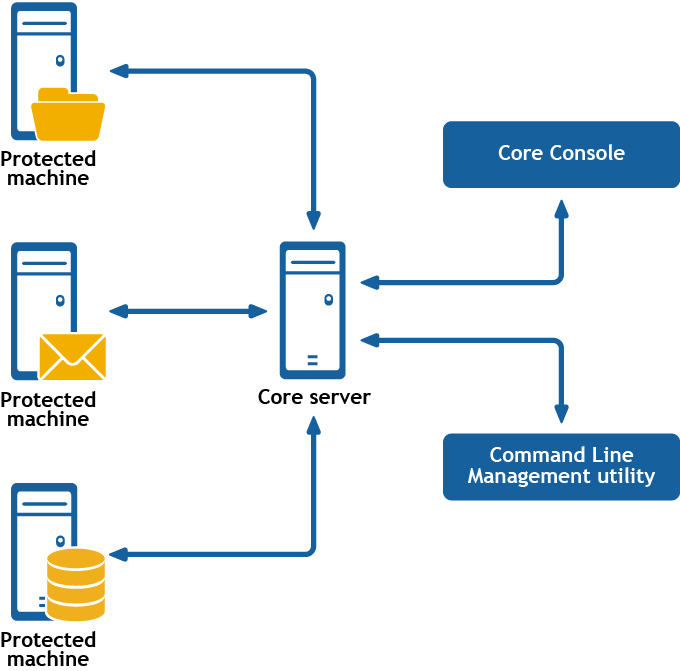
Rapid Recovery Command Line Management is a Windows command line utility that lets users interact with the Rapid Recovery Core server. It offers some of the same functions that the Rapid Recovery Core Console graphic user interface provides. For example, Rapid Recovery Command Line Management utility can mount recovery points or force a snapshot.

The Rapid Recovery Command Line Management utility is embedded in every installation of the Rapid Recovery Core. To open the Command Line Management utility for a default installation, open the Command Prompt (right-click and select the Run as Administrator option), and then change the directory to the path C:\Program Files\AppRecovery\Core\CoreService\, which is the location of the cmdutil.exe file. From this directory, you can pass action flags to the Rapid Recovery Command Line Management utility through a selection of command options and qualifiers to perform limited management functions.

How to run a cmdutil command

To run any cmdutil command in the module, at the command prompt, type the command cmdutil followed by a space; then type a slash (/) followed immediately by the command name (do not include a space). Identify each parameter or command option by preceding it with a hyphen or dash, followed by the command option. Include a space before any input to the command option. When using two or more command options, include a space after each option and input pair. Again precede the option name with a hyphen and a space before any input. After typing the command, press [Enter] to run the command.

Each command includes examples to model the syntax. In these examples, the command prompt is designated by the right angle bracket, >. Thus, command structure is as follows:

>cmdutil /[command name] -parameter1 p1_input -parameter2 p2_input

Examples:

To open an existing DVM repository on the local machine, type the following command and press [Enter]:

>cmdutil /opendvmrepository -localpath E:\Repository

To create a new account in the Credentials Vault, type the following command and press [Enter]:

>cmdutil /credentialsvaultaccount -add -accountusername admin -accountpassword password -description "Admin credentials"

Commands

This section describes the commands and options available for the Rapid Recovery Command Line Management utility.

AddEncryptionKeytoProtectedMachine

The addencryptionkeytoprotectedmachine command lets you apply an existing encryption key to a machine that the Core is protecting.

Usage

The usage for the command is as follows:

/addencryptionkeytoprotectedmachine -core [host name] -user [user name] -password [password name] -name [encryption key name] -comment [comment or description of key]
Command Options

The following table describes the options available for the addencryptionkeytoprotectedmachine command:

Table 1: Addencryptionkeytoprotectedmachine command options
Option Description
-?
Display this help message.
-core
Optional. Remote Core host machine IP address (with an optional port number). By default, the connection is made to the Core installed on the local machine.
-user
Ocmdptional. The user name for the remote Core host machine. If you specify a user name, you must also provide a password. If none is provided, then the credentials for the logged-on user are used.
-password
Optional. The password to the remote Core host machine. If you specify a password, you also have to provide a user name. If none is provided, then the credentials for the logged-on user are used.
-protectedserver The name or IP address of the protected machine.
-keyname

Optional. The name of the encryption key. Specify this option if you know the name of the encryption key that you want to set for the protected machine.

NOTE:If the -keyname option is not specified, the list of existing encryption keys appears and you will be prompted to choose the number of the encryption key that you want to apply to the protected machine.

Example:

Apply an existing encryption key to a protected machine. If you want to disassociate the key from the protected machine, then select <none> or specify the <none> value for the -keyname option:

>cmdutil /addencryptionkeytoprotectedmachine -protectedserver 10.10.8.150 -keyname EKname
Documents connexes

The document was helpful.

Sélectionner une évaluation

I easily found the information I needed.

Sélectionner une évaluation