Views
Toad Data Modeler allows you to display and model views in your ER diagrams visually.

You can manage Views via:
- Model menu | Model Items |Views
- Model Explorer | Views folder
View properties and options are database dependent.
To create a new view
- Click
 on the toolbar and then click the workspace.
- Click
 on the toolbar and draw view relationships between some existing table or view and your newly created view.
- Double click the view relationship line to edit it. In Alias field you can specify a new alias name for the linked table.

- Double-click the view to edit it.
- Define properties on General tab and other tabs.
- On tab Attributes you can select columns from the linked tables. Relationship aliases and names of entities are displayed.
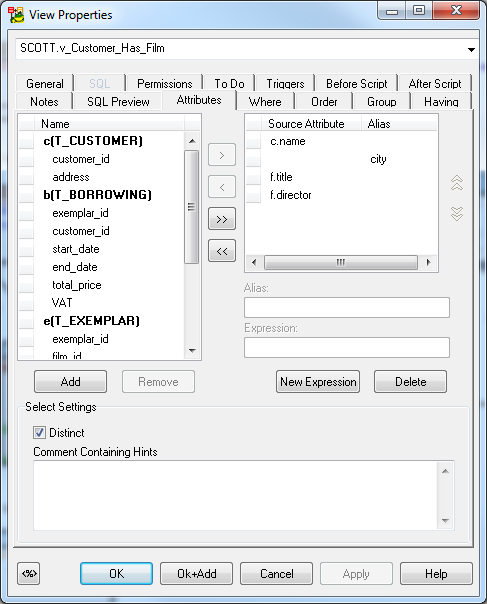
- You can use a template on SQL tab of the view.
|

|
NOTE: As well as for entities and relationships, you can create shortcuts of views on the workspaces of your model. List of view shortcuts can be found in Model Explorer | in particular Workspace folder and in the Views folder | Shortcuts. |
|
|
NOTE:There are some limitations for modeling and reverse engineering of views in Toad Data Modeler. In the following cases views are loaded/modeled as "Select in Views as Text" without view relationships:
- When JOIN is used inside FROM statement. CROSS JOIN is the only supported type of JOIN.
- When a simple format for a name of a table is not used in FROM or when anything follows after a name of a table, e.g. functions, subquery, partition_extension_clause, PIVOT, UNPIVOT, DBLINK, flashback_query_clause, and row_pattern_clause.
- When “WITH common_table_expression”, UNION, EXCEPT, INTERSECT, MINUS, model_clause, and hierarchical_query_clause are used in view.
- When another definition exists between ORDER BY and the end of view, e.g. FOR clause in SQL Server.
|
Materialized Views
Materialized Views are supported in the following databases: Oracle, DB 2, DB2 zOS, , Sybase SQL Anywhere 11, Teradata 13.
Toad Data Modeler allows you to display materialized views graphically in your ER diagram.
To add a materialized view
Click  on the toolbar and then click anywhere on the work area.
or
Model Explorer | Right-click the Materialized Views folder | Add Materialized View.
To edit a materialized view
Double-click the materialized view on the Workspace.
or
Edit the materialized view in Model Explorer | Materialized Views folder | double-click the selected materialized view (or right-click | Edit).
|
Object Navigator Box |
All materialized views of your model are listed here. The combo-box allows you to edit them, one by one from one place. Use Apply to confirm all the changes you make. |
|
General Tab |
Description |
|
Caption |
Logical materialized view name |
| Name |
Physical materialized view name |
|
Schema |
Schema selection box |
|
Categories |
Category selection box |
|
Generate |
Select it to generate the materialized view in final SQL (DDL) script. |
|
Generate SQL only |
Select it to generate only the SQL code written on tab SQL. The rest of items will be ignored. |
|
SQL Tab |
Write SQL code of materialized view subquery on this tab.
About Templates |
|
Permissions Tab |
Here you can assign Users or User Groups permissions to the materialized view. |
|
To Do Tab |
On this tab, you can write some tasks on the selected materialized view.
|
|
Note: To see all To Do tasks, select Model | To Do. | |
|
Before Script Tab |
Whatever you write here, it will be generated before the materialized view definition. |
|
After Script Tab |
Whatever you write here, it will be generated after the materialized view definition. |
|
Notes Tab |
Tab for notes on particular materialized view. The text written here will display in a pop up dialog when you point your mouse cursor at the materialized view shortcut in your ER diagram. |
|
SQL Preview Tab |
Click  at the bottom of this tab to see the part of SQL code for the materialized view. at the bottom of this tab to see the part of SQL code for the materialized view. |
|
Refresh Tab |
Use this tab to specify the default methods, modes and times for the database to refresh the materialized view. |
|
Physical Properties Tab |
Define storage characteristics of materialized view on this tab. |
|
Materialized Views Properties Tab |
Define other materialized view characteristics on this tab. |
|
Create Index Tab |
Create index sentences are written on this tab. |
Procedures
To add a procedure
Right-click the Procedures item in Model Explorer | Add Procedure.
To edit a procedure
Double-click the selected procedure in Model Explorer | Procedures (or right-click Edit).
Example: The Procedure Properties dialog (Oracle 10g)

|
General Tab |
Description |
|
Caption |
Logical procedure name |
| Name |
Physical procedure name |
|
Schema |
Schema selection box |
|
Procedure Arguments |
Define procedure arguments here. |
|
Invoker Rights |
Database dependent option. See particular database reference for more information. |
|
Definition is Wrapped |
Database dependent option. See particular database reference for more information. |
|
Generate |
Select it to generate the procedure in final SQL (DDL) script. |
|
Generate SQL only |
Select it to generate only the SQL code written on tab SQL. The rest of items will be ignored. |
|
SQL Tab |
SQL code. (See the example in the following screenshot.)
About Templates |
|
Permissions Tab |
On this tab, you can manage permissions to particular procedure. |
|
To Do Tab |
Here you can write some tasks on the selected procedure.
Note: To see all To Do tasks, select Model | To Do. |
|
Before Script Tab |
Whatever you write here, it will be generated before the Store Procedure definition. |
|
After Script Tab |
Whatever you write here, it will be generated after the Store Procedure definition. |
|
Notes Tab |
Tab for notes on particular procedure. |
Example: The Procedure Properties dialog | SQL tab (Oracle 10g)

Compare Procedures in Sync & Convert Wizard
When the Sync & Convert Wizard shows differences between procedures (on page Select Items), you can double-click the SQL item of procedures to display details about differences between them.
Functions
To add a function
Right-click the Functions item in Model Explorer | Add Function.
To edit a function
Double-click the selected function in Model Explorer | Functions (or right-click Edit).
Example: The Function Properties dialog (Oracle 10g)

|
General Tab |
Description |
|
Caption |
Logical function name |
| Name |
Physical function name |
|
Schema |
Schema selection box |
|
Invoker Rights (CURRENT_USER) |
Database dependent option. See particular database reference for more information. |
|
Function Arguments |
Write function arguments here. |
|
Datatype of the Return Value |
Define data type of the return value. |
|
Deterministic |
Database dependent option. See particular database reference for more information. |
|
Definition is Wrapped |
Database dependent option. See particular database reference for more information. |
|
Generate |
Select it to generate the function in final SQL (DDL) script. |
|
Generate SQL only |
Select it to generate only the content of the SQL tab. All other items will be ignored. |
|
SQL Tab |
SQL code. (See the example in the following screenshot.)
About Templates |
|
To Do Tab |
On this tab, you can write some tasks on the selected function. |
|
Permissions Tab |
On this tab, you can assign a User or User Group permissions for selected function. |
|
Before Script Tab |
Whatever you write here, it will be generated after the function definition. |
|
After Script Tab |
Whatever you write here, it will be generated before the function definition. |
|
Notes Tab |
Tab for notes on particular function. |
Example: The Function Properties dialog | SQL tab (Oracle 10g)

