Chatee ahora con Soporte
Chat con el soporte

Stat 6.3 - System Administration Guide

Overview of Stat Administration Administrative Utilities Stat Security General Maintenance Tables
System Maintenance Service Domain Maintenance Department Maintenance Issue Tracking Maintenance Country Maintenance Customer Maintenance Object Type Maintenance PeopleSoft Environment Connection Maintenance Pre/Post Migration Steps Parameters Oracle Applications Configuration Oracle Applications Connection Maintenance Generic Application Connection Maintenance Schema Object Parameters Maintenance Data Object Maintenance PeopleSoft Search Configurations Stat Report Definition Maintenance Version Control Management Connection Maintenance
Service Domain-Specific Maintenance Configuring the Stat Central Agent Email Configuration Object Security Appendix: Sample Service Domain Configuration Appendix: User Class Rights Appendix: Creating a Staging Database Appendix: Database Tuning Appendix: Oracle Applications File Type Directory Appendix: Ports and Firewalls Appendix: REST Web Services API Appendix: SOAP-Based Web Services API Appendix: Troubleshooting Chart Appendix: stat.conf Configuration Appendix: Custom Report Files

Workflow Rules

In addition to the status change sequence defined by a workflow diagram, you can further regulate the life cycle of CSRs by defining transfer rules and status rules. Transfer rules stipulate conditions which must be met before a CSR can move from one status to another. Status rules limit the range of certain values available in a CSR while it is in a particular status.

Transfer Rules

After connecting two statuses in the Workflow Template window, you can define a set of transfer rules that specify conditions that must be met before the status change may occur. Using transfer rules you can stipulate the following:

Stat records the time and date when a CSR enters a status and when it exits that status. This means if you define two or more transfer rules in a workflow that requires migrations to the same environment, performing the migration the first time will not satisfy the other rule(s) that require the same migration. For example, let’s say you define two transfer rules: the first rule says a migration must occur to the Production environment before a CSR can transfer from the status A to the status B. The second rule also says a migration to Production must occur before the CSR can change from the B status to a third status, C. Because Stat records the time and date that a CSR is in a particular status, the first transfer rule can only be satisfied if the migration occurs during the time the CSR is in status A, and the second transfer rule can only be satisfied if the migration occurs during the time the CSR is in status B.

Select User if you want to authorize individual users to make the status change. Then in the displayed list of users, select each user you want to authorize.
Select Users in Class if you want to authorize all the users in specific user classes to make the status change. Then in the displayed list of user classes, select each user class you want.
NOTE: The environments displayed in the Migration To field, if any, are determined by the migration path specified in the Workflow Maintenance table. In addition, you can assign user class rights that enable users to migrate to any environment in the migration path regardless of transfer rules.
8
Click OK or Apply to save your work.

Setting Up Transfer Approval Lists

If a CSR status transfer requires the approval of certain users, you can specify who these users are in the Approval List tab of the Transfer Rules window.

When setting up a transfer approval list, you can include different approver groups, including individual users, entire user classes or queues, or a combination of the three. The approval of any user, user class, or queue that you add to a list can be either required or optional.

Approval requirements that involve multiple approver groups or that can be satisfied in more than one way are defined using AND and OR operators. As you add approver groups using AND and OR operators, Stat displays the list as a tree structure and in the form of a SQL statement at the bottom of the window.

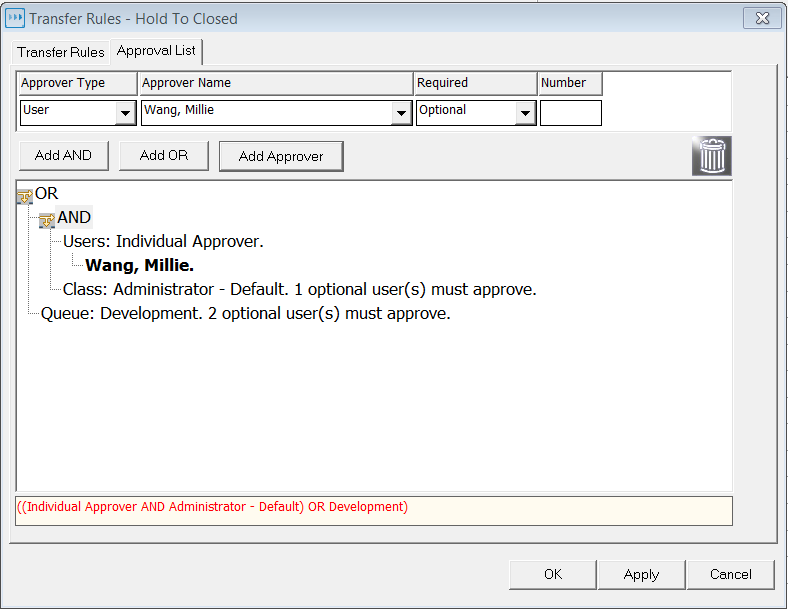
For example, let’s say a status transfer can be approved in one of two ways:

In this case, your approval list would look like this:

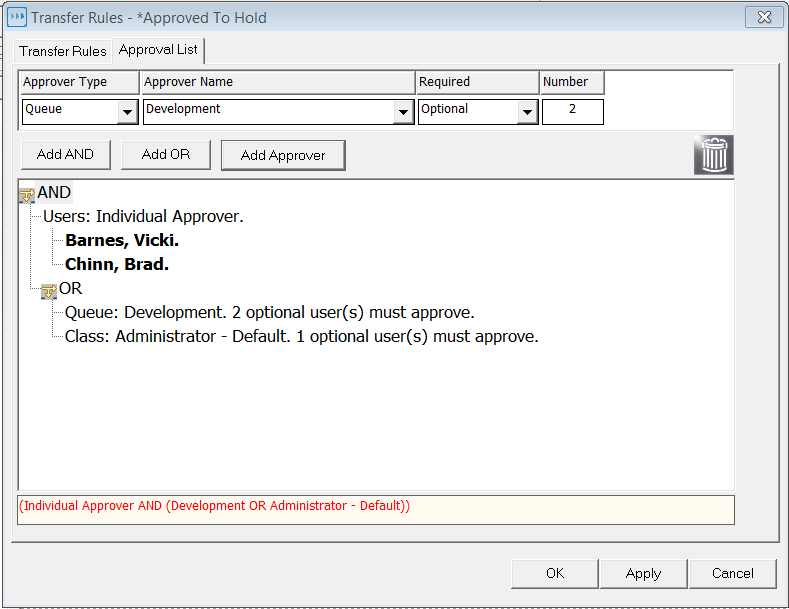
To further illustrate, let’s say that the status transfer must be approved by:

In this case, the approval list would look like this:

It is recommended that before setting up a transfer approval list, you have a basic idea of what approver groups (users, user classes, and queues) you want involved in the approval process as well as the relationships between these groups, which you define using AND and OR operators. For example, if the approval of one or more approver groups are required, you would begin the approval list with the AND operator. If, however, the approval of only one of two or more approver groups are required, you would begin the list with the OR operator.

After defining a transfer approval list, you can configure Stat to automatically transfer the status once all the required approvals and any other conditions of the transfer rules have been met.

Click AND if the approval of one or more approver groups are required
Click OR if the approval of one of two or more approver groups are required
3
In the Approver Type field, select the approver group you want to add to the list.
Options include User, User Class, and Queue.
4
In the Approver Name field, select the name of the user, user class, or queue you want to add.
5
In the Required field, select Required if the approval is required or Optional if it is not required.
The Required option means that the individual user and every member of the user class or queue must approve the status transfer. Optional means that the individual user’s approval is not required, whereas for user classes and queues, it means that the approval of only a specified minimum number of users within that class or queue are required.
6
If you selected User Class or Queue in the Approver Type field and Optional in the Required field, specify the minimum number of users in that class or queue who must approve the transfer in the Number field.
7
Click Add.
b
Click AND or OR.
12
Click OK or Apply.

Auto Advance Option

To instruct Stat to automatically transfer rules, select the Auto Advance check box. The Auto Advance option is only available on transfer rules that have either Tasks rules, Migration rules, OA Patch Apply rules, or approval lists. All transfer rules must be completed for an auto-advance to take place.

Setting the Auto Advance option on the two transfer rules from the same status (A>B and A>C) could create a conflict where both rules are satisfied at the same time that the CSR is saved. When this is the case, Stat does not automatically transfer the status because it is not clear which transfer has precedence.

Documentos relacionados

The document was helpful.

Seleccionar calificación

I easily found the information I needed.

Seleccionar calificación