To back up the entire source system, including SharePlex, you must shut down SharePlex replication while the backup is performed.
This procedure stops user access to the source data but does not deactivate or reactivate the configuration file. Replication resumes when started after the backup.
Supported databases
Oracle
All targets
Procedure
Perform these steps on the source system:
- Stop all system activity.
- Start sp_ctrl.
-
Flush the data to the target system. This command stops the Post process and places a marker in the data stream that establishes a synchronization point between source and target data.
sp_ctrl> flush datasource
where: datasource is the datasource specification of the source database in the configuration file, for example o.ora1.
-
Shut down SharePlex. This command shuts down SharePlex.
sp_ctrl> shutdown
- Shut down the database.
-
Perform the backup.
- Start the database.
- Start sp_cop (Unix and Linux) or the SharePlex service (Windows).
- Start sp_ctrl.
- Allow users to access the database.
-
Verify that the SharePlex Capture, Read, and Export processes started.
sp_ctrl> status
Perform these steps on the target system:
-
Start Post.
sp_ctrl> start post
-
Verify that Post started.
sp_ctrl> status
Use the following resources from the Quest Support Portal to help you troubleshoot SharePlex.
See also, Prevent and solve replication problems.
Appendix A: Peer-To-Peer Diagram
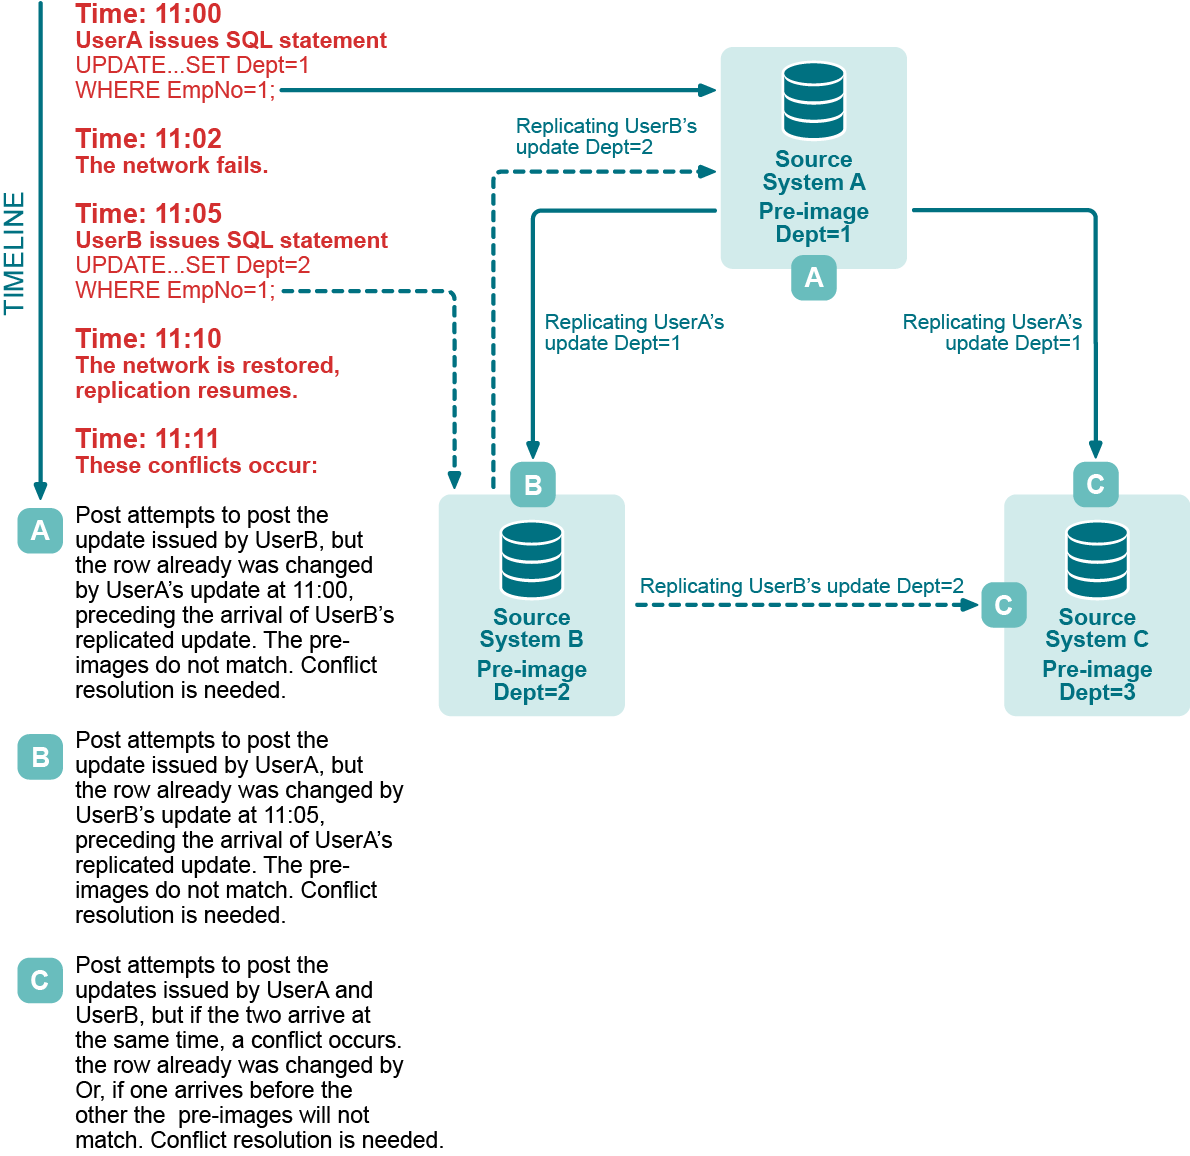
This diagram visually explains the concept of peer-to-peer replication. For more information, see Configure peer-to-peer replication.

Appendix B: SharePlex environment variables
SharePlex uses the following environment variables, which you may need to set in certain situations. Usually you must perform additional steps before or after setting a variable, so refer to the recommended instructions before setting a SharePlex variable.
| EDITOR |
Sets the default ASCII text editor for sp_ctrl commands that use one, for example the create config command. |
| HOST |
Sets a host name for all locally run sessions of sp_ctrl. |
| SP_COP_TPORT |
Sets a non-default port number for an instance of SharePlex. The default port number is 2100. You may need to set a different port number if one of the following is true:
- You are setting up additional instances of sp_cop.
- A different port number than 2100 must be used.
|
| SP_SYS_HOST_NAME |
Sets the host name that SharePlex binds to during configuration activation. This variable is used for the following:
|
| SP_SYS_VARDIR |
Sets the full path to the SharePlex variable-data directory so that sp_cop can locate the configuration data, queues, logs and other information. If there is only one instance of sp_cop on the local system, this variable is set by default*. If there are multiple instances of sp_cop on the local system, always set this variable to point to the correct variable-data directory of an instance before setting any other SharePlex variables for that instance. |
| SP_SYS_SECURE_MODE |
Suppresses the output of the compare and repair SQL log file for all compare and repair runs while the current instance of SharePlex is running. This variable must be set before starting SharePlex, so if the sp_cop process is running it must be restarted after setting this variable. When sp_cop is run with this environment variable, the compare and repair commands will not put data into SQL files and the Post process will not put data into the SharePlex error log. |
* On Unix and Linux, the variable-data directory is set in the proddir/data/default.yaml file. On Windows, it is set in the Windows Registry.
To set an environment variable in Unix or Linux
ksh shell:
export variable_name=value
csh shell:
setenv variable_name value
ksh shell:
export SP_SYS_VARDIR=full_path_of_variable-data_directory
csh shell:
setenv SP_SYS_VARDIR full_path_of_variable-data_directory
To set an environment variable on Windows
Set the environment variable by adding it to the SharePlex node of the Windows Registry.
Important! Incorrect Registry settings can adversely affect the operation of SharePlex. Consult a System Administrator if you need help with this procedure.
- Shut down the SharePlex service.
- Open the Run dialog. The location varies with the Windows version.
- In the Run dialog, type regedit to run the Registry Editor.
- Expand the SharePlex node:
\HKEY_LOCAL_MACHINE\Software\Wow6432node\Quest Software\SharePlex
- Right click the port number of the SharePlex instance to which you want to add a variable, then select New, then String Value.
- Under the Name column, right click the new variable, then select Rename.
- Type the correct name.
- Double click the new variable.
- Under Value Data, enter the string for the new variable and then click OK.
- Exit the Registry.


