Meeting Links are migrated to a Microsoft Exchange Online in the target tenant. When a calendar item with a link to a Microsoft Teams meeting is migrated, the link to the original Teams meeting in the source is retained. Use the Meeting Link Migration Task to update Microsoft Teams meeting links in the target.
How it works: The meeting link migration task creates a new Teams meeting with the original meeting details in the target. It sets the target user as the organizer. This new meeting invite must be accepted by all participants. The original meeting migrated to the target is canceled. The cancellation email is automatically sent out to the organizer and attendees.
Considerations
- The attendee list is not updated to match the target domain.
- A cancellation email is sent out to the organizer and attendees. Since the source attendees are not replaced with the corresponding target ones, the cancellation email is sent out to the source.
- A new meeting is created if the migrating user is the organizer of that particular Teams meeting.
- A meeting is not recreated if the source meeting was created in Microsoft Teams through a Teams channel.
- On Demand Migration recreates present and future meetings, both one-time and recurring meetings. Meetings that happened in the past are migrated with Calendar migration.
- Recurring meetings with modified instances are reset to original settings after migration.
- The subsequent runs of the Meeting Link Migration Task will skip the meetings which were previously processed.
- Properties like a flag and categories are not supported with this migration.
|

|
IMPORTANT:
Mailbox migration with the Migrate Calendar option selected in the New Mail Migration Task wizard, must be completed before starting this task. |
To migrate meeting links:
- Log in to Quest On Demand and choose an organization if you have set up multiple organizations.
- From the navigation pane, click Migration to open the My Projects list.
- Create a new project or open an existing project.
- Click the Mail icon, or click Open Project from the project tile to open the project workspace.
- Click the Mailboxes tab. From the Mailboxes List, select the pre-migrated mailboxes in the list for which you want to migrate the meeting links. You can use search, filtering or collections to quickly navigate through the list of mailboxes.
- From the Mailboxes List toolbar, click More > Meeting Link Migration. The New Meeting Link Migration Task wizard opens. This option is not available if the target is a Microsoft Exchange on-premise server.
- Step 1: Custom Email Message
Customize the cancellation message in the text box.
- Step 2: Notification
- Send notification email once the task is completed - select this option to send a notification email when a discovery task completes.
- Only in a case of failure - Select this option to send the email if the discovery task fails to complete successfully.
- Recipients - enter the email address of the recipients of this email. You can specify multiple recipient email addresses separated by semicolon.
- Click Next.
- Step 3: Schedule
- Choose from one of three options to schedule the task. The scheduler will be activated after you complete the task wizard.
- Run now - task runs immediately.
- Run later - task must be started manually.
- Schedule - task will be started at a future date and time entered in the corresponding calendar field.
- Click Next.
- Step 4: Summary
- Review the task summary. You can specify a custom task name. Default name is Meeting Link Migration Task.
- Click Finish to save or start the task depending on the schedule option selected.
How to track the migration
You can track a task's progress from the Tasks tab and filter for tasks where Type = Meeting Link Migration. You can view the summary on the Project Dashboard or monitor alerts and notifications in Events.
To support the customer preferences related to mail forwarding, the following behavior is now supported for mail migration task in case forwarding is not set using On Demand Migration (Mail Flow column is empty) and for mailbox switch (standard and reverse scenarios) tasks:
|
Mail migration
(From target to source option) |
Points to target * |
Not set / Set to any SMTP address |
Not set (cleared) |
Source.PrimarySMTPAddress or one of the existing email addresses from selected custom domain for forwarding, if set. |
| Points to any SMTP address except for target * |
Not set / Set to any SMTP address |
Remains unchanged |
Source.PrimarySMTPAddress or one of the existing email addresses from selected custom domain for forwarding, if set. |
| Not set |
Not set / Set to any SMTP address |
Not set |
Source.PrimarySMTPAddress or one of the existing email addresses from selected custom domain for forwarding, if set. |
|
Mail Migration
(From source to target option) |
Not set / Set to any SMTP address |
Points to source** |
Target.PrimarySMTPAddress or one of the existing email addresses from selected custom domain for forwarding, if set |
Not set (cleared) |
| Not set / Set to any SMTP address |
Points to any SMTP address except for source ** |
Target.PrimarySMTPAddress or one of the existing email addresses from selected custom domain for forwarding, if set |
Remains unchanged |
| Not set / Set to any SMTP address |
Not set |
Target.PrimarySMTPAddress or one of the existing email addresses from selected custom domain for forwarding, if set |
Not set |
| Mail Migration: Remove |
Not set / Set to any SMTP address except for target * |
Points to source** |
Remains unchanged |
Not set (cleared) |
| Points to target * |
Not set / Set to any SMTP address except for source ** |
Not set (cleared) |
Remains unchanged |
| Not set / Set to any SMTP address except for target * |
Not set / Set to any SMTP address except for source ** |
Remains unchanged |
Remains unchanged |
|
Switch
(From source to target option) |
Not set / Set to any SMTP address |
Points to source** |
Target.PrimarySMTPAddress or one of the existing email addresses from selected custom domain for forwarding, if set |
Not set (cleared) |
| Not set / Set to any SMTP address |
Points to any SMTP address except for source ** |
Target.PrimarySMTPAddress or one of the existing email addresses from selected custom domain for forwarding, if set |
Remains unchanged |
| Not set / Set to any SMTP address |
Not set |
Target.PrimarySMTPAddress or one of the existing email addresses from selected custom domain for forwarding, if set |
Not set |
|
Unswitch
(From target to sourceoption) |
Points to target * |
Not set / Set to any SMTP address |
Not set (cleared) |
Source.PrimarySMTPAddress or one of the existing email addresses from selected custom domain for forwarding, if set |
| Points to any SMTP address except for target * |
Not set / Set to any SMTP address |
Remains unchanged |
Source.PrimarySMTPAddress or one of the existing email addresses from selected custom domain for forwarding, if set |
| Not set |
Not set / Set to any SMTP address |
Not set |
Source.PrimarySMTPAddress or one of the existing email addresses from selected custom domain for forwarding, if set |
* Target.PrimarySMTPAddress or any of Target.EmailAddresses
** Source.PrimarySMTPAddress or any of Source.EmailAddresses
Switching Mailboxes
The switch mailbox task allows customers to set up mail forwarding as the final step in the migration and mark the mailbox state as Switched. This task may not be required if forwarding was set during the mail migration task.
To start a Mailbox Switch Task
- Log in to Quest On Demand and choose an organization if you have set up multiple organizations.
- From the navigation pane, click Migration to open the My Projects list.
- Create a new Hybrid Exchange project or open an existing project.
- Click the Mail tile, or click Open from the Mail tile to open the Accounts and User Data dashboard.
- Click the Mailboxes tab. The Mailboxes List opens. Select the mailbox accounts in the list that you want to switch. You can use search, filtering or collections to quickly navigate through the list of mailboxes. You can also select the check box in the table header to select all the mailbox accounts.
- From the actions menu, click Switch Mailboxes. The New Mailbox Switch Task wizard opens.
- Step 1: Mail Flow
- Select options as described below:
- Mail forwarding direction - Set the mail forwarding direction by choosing From target to source or From source to target. From the On Demand Migration table of mailboxes, the forwarding email is in the Source Mailbox / Target Mailbox depending on the mail forwarding direction selected. See the Mail Flow column value (To Source or To Target) which can also be switched as part of a migration task (see Migrating Mailboxes).
- Custom domain for forwarding - Specify the custom domain name for forwarding email addresses. If the domain is omitted or does not exist, the primary SMTP address will be used.
- Mark Mailbox State column as Switched – select this check box to change the Mailbox State from its current value to “Switched”.
- Click Next.
- Step 2: Notification
- Select options as described below:
- Click Next.
- Step 3: Schedule
- Choose from one of three options to schedule the task. The scheduler will be activated after you complete the task wizard.
- Run now - task runs immediately.
- Run later - task must be started manually.
- Schedule - task will be started at a future date and time. Enter the start time for the task.
- Click Next.
- Step 4: Summary
- Review the task summary. You can specify a custom task name. The default name is Mailbox Switch Task.
- Click Finish to save or start the task depending on the schedule option selected.
Queuing automates migration task orchestration and simplifies migration planning. Queuing allows migration operators to submit migration tasks for any number of objects at once.
- Removes the need to create multiple migration tasks that would have to be submitted and monitored separately
- Maximizes how many concurrent migrations can be processed in parallel
- Reduces the stress of organizing your migration around capacity constraints
- Frees up time to focus on other project tasks
How does queuing work?
When you submit a migration task, On Demand Migration places all objects to be migrated into a queue for that asset, confirms available capacity, and then intelligently selects objects from the queue by processing objects with the highest priority first, using a first-in-first-out approach within that priority.
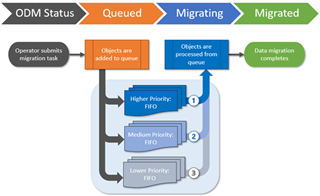
How do I assign priorities?
When submitting a migration task, you have the option to assign priority levels in the Schedule step of the migration wizard, to help control which objects will be processed from the asset task queue first.
How does first-in-first-out (FIFO) work?
When you submit a new migration task, objects are placed at the end of the asset queue for their assigned priority, meaning that tasks previously submitted with the same priority will be processed first.
As On Demand Migration for Hybrid Exchange completes a migration job, it will immediately start processing the next available job by selecting objects from the beginning of the highest priority queue.
This respects the FIFO approach while still ensuring that higher priority tasks are always processed before those with lower priorities.
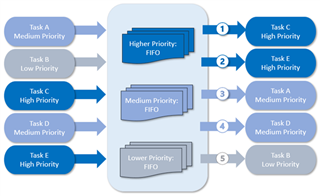
What is an example scenario?
Let’s imagine that a migration operator submits five OneDrive migration tasks throughout the day, with a mixture of priorities, in the order of Task A, Task B, Task C, Task D, and Task E.
If there is available capacity to process all the objects when each task is submitted, the migrations states of all tasks will immediately switch to Migrating and all five tasks will process concurrently with no queue management required.
However, if the available capacity for OneDrive migrations is at its maximum limit when the tasks are submitted, On Demand Migration for Hybrid Exchange will place the objects in the OneDrive queue and then process the tasks in order of priority and FIFO as capacity becomes available.
|
|
NOTE: Every On Demand Migration for Hybrid Exchange project has its own migration queue and does not compete with asset queues in other projects. |
What determines available capacity?
On Demand Migration for Hybrid Exchange uses Microsoft APIs to perform migration tasks and must abide by the API limits that Microsoft enforces in each tenant. These limits are in place to ensure that migration activities do not impact your daily business operations. On Demand Migration for Hybrid Exchange operates within the available capacity for your source and target tenants.
How do I know which objects are queued?
When you submit a migration task for an asset that is processing at maximum capacity, the newly queued objects will display the migration state Queued in the list view and object detail pane.
You can sort and filter the list view by migration state to view all queued objects.
