The dashboard provides comprehensive information that has been discovered about a specifiable user. The following information is displayed:
|
Item |
Description |
|---|---|
|
Basic User Information |
Shows information about the user such as the User SID, login name, OU where the Active Directory account resides. In addition, the user address can be displayed. This might be helpful to confirm the chosen user identify. |
|
Mailboxes |
Shows detailed information relating to the user mailbox, and personal archive as discovered by Archive Shuttle. |
|
Archives |
Displays detailed information relating to the primary Enterprise Vault archive that has been discovered for the user. |
|
Migration Status |
Information relating to the migration can also be viewed, if this user is currently mapped for migration. The information includes the number of items, priority, number of failed items and information relating to the size of the arhive. The information is also displayed graphically as a series of pie charts at the bottom of the screen. |
|
Stage 2 Status |
This section shows the current state of any Stage 2 commands which have run on this user. |
When migration is underway, this page will show additional information related to the migration. This includes statistics and overall progress graphs. It is also possible to see the Failed Items for a selected user/migration by clicking on the hyperlink on this page.
Valuable information about module-level responsiveness can be gained from the Module Dashboard in Archive Shuttle. Using the dashboard it is possible to see detailed information relating to the operations being performed by particular modules on particular servers involved in the migration. For example, if new mappings have just been created, and yet one or more Enterprise Vault Export modules are showing no items being exported, it may indicate an area that should be investigated further.
The display also shows whether a module is enabled or not and the current logging level for the module and Core.
Modules have to be enabled in order for them to receive work to do.
The modules are monitored every 5 minutes to check if they are still running, or have failed. If they have failed an attempt will be made to restart a module, by issuing a command to the Admin Module on the affected machine. By default Archive Shuttle will try 5 times to restart a module. Every retry to start the module is by default one more minute apart from the previous attempt for a maximum of 10 minutes. The status of the module will be on the System Health page.
Actions to be performed on the Modules page
·Enable: Enable selected modules
·Disable: Disable selected modules
·Configure: Most modules allow specific configuration relating to parallelism and other performance/load related elements to be configured. For example you could configure one EV Export module to have archive and item parallelism of 10 and 2 respectively, and another EV Export module could have archive and item parallelism of 15 and 1 respectively.
Its also possible to have these configuration changes scheduled to be effective at particular times of day and days of the week.
The data grid showing module information also includes columns which show which configuration is active, and the time left before the next change in configuration.
·Start: Start the selected module immediately
·Stop: Send a command to the selected module to stop processing
·Restart: Send a command to the selected module to restart
·Delete: Remove a module. It may be necessary to choose a replacement.
·Enable performance statistics: Enables the collection of performance statistics for a module
·Disable performance statistics: Disables the collection of performance statistics for a module
·Set Schedule: Define a schedule for when the selected module should run
·Update: Send a command to the selected module to perform an automatic update to the latest version.
|
|
NOTE: For the Update command to work correctly, there are additional steps that should be performed on the Archive Shuttle Core Server. These are covered later in this section. |
·Download: Allows you to download the module MSI package.
·Set Log Level: Allow the logging level of a module (or set of modules) to be changed in real-time. Increasing the logging level may help with providing more detail to Support for troubleshooting.
·Refresh: Refreshes the module grid
|
|
NOTE: Disabled modules still transmit backlog data to the Core Web Service. These modules do not get new work to perform. |
Setting a schedule for a module
Each of the Archive Shuttle modules can have a schedule defined for when the module should execute tasks. To set a schedule, follow these steps:
1.Navigate to the Modules page.
2.Select a Module by clicking on the checkbox next to the name of the module
3.Click on Set Schedule in the navigation bar
|
|
NOTE: When setting a schedule remember to click on Save in the Set Schedule window to commit the schedule to the database. |
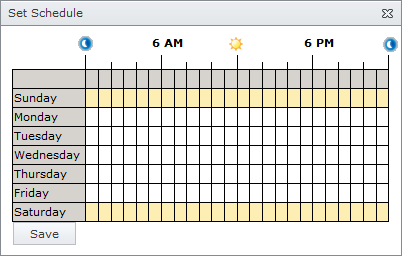
The following screenshot shows a module schedule where the module is configured to run 24×7:
The following screenshot shows a module schedule where the module is configured to run just on Saturday and Sunday:
Update installed modules
During a complex migration there may be many modules installed on different servers throughout an environment. Archive Shuttle has a method for simplifying the process of updating the modules when new versions become available. In order to update modules from the Archive Shuttle Web Interface, follow these steps:
1.Download the new MSI file, the file required will have a name formatted in this manner: ArchiveShuttleModulesInstall-X.x.x.xxxxx
2.Copy the MSI file to the following folder on the server that hosts the Archive Shuttle Web Service:
a.Webservice\bin\ModuleInstallers
3.Navigate to the Modules page in the Archive Shuttle User Interface.
4.Select one or more modules, and click Update.
The MSI file will then be transferred to the server that was selected, and then the MSI file will be executed in order to update the installation.
Restart Enterprise Vault Services
From the Services tab it is possible to restart some or all of the Enterprise Vault services on a particular Enterprise Vault server. You can also direct the command to a particular Archive Shuttle Admin Service.
This page is used to map containers to either new or to existing containers based on certain criteria.
The following basic information about each container is visible in the grid view:
·Name
·Indicator field to show whether the container has an owner or not
·Owner Full Name
·Group
·Type of container (e.g., Enterprise Vault)
·Archive Type
·Indicator field to show whether the container has a mailbox or not
·Link Name
·EV Archive Status
·Item Count
·Total Size
·Indicator field to show whether the container is mapped or not
If a Containers owner / user could not be determined in Active Directory, it is considered ownerless, and is marked as such in the Name column.
Actions to be performed on the Bulk Mapping page
Add Mappings: Add mappings for selected containers. A pop-up wizard allows the mapping to be defined. The information that is required depends on the target:
Enterprise Vault - The target user strategy must then be chosen as follows:
·Same User
·Different User (Choose this option if the migration is to take place to another domain. The target domain can be chosen from a drop-down list, and matching criteria must be specified (e.g., Legacy Exchange DN, SID History, User Name))
Run Item Collection: Collect full or delta items for containers.
Run Shortcut Collection: Run full shortcut collection.
Auto Create Mappings: Assigns mapping templates and automatically creates mapping for selected containers(s) once Office 365 user's mailbox is present in the database. To assign a template to automatically create a mapping:
1.Select one or multiple containers to assign a mapping template to.
2.Click Auto Create Mappings.
3.Select the template to assign to the container, then click Save.
4.After a moment, the mapping template should be assigned to the container.
You can check which auto-created mapping templates have been assigned under the columns Autocreate and Template For Autocreate in the grid.
To remove a mapping template for auto-creation:
1.Select the container which has been assigned a mapping template for auto-creation.
2.Click Auto Create Mappings.
3.Select No template, then click Save.
|
|
NOTE: ·Only templates with Office 365 as the target can be assigned. Templates for leavers currently cannot be used. ·You currently cannot assign mapping templates to ownerless containers. ·You currently cannot change the template once a mapping has been created. |
The container strategy must then be chosen as follows:
Create new containers - Choose this option if Archive Shuttle should create new containers in the target environment.
Using existing containers - Choose this option if Archive Shuttle should use existing containers in the target environment.
Create new if there is no existing - Choose this option if Archive Shuttle should primarily use existing containers in the target environment, and if they do not exist, they will be created.
The target link must then be selected.
Choose the Link where you want to migrate to: - Select an entry from the drop down list that will correspond to a link in the target environment.
Exchange - The mailbox type must then be chosen as follows:
·Primary mailbox: Choose this option if Archive Shuttle should ingest the data in to the users primary mailbox.
·Secondary (Archive) Mailbox: Choose this option if Archive Shuttle should ingest the data in to the users secondary (archive) mailbox. If this option is selected, then an option of what action should be taken if a secondary mailbox does not exist can be specified. The choice of options are to either skip the ingestion or ingest into the primary mailbox instead.
Office 365 - The mailbox type must then be chosen as follows:
·Primary mailbox: Choose this option if Archive Shuttle should ingest the data in to the users primary mailbox.
·Secondary (Archive) mailbox: Choose this option if Archive Shuttle should ingest the data in to the users secondary (archive) mailbox. If this option is selected then an option of what action should be taken if a secondary mailbox does not exist can be specified. The choice of options are to either skip the ingestion or ingest into the primary mailbox instead.
·Enable Secondary (Archive) mailbox: Select this option to create an archive for Office 365 during provisioning.
The target link must then be selected.
·Choose the Link where you want to migrate to:
Select an entry from the drop down list that will correspond to a link in the target environment.
PST - The format must then be chosen as follows:
·PST: The output format will be PST
The target link must then be selected.
·Choose the Link where you want to migrate to:
Select an entry from the drop down list that will correspond to a link in the target environment.
Later in adding this type of mapping, it is required to choose a PST File name policy. This is selected from a drop down list.
The remaining elements in the pop-up wizard are then the same regardless of the target for the migration:
·Workflow Policy: The workflow policy must then be chosen, the list of workflows that are available will be determined by the chosen target. For example, if the migration is to Enterprise Vault, only those workflows applicable to an Enterprise Vault migration will be shown. Additional workflow policies can be defined. This is described in the section Workflow Policies. You are also able to select a pre-migration policy to your mappings.
·Filter Policy: The filter policy must then be chosen from the drop-down list. The will be a default filter which performs no filtering. Additional filter policies can be defined. This is described in the section Filter Policies.
·Choose Container Mapping Settings: Properties for the new mapping can then be set.
·Migration Status: Enabled: Enable immediate migration for the newly added mappings.
·Migration Status: Disabled. Does not immediately start migration for the newly added mappings.
·Item Gathering Status: Enabled. Enables item gathering for the newly added mappings.
·Item Gathering Status: Disabled: Does not start item gathering for the newly added mappings. There will be a summary page displayed at the end of the wizard when creating a new container mapping. This contains all of the information gathered during the wizard and should be reviewed before committing the changes.
·Run Item Gathering: Start Full or Delta item collection for selected containers. The source container will be examined and data relating to each item will be collected and added to the appropriate Archive Shuttle Link database.
Dissociate Archive User
There is an ability to disassociate the user of a source container so the container may be migrated as a leaver. To do this:
1.Select the row(s) with a source container.
2.Click Dissociate Archive User from the top ribbon.
3.This container will be marked as ownerless.