Connecting to a Full SQL Job Database
|
Navigation: Saving or Running a Migration Job > Connecting to a Full SQL Job Database |
If you are using SQL CE to host your Content Matrix Jobs Database, you will receive a warning in the job log (and as a pop-up if you are running the job from the Console interface).
The use of SQL CE in a production environment is discouraged because of the following limitations:
·It uses a single .list file that is less robust and reliable and may be corrupted after the database reaches 4 GB.
·Data compression is not supported.
·Support for large objects is limited.
To switch to a full-feature SQL Server for the Content Matrix Job Database:
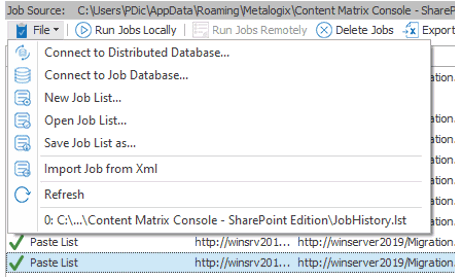
1.From the Job List choose File > Connect to Job Database.
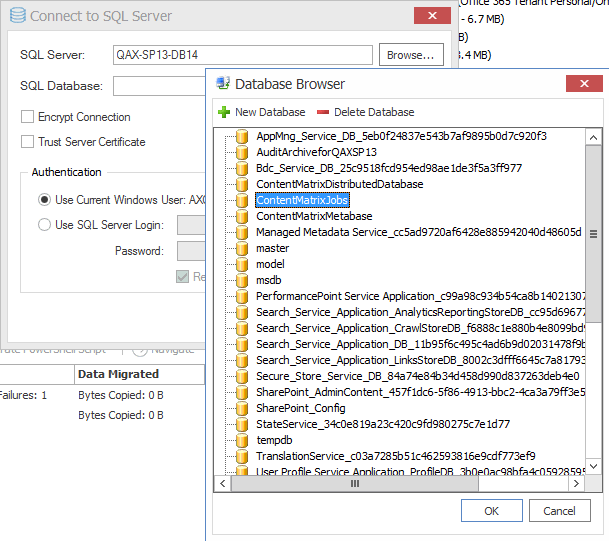
2.Complete the Connect to SQL Server dialog:
§If you are connecting to an on premises SQL database, create (using the New Database option) or select the database you want to use.
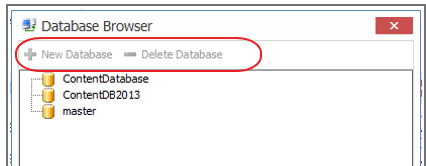
§If you are connecting to an Azure SQL database, select the database that has been created in Azure Portal for use by Content Matrix. (Note that the New Database and Delete Database options will be disabled.)
3.If you want to use an encrypted connection to the database, check the Encrypt Connection box.
NOTE: If the certificate used for encryption is not trusted, you will also need to check the Trust Server Certificate box.
4.Select an Authentication method for connecting to SQL server.:
·Use Current Windows User
OR
·Use SQL Server Login
NOTE: Currently, Use SQL Server login is the only valid option for an Azure SQL server.
5.Click [OK].
Saving a Job Configuration as a Template
|
Navigation: Saving or Running a Migration Job > Saving a Job Configuration as a Template |
You can create job configuration templates for a set of selected settings which can be saved and reused, including any options that are not normally preserved using the Preserve Configuration Options option (in the ribbon Settings menu).
These templates can also be moved to another machine and used with a separate install of Metalogix Content Matrix Console (provided that it is the same Edition of Metalogix Content Matrix, and the same version number or greater).
To save a job configuration template:
1.After initiating a migration, complete the Configure (Object) Copying Options with the settings that you want to include in the template.
2.Click [Save Job Configuration].
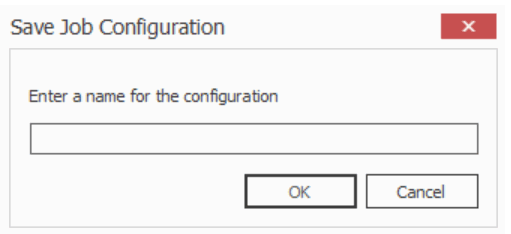
Here you can set the display name for the job template. This is not the actual file name, but it is the name that Metalogix Content Matrix will use to list the template.
NOTE: In most cases, when a job template is saved by Metalogix Content Matrix it will be saved to the following location:
C::\Users\<User>\AppData\Roaming\Metalogix\Metalogix Content Matrix Console - <Product> Edition
However, it is highly recommended that you do not interact with this system location. If you are trying to save a job template so it can be exported to another system the template can be exported from the Manage Job Configurations dialog.
3.Enter the desired display name value and click [OK] to continue.
Once the save is complete, you will be returned to the Configure <Object> Copying Options dialog where the migration can either be Run or Saved.
The saved job templates will now be visible in the Manage Job Configurations dialog.
NOTE: If you are looking to save a job template and move it to another system for use, this should be done using the Export option in the Manage Job Configurations window. Additionally, if you are trying to Import a job template from another system, this must also be done from either the Manage Job Configurations dialog or it can be imported when applying a template.
Applying a Job Template
|
Navigation: Saving or Running a Migration Job > Saving a Job Configuration as a Template > Applying a Job Template |
Any job templates that have been imported or saved, and are available in the Manage Job Configurations dialog can be applied to another migration of the same type. For example, if migrating at the site level, you would not be able to use a job template that is created for a migration at the list level. It would only be able to use a template that migrates at the site level.
The source and target connection types do not apply directly to a job template, so it does not matter if the connection types for the new migration are the same as the connection types for the job template. If the connection types are different than any options that are not applicable for the connection types that are being used will not be available, but all other options will be set.
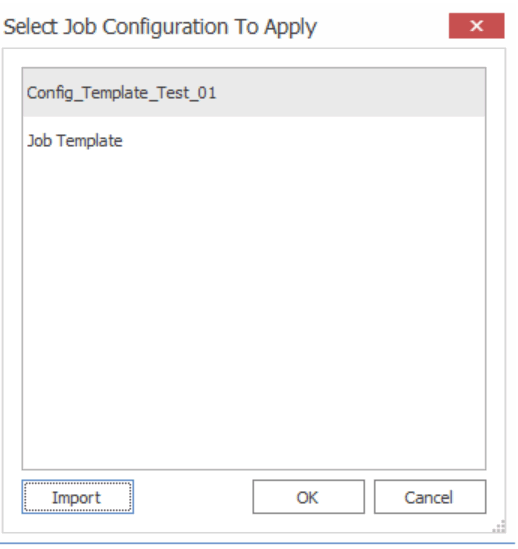
1.After initiating a migration, click [Open Existing Job Configuration] in the bottom left corner of the Configure <Object> Copying Options dialog to display the Select Job Configuration to Apply dialog.
NOTE: Any options you have specified directly in the dialog will be overwritten once a job template is applied.
The dialog lists all of the job templates that are currently available for the migration type (i.e. a site, list, item, etc. migration), as well as only the templates for the specific Edition of Metalogix Content Matrix that is being used.
2.Select the desired job template and click [OK].
You will be prompted to confirm your action before continuing. Remember that if you choose to apply the template, any other settings that you entered directly in the Configure <Object> Copying Options will be lost.
The Configure <Object> Copying Options dialog will now reflect all of the template options. Any additional configuration options can be set or modified, and the migration can continue as normal.
Managing Job Templates
|
Navigation: Saving or Running a Migration Job > Saving a Job Configuration as a Template > Managing Job Templates |
Metalogix Content Matrix Console job templates can be managed in the Manage Job Configurations dialog. This dialog allows users to Import, Export, Delete, or Filter any job templates. Below is a breakdown of the available options in the Manage Job Configurations dialog.
·Import - This button allows users to Import a job template. The imported job template must be from the same Edition of Metalogix Content Matrix Console. For example, if users are importing a template into SharePoint Edition then the template must have been exported from SharePoint Edition.
·Export - This button allows users to Export a job template. The export will create an XML file in a desired folder location so the file can be copied and placed into another location as needed.
·Delete - This button will delete any selected job templates from Metalogix Content Matrix Console. When deleting a template, a confirmation dialog will open and must be confirmed before the templates are deleted. Deleting will permanently delete the selected templates from Metalogix Content Matrix Console.
·Filter - This is a text box that allow users to enter a value that Metalogix Content Matrix will filter the job templates against. The filter will only display items that contain the specified value. There is a Filter icon to the right-hand side of the filter text box. Clicking this icon will apply the filter text value to all of the job templates listed in the Manage Job Configurations dialog, so only the templates that contain/include the matching filter value will be shown. Filtering can be cleared by removing the text value from the filter text box, and clicking the filter icon button.

