The information in this article applies to:
File System Auditor Version 2.5 and higher
HOW TO:
Step-By-Step Guide for Installing File System Auditor
Note: This article is not intended to replace the Getting Started Guide, which should be reviewed for system requirements, and during the installation process.
Step 1 – Prerequisite Check:
Review the “Minimum Requirements” section of the Getting Started Guide to make sure all the requirements have been met.
Step 2 – Installation of File System Auditor:
Install the File System Auditor by executing FSASetup_2.x.msi. On the Welcome screen, click “Next”:
![[image]](https://support.quest.com/KBArticleImages/SL3575/1c106e38.jpg)
Accept the terms of the license agreement and click “Next”:
![[image]](https://support.quest.com/KBArticleImages/SL3575/ace4ba8e.jpg)
Change the location of the installation if necessary, and click “Next”. This will install the Agent Configuration Console and Report Configuration Console:
![[image]](https://support.quest.com/KBArticleImages/SL3575/f988f02e.jpg)
Click “Install” and “Finish” to complete the installation:
![[image]](https://support.quest.com/KBArticleImages/SL3575/6dbd003d.jpg)
![[image]](https://support.quest.com/KBArticleImages/SL3575/6a718208.jpg)
Step 3 – Enable TCP/IP and Named Pipes:
To configure SQL to allow remote connections make sure that TCP/IP and Named pipes are enabled on the File System Auditor machine, all of the machines that will have the File System Auditor Agent installation; and also within SQL.
On the File System Auditor machine and Agent machines go to Start > Run and enter “cliconfg”. The results should look as displayed below, having TCP/IP first in order, then Named Pipes. Highlight TCP/IP and select Properties to make sure you’re using the correct port. The default port for SQL is 1433. Also, check “Enable shared memory protocol”, and then click “OK”:
![[image]](https://support.quest.com/KBArticleImages/SL3575/40c288d6.jpg)
On the SQL server go to All Programs > Microsoft SQL Server 2005/2008 > Configuration Tools > SQL Server Configuration Manager. Highlight “Protocols for MSSQLSERVER/SQLEXPRESS”, (or the specific instance for your environment) and make sure TCP/IP and Named Pipes are enabled. Then double click on TCP/IP, select the IP Addresses tab and make sure that all instances of TCP Port are set to 1433 (or the correct port for your environment if not using the SQL default). Scroll down if needed to find all instances, click “OK”:
![[image]](https://support.quest.com/KBArticleImages/SL3575/386951fb.jpg)
If any changes have been made, the SQL services will need to be restarted. Please be careful doing this during business hours to avoid affecting any other users, and/or databases connected to the SQL instance. If using a named instance, it is also recommended that the SQL Browser service be started.
For more information on this subject for SQL 2005 see: Microsoft KB 914277
Step 4 – Create the database:
Next, via Start > Programs > ScriptLogic Corporation > File System Auditor use the “Database Wizard” to create the File System Auditor database.
![[image]](https://support.quest.com/KBArticleImages/SL3575/afd9e3c4.jpg)
On the Welcome screen click “Next”:
![[image]](https://support.quest.com/KBArticleImages/SL3575/bbb91b1b.jpg)
Select “Create New Database” and click “Next”:
![[image]](https://support.quest.com/KBArticleImages/SL3575/a93ac48d.jpg)
Browse to your SQL Server Instance and keep the default database name, or it can be changed if desired. The default database name is “SLFileAuditor”. Select the authentication mode, and click “Next”:
![[image]](https://support.quest.com/KBArticleImages/SL3575/78b27074.jpg)
The default options can be selected and this would create the two File System Auditor security groups (FSA_Admin and FSA_User) as local groups on the SQL server. If when creating the databases “Global” is selected, the groups will be in the Active Directory Users container. If the default location of the .mdf and .ldf files needs to be changed, select “Override Default File Locations” and browse to the locations. Click “Next”:
![[image]](https://support.quest.com/KBArticleImages/SL3575/14753507.jpg)
Click “Finish” to complete the database creation:
![[image]](https://support.quest.com/KBArticleImages/SL3575/ca972022.jpg)
Next, the account(s) of users administering File System Auditor, and the account used to install the Agent needs to be in the local admin groups on all machines involved (File System Auditor machine, SQL server, and machines with the Agent). These accounts also need to be in the File System Auditor security group FSA_Admin for Windows authentication. For users only using the Report Configuration Console, their account needs to be in the FSA_User security group.
Step 5 – Applying the license file or Evaluating File System Auditor:
The first time the Agent Configuration Console is opened the license file needs to be applied, or “Begin Evaluation” is selected if evaluating File System Auditor. Either browse to the location of the original license file received from ScriptLogic, or click “Begin Evaluation”:
![[image]](https://support.quest.com/KBArticleImages/SL3575/6df01732.jpg)
If applying the license file click “Apply License file” after browsing to it. Otherwise, click “I Agree” to the terms of the evaluation.
Step 6 - Install the Agent:
Click “Add File Servers”, and “Next”:
![[image]](https://support.quest.com/KBArticleImages/SL3575/b276b421.jpg)
Click “Add”, browse to the server(s) and click “OK”:
![[image]](https://support.quest.com/KBArticleImages/SL3575/061ac907.jpg)
Click “Next” to proceed, then “Finish” completing the Agent installation:
![[image]](https://support.quest.com/KBArticleImages/SL3575/6f918965.jpg)
Browse to the SQL Server Instance and Database Name, and select the Authentication method. Then, click “Next”:
![[image]](https://support.quest.com/KBArticleImages/SL3575/d71a6613.jpg)
On a first time installation you may want to uncheck “Add all public shares as path filters” (the desired paths can be entered later), and on the “Process Exclusion Filters” tab select “Default Filters” and “Yes”. Then click “Next” to continue:
![[image]](https://support.quest.com/KBArticleImages/SL3575/cfccd860.jpg)
Click “Next” and “Finish” to continue:
![[image]](https://support.quest.com/KBArticleImages/SL3575/f8af20b3.jpg)
Click “Finished”:
![[image]](https://support.quest.com/KBArticleImages/SL3575/b15dc005.jpg)
To add the paths to audit, on the Path Filters tab click “Add” and browse to each path, then click “OK”:
![[image]](https://support.quest.com/KBArticleImages/SL3575/b1530db4.jpg)
Step 7 – Running Reports:
To run reports open the Reporting Console from within the Agent Configuration Console, or from the Start menu:
![[image]](https://support.quest.com/KBArticleImages/SL3575/9ad59124.jpg)
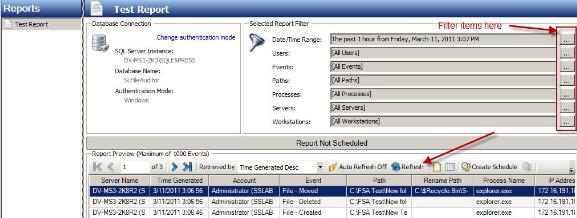
Select “Create New Report”. Enter the Report Name, Database Information, and select the authentication method. Click “OK”:
![[image]](https://support.quest.com/KBArticleImages/SL3575/b108d14e.jpg)
The “Refresh” button may need to be selected to see the data. If desired, to narrow down the results, select the appropriate filter items:
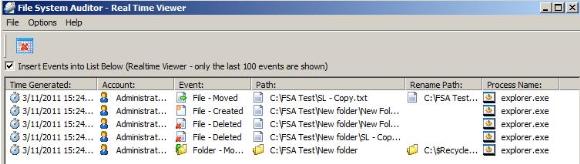
Step 8 – Real Time Viewer:
The Real Time Viewer is installed on every machine that the Agent is installed on. It only displays the last 100 events and is used for troubleshooting purposes.
Related Articles or Solutions:
