Open and Save Files
The default in Toad's Editor is the standard Windows-style Open and Save File dialogs.
To open a file
Click 
To load an object from the database
Click 
To save a file or files
Click one of the following: 


Change Current Schema
ALTER SESSION SET current_schema = "USERNAME"
Find text in the Editor
The Editor provides multiple ways to find what you are looking for in the Editor window.
All of these tools are located under the Search menu on the main Toad Toolbar.
To save the settings as a macro, click 
| Command | Shortcut | Description/Actions |
|---|---|---|
| Find | CTRL+F |
Opens the Find dialog. Enter a keyword or phrase to search for in the Editor window. There are options for case sensitive, finding whole words, using Regular Expressions (see Regular Expression Searches), and searching forward or backward in the buffer. If text is highlighted prior to opening the Find dialog box, that text will be placed into the Text to Find data entry box. If no text is highlighted, then the word at the cursor will be placed in the Text to Find data entry box. The last n find items are available in the drop-down list. They are NOT saved from Toad session to Toad session. You can also copy other text and paste it into the Find dialog box using CTRL+V. Find may be available for a window even if the Find button is not present on the toolbar. In these cases, you easily can use CTRL+F from the keyboard to access this feature. |
| Replace | CTRL+R |
Opens the Replace dialog, where you can find the keyword or phrase, and then replace it with a different string of text. When you select Regular Expressions, you can use the Replace with Template option to convert \t, \r, and \n in the text specified in Replace with to a tab, carriage return, and newline, respectively. |
| Show All | None |
This command only works after you have performed the Find command. After you use the Find command to search through your text for a word or phrase, you can use Show All to highlight every occurrence of the search phrase. The highlighting is removed with any change to the text in the Editor. |
|
Find Next
|
F3 |
This item is only enabled after you have performed a Find. It goes to the next occurrence of the text you were searching. |
| Find Previous | SHIFT+F3 |
This item is only enabled after you have performed a Find. It goes to the previous occurrence of the text you were searching. |
| Goto Line | CTRL+G |
If you have a large file, you may want to use this command to move your cursor to a specific line number. You must enter an integer from 0 to the last line number of the buffer contents. You can also use bookmarks to quickly navigate around the buffer contents. Use Bookmarks |
| Find in Files | None | Finds text in files and supports multiple concurrent searches. Find in Files |
Create a Find and Replace Macro
Toad enables you to create Find-and-Replace Macros that enables you to quickly perform find-and-replace tasks that you perform often.
To create a Find and Replace Macro
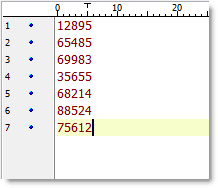
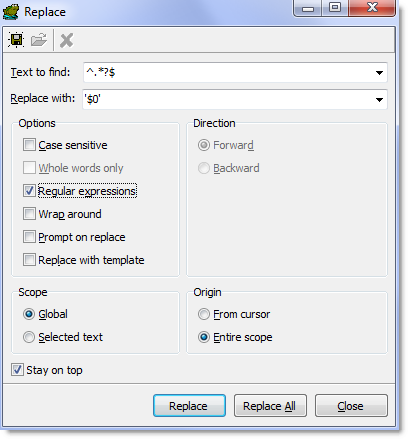
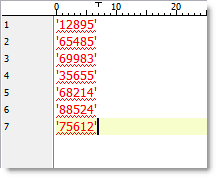
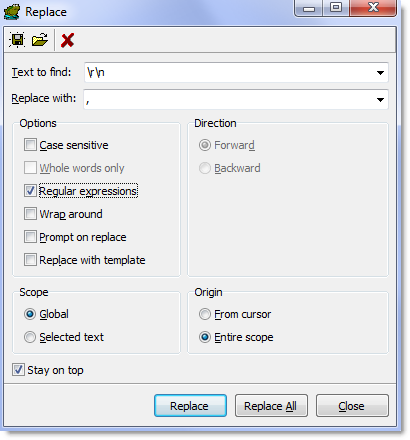
The following is an example of how to create a Find and Replace Macro. In this example, you frequently need to select a few Product IDs from a large table and perform a query on them to make the data more manageable. To accomplish this, you copy the IDs and paste them in the Editor. Then, you create two Find and Replace macros. The first macro wraps the pasted IDs in quotes. The second macro removes newlines and converts them to a comma separated list.
-
Copy the Product IDs from the table, then paste them in the Editor.
- Create the first macro:
-
Click CTRL+R.
-
Complete the fields in the Replace window to wrap the IDs in quotes.
- Click
and name the macro WrapInQuotes. Click OK.
-
Click Replace All in the Replace window. Toad runs the macro against the Editor.
-
- Create the second macro:
-
Click CTRL+R.
-
Complete the fields in the Replace window to create a comma separated list.
- Click
and name the macro CommaSeparatedList. Click OK.
-
Click Replace All in the Replace window. Toad runs the macro against the Editor.
-
- Use the new comma separated list to query the IDs.
-
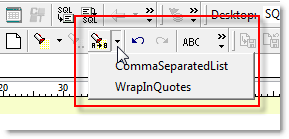
To reuse these macros in the future, click the down arrow next to the
(Replace Text) button in the Edit toolbar. Run the WrapInQuotes macro first and then the CommaSeparatedList macro.

